
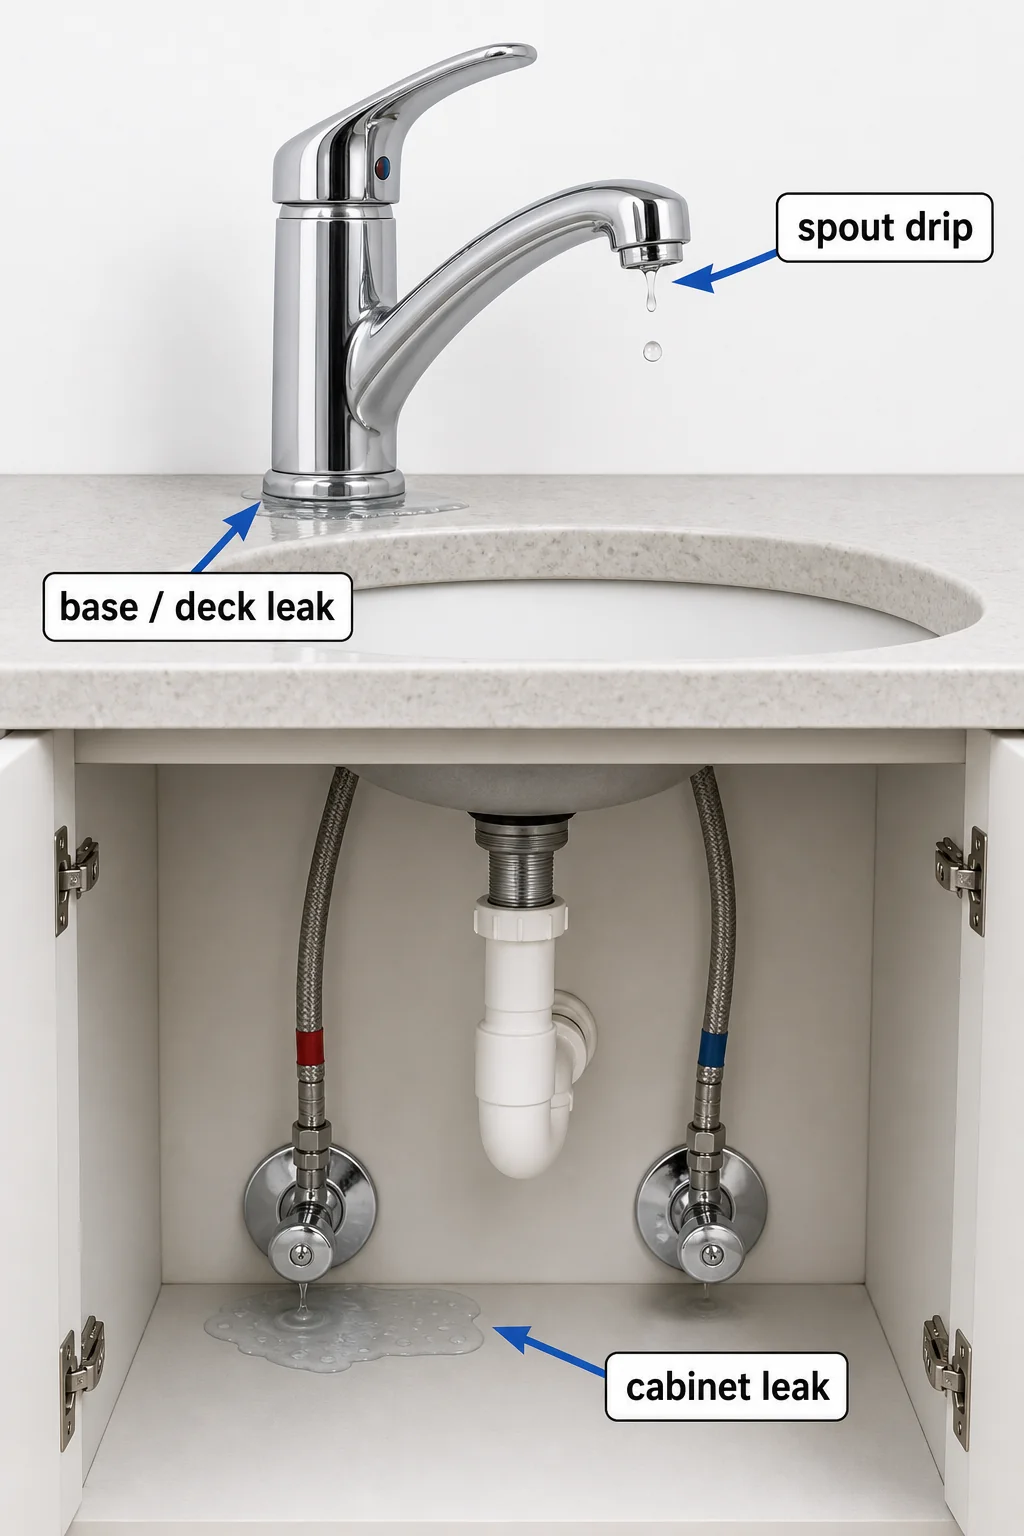
A leaking faucet is not one problem but about seven, and which is yours depends on WHERE the water shows up and WHEN. A drip from the spout is usually a worn cartridge, O-ring, or valve seat; a leak around the handle points to the handle O-rings or packing nut; a puddle under the sink is often a loose supply-line connection rather than the faucet itself. Find exactly where the water appears before you buy any part — that is what tells you which of the seven causes is yours.
Why is my faucet leaking? It’s the question that sends most homeowners to a search bar — and the answer isn’t one problem. A leaking faucet is a handful of different problems that all look similar from the outside. Below are seven of the most common sink-faucet leak patterns. Water shows up where it shouldn’t, and the easy temptation is to grab the part that fixed somebody else’s leak and hope it fixes yours. That’s how most homeowners end up at the hardware store twice: once for the wrong part, once for the right one.
The better approach is to spend five minutes diagnosing before you spend any money. Where the water is coming from, and when it shows up, tells you what’s actually broken. This guide walks through the seven most common causes of a leaking faucet — ranked by how often each one is the real culprit — and gives you the symptom-to-cause shortcut so you can match yours in a single read.
If you’ve already identified what kind of faucet you have, you can skip the next paragraph. If not, take 60 seconds with the Complete Guide to Faucet Repair and the faucet brand and model identification guide — most of what follows is brand-agnostic, but a few causes only apply to certain faucet types, and knowing yours saves time on the fix.
Why Is My Faucet Leaking? Start With Where the Water Is
Before the seven causes, the fastest screening question is where. Most leaks fall into one of four locations, and each location points at a different short list of causes:
- Drip from the spout when the faucet is off → likely cause 1, 3, or 4 (worn cartridge, worn washer, or corroded valve seat). The water is making it past the shutoff inside the valve.
- Water around the base of the faucet, or on the deck/countertop → likely cause 2 (worn O-ring). The seal between the spout and the body has failed.
- Water seeping out from under the handle while the faucet is running → on a modern faucet, an upper O-ring or the cartridge (cause 1 or 2); on an older two-handle compression faucet, the packing nut or stem packing under the handle has loosened or dried out. A quarter-turn snug on the packing nut often stops that one before you replace anything.
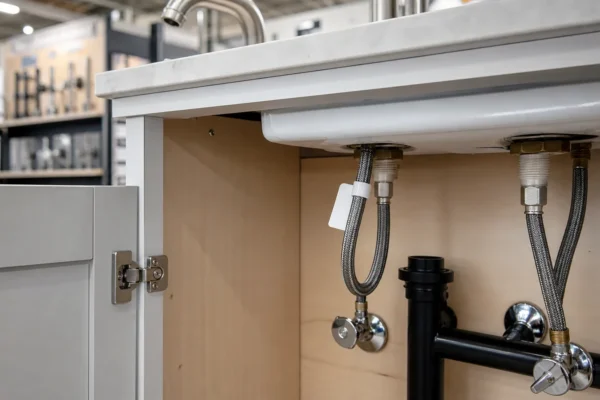
- Water pooling under the sink in the cabinet → likely cause 5 (loose supply connection or shutoff valve). This usually isn’t the faucet at all.
That location sort handles about 80% of leaks. Two patterns don’t sort by location — they sort by timing: a drip that comes and goes at random is usually cause 6 (mineral scale wearing down a seal that hasn’t fully failed), and a drip that shows up only at certain times — often overnight or first thing in the morning — is the tell for cause 7 (water pressure climbing too high when nobody’s drawing water). We’ll cover the six most common in order of frequency, then the seventh worth ruling out when nothing else fits.
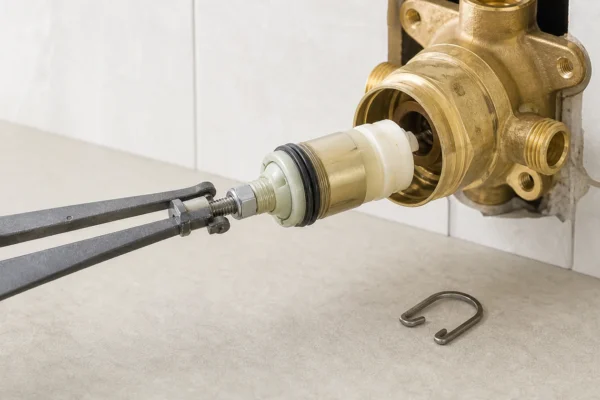
Cause 1: A Worn Cartridge (Modern Single-Handle Faucets)
This is one of the most common causes of a leaking modern faucet. Many single-handle faucets sold in the last couple of decades use a cartridge or ceramic-disc mechanism — and if you have one of those, the cartridge is the most likely culprit when a drip starts.
What’s actually happening: the cartridge is a replaceable insert inside the faucet body that controls both the hot/cold mix and the on/off. It has internal rubber seals (for older cartridges) or ceramic discs (for premium ones). Over years of use, rubber seals harden and crack; ceramic discs eventually scratch from mineral grit. Either way, water sneaks past the seal even when the handle is closed, and you see a slow drip from the spout.
How to confirm: the drip is from the spout end, not the base or the cabinet. The drip continues even when both handles are fully closed (or in a single-handle faucet, when the handle is all the way “off”). On a single-handle faucet, the drip rate sometimes changes when you move the handle slightly — a sign the cartridge isn’t fully sealing in any position.
The fix: replace the cartridge. As a typical U.S. retail snapshot (May 2026): common aftermarket cartridges run around $15–$45, while OEM or specialty cartridges run $40–$75+. Difficulty is easy once you’ve identified the right replacement part — which is exactly what the brand and model identification guide is for. Buying the wrong cartridge is the most expensive mistake in DIY faucet repair; identify first, then buy.
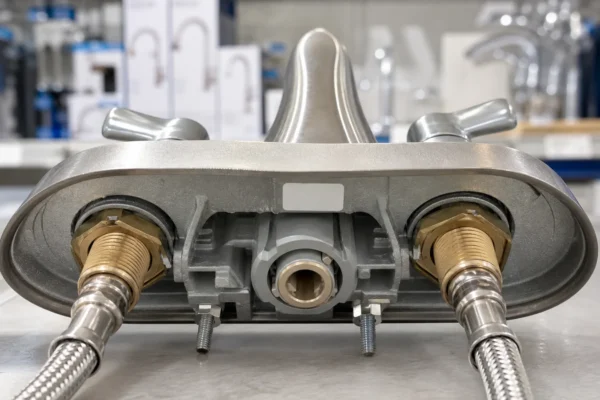
Cause 2: A Worn O-Ring (Leaks Around the Base)
If water is showing up around the bottom of the faucet — on the countertop or pooling on the deck — the cartridge is fine. The leak is an O-ring failure.
What’s actually happening: inside the faucet body, an O-ring (or sometimes two) seals the spout to the base where it pivots. The O-ring is a small rubber loop that gets compressed when the faucet is assembled. Over time the rubber wears out from a combination of friction during normal use, repeated movement when you swivel the spout, and mineral buildup. Once it fails, water under pressure inside the faucet body squeezes past it and shows up on the deck.
How to confirm: the water is visible at the base of the faucet — not the spout end, not the cabinet — and it usually shows up while the water is running, not when the faucet is off. A common tell: the water often appears specifically when you swivel the spout from side to side. That’s the worn O-ring slipping past its seat as the spout moves.
The fix: replace the O-rings. Single rings can be as cheap as a couple of dollars, but most homeowners buy a kit or assortment pack — typically $2–$8. Most cartridge and ball faucets use O-rings of standard sizes you can buy at any hardware store. Difficulty is easy mechanically, though you’ll need to remove the spout (which usually pulls straight up after a set screw or retaining clip is loosened). While you’re in there, replace both O-rings if your faucet has two — saving the $2 is not worth a second disassembly in eighteen months.
Cause 3: A Worn Washer (Older Compression Faucets)
If you have an older home — or a budget bathroom fixture — there’s a good chance you have a compression faucet. These have two separate handles that take multiple turns to fully open or close, and they fail completely differently from modern cartridge faucets.
What’s actually happening: at the bottom of each stem inside a compression faucet, a rubber washer presses down onto a metal seat to stop the water flow. The rubber washer is a consumable. It hardens, cracks, or compresses permanently over years of use. Once it fails, water gets past the seat and drips from the spout — usually only from the hot or cold side, depending on which washer went first.
How to confirm: you have two separate handles (one hot, one cold), and the drip is from the spout. Test which side: shut off the cold supply valve under the sink. If the drip stops, the cold-side washer is the problem. Repeat for the hot side. The drip “tells you” which handle to disassemble — you don’t have to guess.
The fix: replace the washer (and inspect the seat). Washer assortment packs typically run $4–$14 depending on size and depth. The hard part isn’t the washer — it’s the seat. If the metal seat the washer compresses against has gotten pitted from mineral buildup, a new washer won’t seal either, and you’ll need to either replace the seat (with a seat wrench, typically $10–$18) or resurface it. Most homeowners replace the washer first and check the seat only if the new washer doesn’t fix the drip.
Cause 4: A Corroded Valve Seat (Drip That Won’t Stop)
This one is the maddening cousin of causes 1 and 3. You replaced the cartridge or washer, and the drip from the spout is still there — just slower.
What’s actually happening: the valve seat is the metal surface that the cartridge or washer presses against to stop water flow. In hard-water areas, the seat slowly gets etched and pitted by mineral deposits over years. A new cartridge or washer can’t seal against a damaged surface no matter how new the rubber is. Trade-plumber guidance is that mineral-corroded valve seats often need light resurfacing — and in worse cases, the seat (or the whole faucet) needs to be replaced. Newer plastic seat assemblies generally have to be swapped out rather than resurfaced.
How to confirm: you’ve already replaced the cartridge or washer once, and the drip persists. Pull the cartridge/washer back out and look closely at the seat (the metal ring or surface it pressed against). If you see ridges, pitting, or a roughened texture, the seat is the real problem.
The fix: if the seat is removable (most compression faucets have replaceable seats), unscrew it with a seat wrench and install a new one. Common sink-faucet seats often run a few dollars apiece. If the seat is integral to the faucet body (most modern cartridge faucets), a light resurfacing pass can sometimes restore the sealing surface, but if the pitting is deep, the faucet body itself needs replacement. At that point, replacing the whole faucet is usually cheaper than chasing the seat repair.
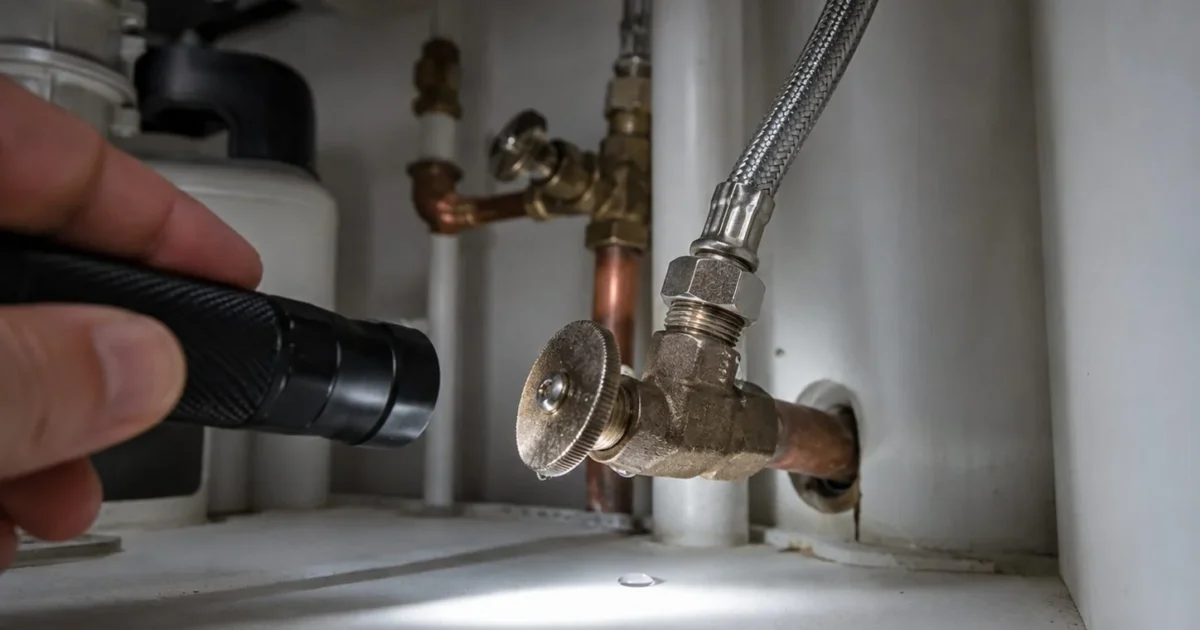
Cause 5: A Loose Connection or Shutoff Valve (Under-Sink Leaks)
If water is pooling under the sink in the cabinet, the timing of the leak tells you where to look. A leak that shows up only when the faucet is running points one place; a leak that’s there 24/7 even when the faucet hasn’t been touched in hours points somewhere else.
What’s actually happening: under every sink there are two shutoff valves (one hot, one cold) and two flexible supply lines (the braided steel hoses) that connect those valves to the bottom of the faucet. There’s also, on many newer faucets, a faucet-side hose cluster or pull-down hose inside the cabinet. Any of those can leak: the threaded connection at the valve, the threaded connection at the faucet, a pinhole or split in a supply hose, the pull-down hose connection, or a deteriorated rubber seal inside an aging shutoff valve.
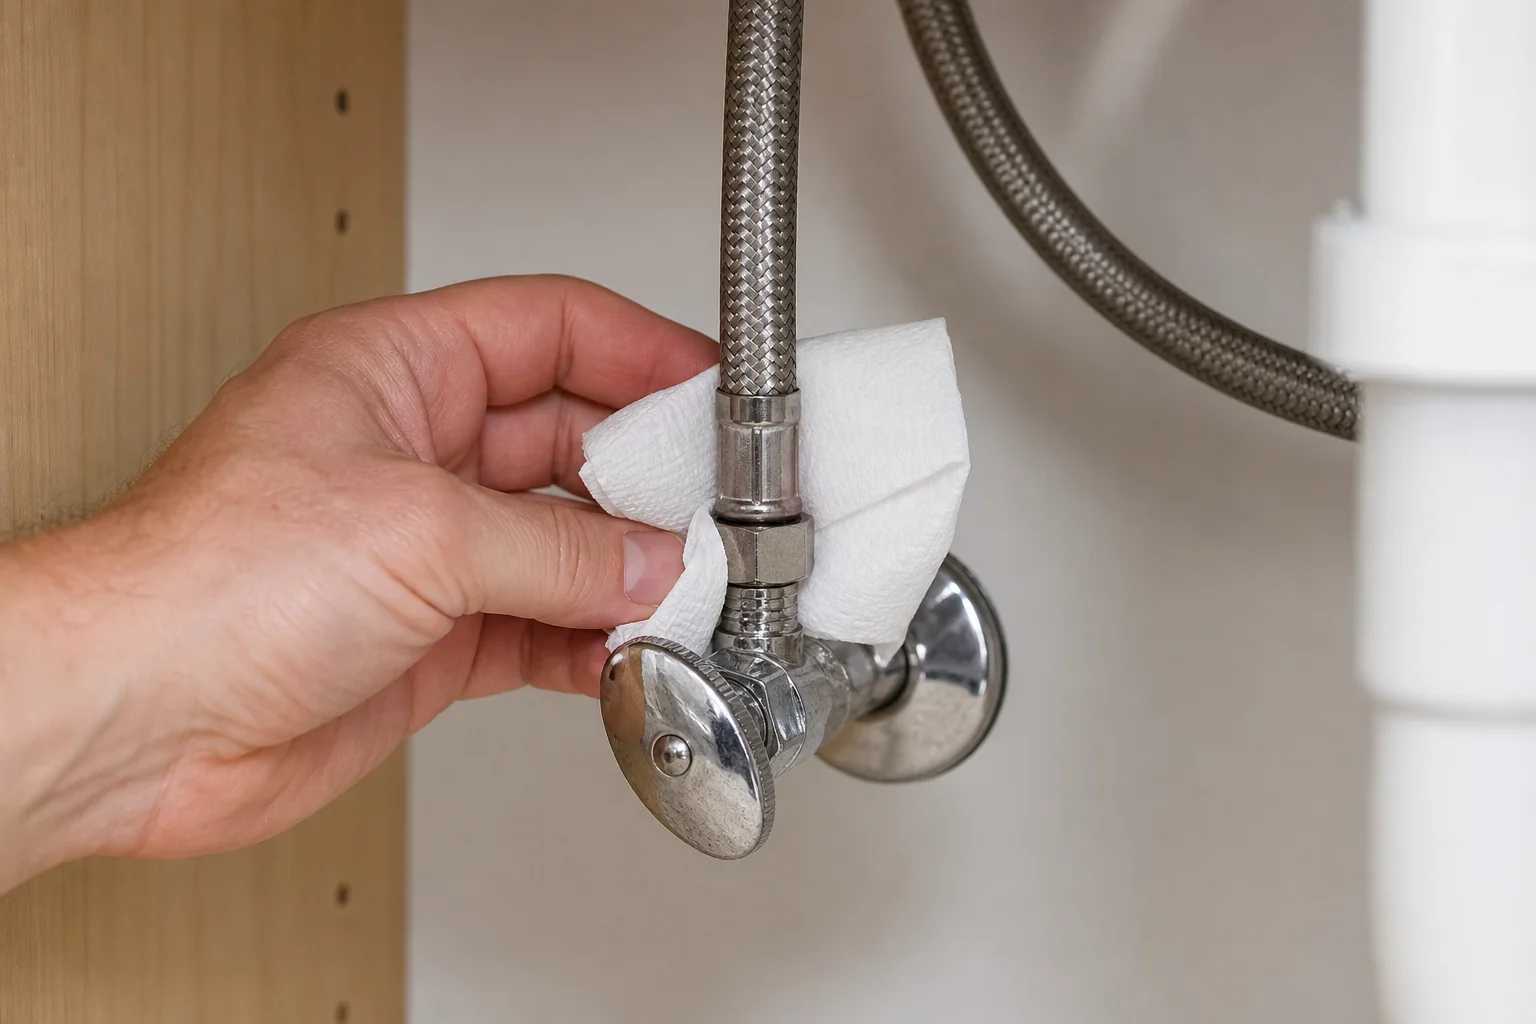
How to confirm: Dry the area first. Put a piece of paper towel under each individual connection and run the faucet for 30 seconds. The towel that gets wet first tells you which connection is leaking. Then read the timing:
- 24/7 cabinet leak (water visible even when the faucet hasn’t been used) → almost always a pressurized supply-side component: shutoff valve seal, house supply line, or the faucet-side supply line where it meets the shutoff. Pressure is constant on this side, so a failed seal drips constantly.
- Cabinet leak only while the faucet runs → typically a faucet-side hose cluster, pull-down/pull-out hose connection, or an internal connection that only sees flow when water is moving.
The fix: depends on the source. A loose threaded connection often just needs to be snugged up a quarter-turn with an adjustable wrench — don’t overtighten, that’s how connections crack. A leaking supply hose is a typical $4–$10 replacement (and an easy DIY: hand-tighten the new hose, snug the last quarter-turn with a wrench). A leaking shutoff valve is the one to be careful with. If the valve looks corroded or won’t fully close, stop and consider a plumber. A shutoff valve that breaks open inside a closed wall cavity can cause severe water damage — and the cost of fixing flooding, drywall, and finishes can dwarf the original $20 valve repair many times over.
Cause 6: Mineral Scale Wearing Down Otherwise-Good Seals
This isn’t a single failure point — it’s the reason causes 1 through 4 happen sooner in hard-water homes than in soft-water ones.
What’s actually happening: hard water carries dissolved calcium and magnesium that crystallize out as scale on every surface inside your faucet. The scale builds up on O-rings, cartridges, and valve seats, abrading the rubber every time the faucet is used. Hard water accelerates the failure modes in causes 1–4 — seals wear out faster, cartridges get harder to remove, and valve seats pit sooner. The scale also clogs flow paths and can cause intermittent leaks that come and go: water finds a new way past a partially-clogged seal one day, then the scale shifts and the leak disappears the next.
How to confirm: look for white or brown crust around the base of the faucet, on the aerator, or on the cartridge when you pull it out. If your kettle has scale buildup, your faucet does too. The intermittent leak pattern is the second tell — a drip that’s worse some days than others, sometimes stopping entirely, is the signature of a scale-affected seal.
The fix: descale during repair. Whenever you have the faucet apart for causes 1–4, a 50/50 white vinegar and water solution is the common cleaner for removable parts and O-ring contact surfaces — soak time varies by part and finish, so follow the manufacturer’s guidance for your specific faucet (some allow extended soaks; others want a brief contact only, especially on certain finishes). Apply a small amount of NSF-61-rated silicone plumber’s grease to O-rings and cartridge seals during reassembly — and avoid petroleum-based lubricants, which can react with rubber seals. In severely hard-water areas, a whole-house water softener is the real long-term answer; in the meantime, regular descaling may help reduce buildup-related wear.
Cause 7: Water Pressure That’s Too High (the Drip That Comes and Goes)
This is the cause most homeowners never check — and the reason some faucets keep dripping no matter how many cartridges and washers you swap in. When household water pressure is too high, water gets forced past seals that would hold fine at a normal pressure.
What’s actually happening: residential plumbing is designed for a static pressure of roughly 40–60 psi. Municipal supply pressure often runs higher and swings over the course of a day — it tends to peak overnight and in the early morning, when few people in the neighborhood are drawing water. When static pressure climbs past about 80 psi, it pushes water past cartridge seals, washers, and O-rings that seal perfectly well at normal pressure — so the faucet drips intermittently, worst at the times of day pressure is highest. Sustained high pressure also shortens the life of every seal and valve in the house and is a common source of water hammer (the bang you hear when a valve snaps shut).
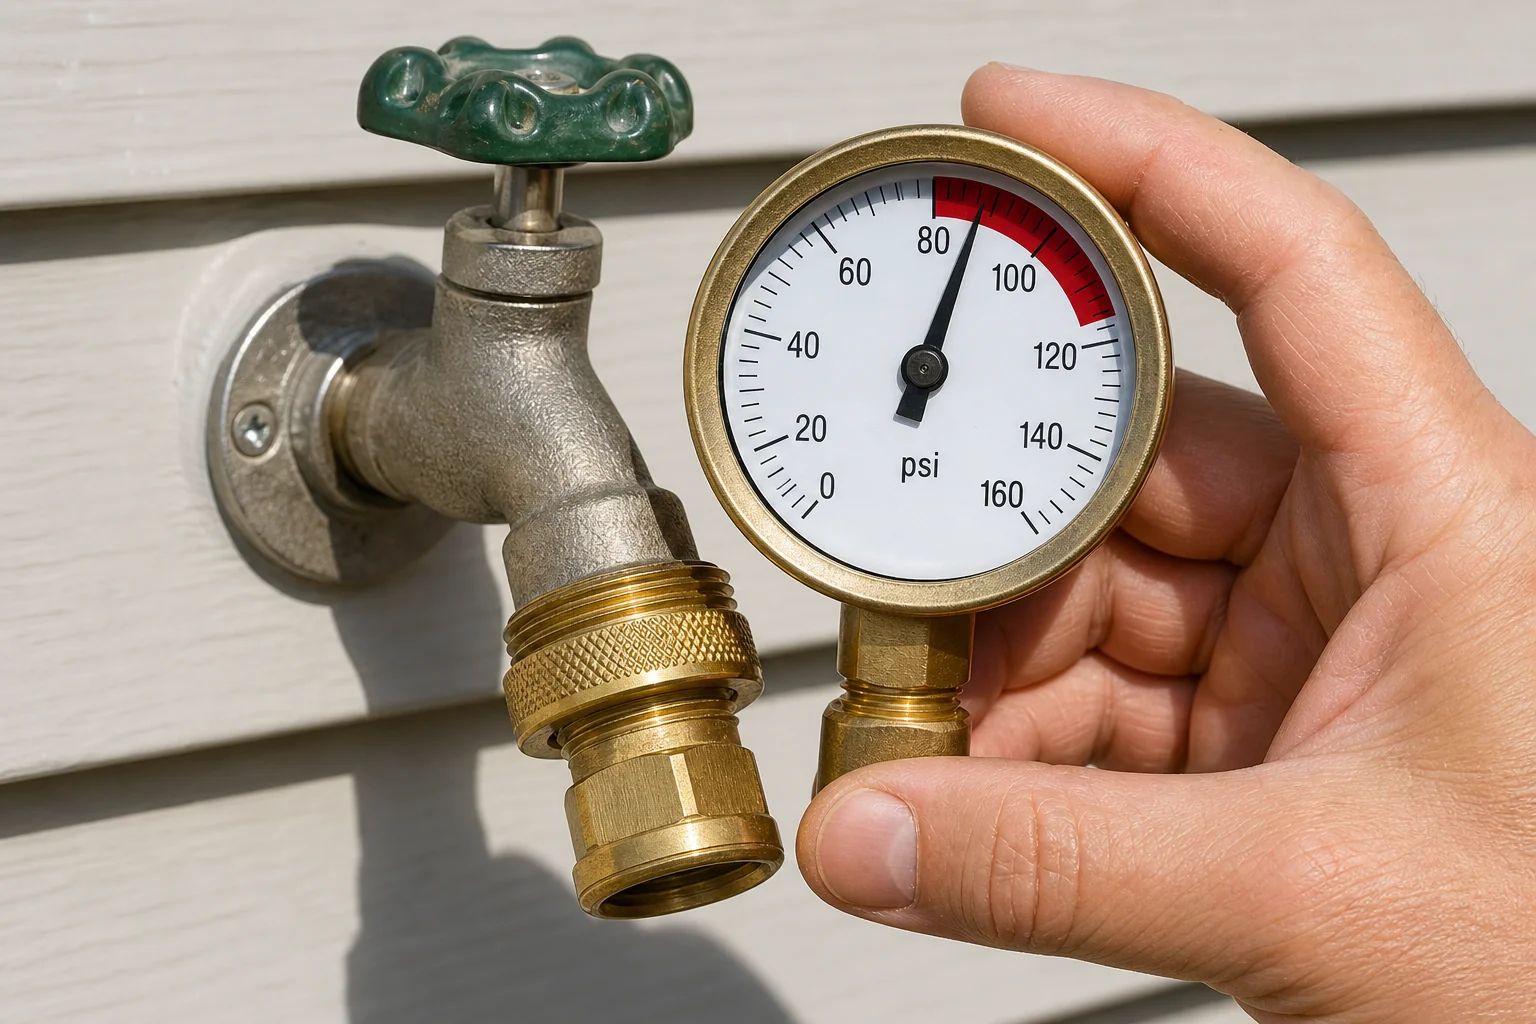
How to confirm: the signature tell is a drip that’s intermittent and time-linked — there overnight or first thing in the morning, gone by midday — rather than constant. Confirm it directly: thread an inexpensive water-pressure test gauge (about $10–$15) onto an outdoor hose bib or the washing-machine connection and read the static pressure with no water running anywhere in the house. A reading over 80 psi is both the likely leak driver and a code problem.
The fix: if pressure reads high, the answer isn’t another cartridge — it’s a pressure-reducing valve (PRV) on the main line, set to bring the whole house down to a safe 50–60 psi. Plumbing codes require a PRV wherever static pressure exceeds 80 psi, precisely because of the wear that sustained high pressure inflicts on fixtures and seals. A PRV installation is at the edge of DIY — it’s a cut-in on the main line — so many homeowners have a plumber set it. Once the pressure is corrected, repair the worn seal it was hiding (usually cause 1 or 2); high pressure often just finishes off a seal that was already on its way out.
The Symptom-to-Cause Shortcut
If you only want one section of this article, here it is:
| Symptom | Most likely cause | Then check |
|---|---|---|
| Drip from spout, modern single-handle faucet | Worn cartridge (cause 1) | Valve seat condition (cause 4) |
| Drip from spout, older two-handle faucet | Worn washer (cause 3) | Valve seat condition (cause 4) |
| Water at the base of the faucet, on the deck | Worn O-ring (cause 2) | Both O-rings if there are two |
| Water from under the handle while running | Packing nut / stem packing or upper O-ring | Snug the packing nut a quarter-turn first; then replace the packing or O-ring |
| Water in the cabinet under the sink | Supply line / shutoff valve (cause 5) | Each connection point with a paper towel |
| Intermittent drip with no clear time pattern | Mineral scale (cause 6) | Descale during repair |
| Drip only at certain times (overnight / early morning) | High water pressure (cause 7) | Test static pressure; PRV if over 80 psi |
| Drip continued after you replaced the cartridge | Corroded valve seat (cause 4) | Seat surface for pitting |
What to Do Next
Once you’ve identified the cause, the fix is the easy part — but only if you have the right replacement part. The most common DIY mistake isn’t doing the repair wrong; it’s buying a cartridge or washer that doesn’t fit the specific faucet you have. The brand and model identification guide walks through five reliable methods to figure out exactly what faucet you’re working on, including what to do when there’s no visible model tag.
For the actual step-by-step repair, the Complete Guide to Faucet Repair is the hub — it covers the four faucet types, the tools you need, and the line between DIY and “stop and call a plumber.” More detailed brand-specific repair guides are publishing weekly through summer 2026. Sign up for the email list below and you’ll get each new guide the week it ships.
Why is my faucet leaking?
It’s almost always one of a few worn parts: the cartridge (modern single-handle faucets), an O-ring (leaks around the base), a rubber washer (older compression faucets), a corroded valve seat (a drip that won’t stop), or a loose under-sink connection. Where the water shows up points you at which one.
Does where the leak appears tell me the cause?
Yes – that’s the fastest diagnostic. A drip from the spout points at the cartridge, washer, or valve seat; a leak around the base of the handle points at an O-ring; water under the sink points at a supply connection or shutoff valve rather than the faucet itself.
Can I fix a leaking faucet myself?
Most causes are a DIY repair with basic tools – shut off the supply valves under the sink first, then replace the worn cartridge, O-ring, or washer. A corroded valve seat or a faucet that keeps leaking after new parts is where it gets harder.
Why does my faucet still drip after I replaced the washer or cartridge?
Usually a corroded or pitted valve seat the new part can’t seal against, or mineral scale wearing down otherwise-good seals. The seat may need dressing or replacing, and hard-water scale should be cleaned out of the valve body before the new part goes in. If the drip only shows up at certain times of day, also test your water pressure – pressure over 80 psi forces water past good seals.
Can high water pressure cause a faucet to drip?
Yes. Static pressure above about 80 psi pushes water past cartridge seals, washers, and O-rings that seal fine at a normal 40-60 psi, so the faucet drips intermittently – usually worst overnight and early morning when supply pressure peaks. Test it with an inexpensive gauge on a hose bib; the fix is a pressure-reducing valve on the main line, which plumbing codes require above 80 psi.
When should I call a plumber for a leaking faucet?
When the shutoff valve itself leaks or won’t close, the leak is inside the wall, the valve seat is damaged beyond a simple swap, or you’ve replaced the obvious wear parts and it still drips – at that point the diagnosis is likely wrong or the valve body is failing.
Sources
This guide draws on current manufacturer troubleshooting documentation and plumbing trade resources. Specific authoritative sources:
- Moen Support — under-sink leak guides distinguishing 24/7 supply-side leaks from usage-only faucet-side leaks; silicone-lubricant guidance and warnings against petroleum-based products
- Home Depot Repair Guides — valve seat identification, faucet-type troubleshooting, paper-towel diagnostic method
- Danco — two-handle isolation diagnostic (shut off one supply, watch the drip); silicone faucet-grease NSF-61 specifications; cartridge identification
- Roto-Rooter — corroded valve seat as a faucet-drip cause; brass-seat resurfacing vs. plastic-seat replacement guidance
- International Plumbing Code (IPC) Section 604.8 — a pressure-reducing valve is required where static water-supply pressure exceeds 80 psi; a residential target of roughly 40–60 psi is standard manufacturer and trade guidance for protecting fixtures and seals
- Kohler and Delta product support — vinegar-soak cleaning for removable parts and aerators
- Oatey — silicone plumber’s grease compatibility with rubber and synthetic O-rings, no-petroleum formulation
- EPA WaterSense bathroom faucet specification — 1.5 gpm at 60 psi as of May 2026; the proposed Version 2.0 revision to 1.2 gpm was paused in February 2025 and is not currently in effect
- Pfister Pforever — cartridge identification through model-family support pages and parts diagrams
Pricing reflects typical U.S. big-box retail as of May 2026; check current pricing at your local store or preferred online retailer before buying.
Educational content only. Not a substitute for licensed professional advice. Local plumbing codes vary by jurisdiction. Use of any guidance from this guide is at your own risk.
Get the homeowner’s plumbing repair toolkit checklist — the tools, parts, and decisions every homeowner should have on hand. [Free download — enter your email]
Parts for this repair
As an Amazon Associate, plumbingbythebook earns from qualifying purchases. Links below are affiliate links — they cost you nothing extra.
- Danco 80363 Universal Faucet O-Ring Assortment (125 pc) — For the worn-o-ring leak — 125 sizes covering most faucet brands.
- Danco 80016 Universal Faucet Washer Assortment (195 pc) — For the worn-washer drip on older two-handle compression faucets.
- Moen 104421 Cartridge Puller Tool — If the leak traces to a stuck Moen cartridge, this pulls it without breaking the stem.
Related guides
How to Identify Your Delta Faucet: Model, Trim, and Cartridge [2026]
How to identify your Delta faucet starts with a decision most homeowners get wrong the first time: ordering…
How to Replace a Moen 1225 Cartridge: A Homeowner’s Step-by-Step Guide [2026]
How to Replace a Moen 1225 Cartridge: A Homeowner’s Step-by-Step Guide [2026] A dripping single-handle Moen faucet, a…
American Standard Faucet Cartridge Identification: Find the Right Part Every Time [2026]
American standard faucet cartridge identification trips up more homeowners than almost any other brand — not because American…