
How to replace a faucet aerator is the cheapest, fastest plumbing repair in your house — and it’s the one most homeowners pay a plumber to do without realizing they could have fixed it themselves in five minutes. If your faucet’s flow has gotten weak, sputters, or sprays in weird directions, the aerator (that little screen at the tip of the spout) is one of the most common culprits — and the cheapest one to rule out. A basic replacement runs $2–$10; premium brand-specific aerators run $10–$30. Most installs need one tool you already own.
Low flow is a different problem from a leak — if your faucet is dripping or leaking, see why your faucet is leaking instead.
This guide walks through how to replace a faucet aerator end-to-end, including the 60-second test that confirms it’s actually the aerator’s fault before you bother. The full procedure — diagnose, remove, decide clean vs. replace, reinstall — runs about five minutes start to finish once you’ve done it once.
If you don’t already know what brand of faucet you have, it almost doesn’t matter for this fix; aerators are standardized across most modern faucets. But if the aerator turns out NOT to be the problem, the brand and model identification guide is the next step, and the Complete Guide to Faucet Repair covers what to do from there.
How to Replace a Faucet Aerator: The 60-Second Diagnostic
Before you touch anything, confirm it’s actually the aerator. The test takes one minute:
- Turn the faucet on at full hot. Note the flow.
- Unscrew the aerator (counterclockwise — see Step 1 below for the technique if it’s stuck).
- Turn the faucet on again, no aerator attached.
If the flow goes from a weak trickle to a strong, full-volume stream with the aerator off, the aerator is the problem. You’ve just confirmed it. Continue with the replacement.
If the flow is still weak with the aerator removed, the problem is somewhere upstream — partially-closed shut-off valve, supply line restriction, low household water pressure, or a clogged cartridge. Skip to the Complete Guide to Faucet Repair for that diagnostic path; this article won’t fix you.
What Your Faucet Aerator Actually Does
The aerator is a small device threaded onto the tip of your faucet spout. Despite its tiny size, it does three things:
- Mixes air into the water stream. That’s the “aerator” name. The mixed-air stream feels more substantial than the underlying flow rate — important because modern faucets are flow-restricted by EPA WaterSense regulations (1.5 gpm for bathroom faucets as of 2026, with a proposed 1.2 gpm revision currently paused).
- Regulates flow. Most aerators contain a flow restrictor — a small flat washer with a calibrated hole. Without it, your faucet would spray at full line pressure.
- Acts as a basic filter. A fine mesh screen catches grit, mineral chunks, and the occasional flake of pipe rust before it makes it into your water.
That third function is why aerators clog. Over months and years, mineral deposits and sediment accumulate on the mesh. The clog reduces flow, distorts the spray pattern, and eventually causes the splattering or weird-angle sprays that bring most homeowners here in the first place.
How to Replace a Faucet Aerator: The Step-by-Step
You’ll need: nothing for most installs (hand-tight is usually enough), or a small pair of slip-joint pliers + a strip of cloth or rubber if the aerator is stuck.
The five steps below are the complete procedure for how to replace a faucet aerator on a standard kitchen or bathroom sink. Most modern faucets follow this same flow regardless of brand.
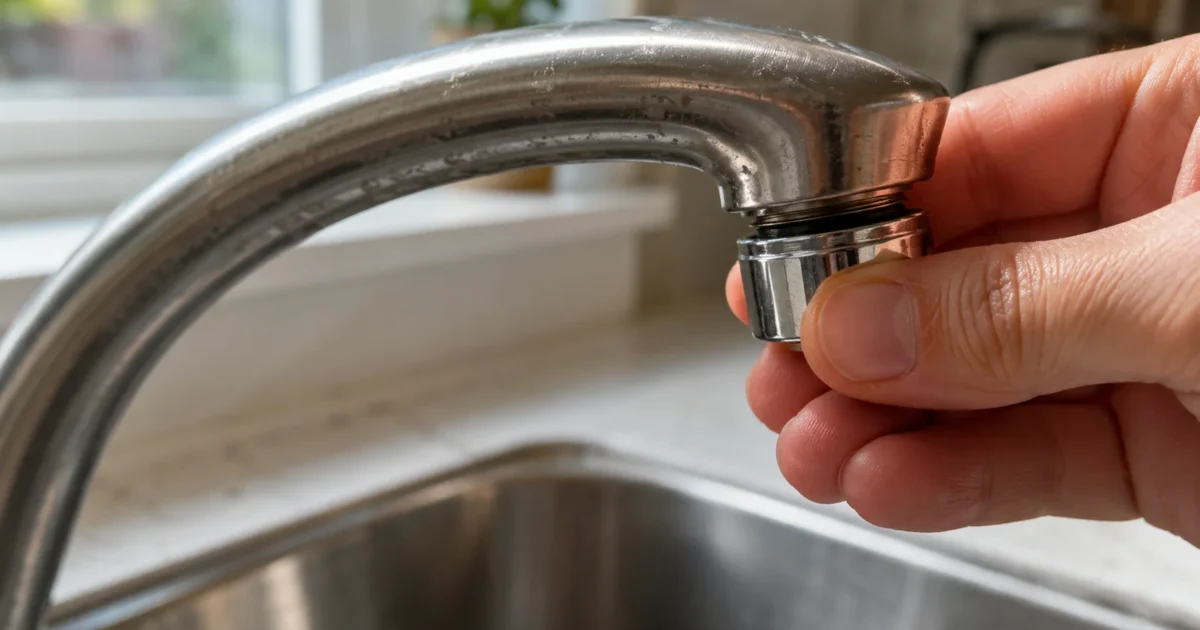
Unscrew the Aerator
Most aerators unscrew by hand if you grip firmly and turn counterclockwise (looking up at the bottom of the spout). The threads are usually small and shallow, so a confident wrist turn handles it.
If hand removal fails, wrap a strip of cloth, a rubber band, or a paper towel around the aerator (protects the finish from scratches), then grip with slip-joint pliers and turn counterclockwise. Apply steady pressure rather than sudden force. You’ll often feel a small “pop” as mineral deposits break free of the threads — that’s normal; keep turning by hand from there.
If it’s truly seized by mineral fusing, work up this ladder rather than forcing it: (1) wrap a vinegar-soaked cloth around the aerator for about 30 minutes to dissolve the scale on the threads; (2) warm the aerator briefly with a hair dryer on high — the metal expands and breaks the mineral bond — never use an open flame, which damages internal seals and finishes; (3) apply a little penetrating oil, wait, then rinse the threads thoroughly afterward since this is a potable-water fitting; (4) for grip without scratches, a rubber strap wrench or even a rubber jar-opener beats pliers, and a wrap of blue painter’s tape on plier jaws protects the finish. Patience here saves you from snapping the aerator off inside the spout.
For tamper-resistant or concealed (cache) aerators — common on Moen kitchen faucets and most newer designer fixtures — you’ll need the manufacturer’s specific key tool. Some Moen models use an oval hidden aerator with a 1/8” hex set-screw; newer “no visible screw” Moen designs require gently prying off the spout throat and using a 7/64” hex wrench; press-fit Moen variants (two retaining fins) require needle-nose pliers to pull straight out. Universal aerator key kits run $10–$15 (Danco’s multi-size kit is around $14). Brand-specific keys from Delta, Moen, or Kohler typically run $5–$15; specialty tools like Delta’s cache wrench are closer to $20. Two things trip people up on cache aerators: when you key one out from underneath the spout you’re looking at it upside down, so “lefty-loosey” feels reversed — go slow and watch which way it actually backs out. And on reinstall, a Neoperl-style cache aerator should be screwed in only until it sits flush, not cranked fully home — over-seating it damages the housing.
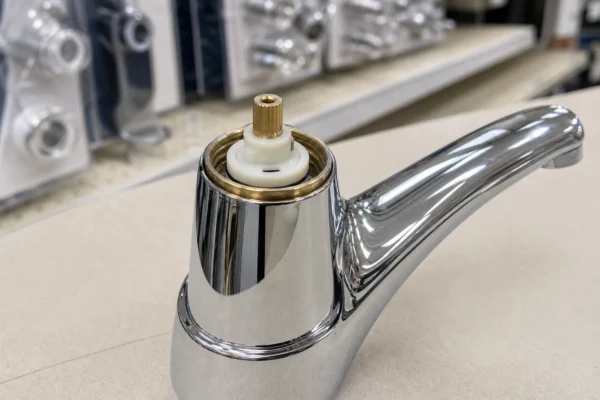
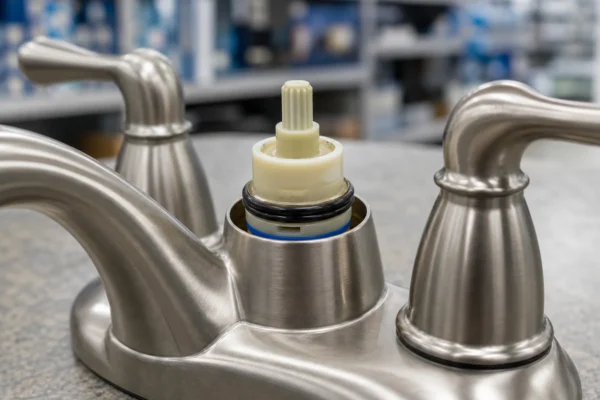
Disassemble + Inspect
Once the aerator is off, it usually has 3–4 stacked pieces inside the outer housing:
- The outer threaded shell — what you just unscrewed
- A rubber gasket / O-ring — sits at the top, seals against the spout
- The flow restrictor — a flat washer with a calibrated hole, often colored
- The mesh screen — usually two stacked layers
Lay them out in order so you can put them back the same way. Take a photo with your phone before you separate anything — easiest reassembly guide.
Now you can see the problem. Mineral deposits look like white or brown crusty buildup on the screen and around the flow restrictor. Sometimes you’ll find pieces of rubber pipe-tape, sand, or pipe shavings — debris that worked its way through the supply line.
Decide Whether to Clean It or Replace the Faucet Aerator
The decision tree on how to replace a faucet aerator vs. just clean the existing one is straightforward:
Clean if: the parts are intact (no cracks, no obvious wear) and the gunk is just mineral or sediment buildup that you can dissolve. (Don’t proceed with how to replace a faucet aerator if a simple soak gets it working — saves the $2–$10.) Drop the disassembled metal/plastic parts in a small bowl of equal-parts white vinegar and water — 5–15 minutes for light buildup, 30–60 minutes for moderate scale, 1+ hour for heavy fused deposits. After soaking, rinse and gently scrub with an old toothbrush, then reassemble.
Important — don’t apply vinegar directly to the faucet finish. Pfister and other manufacturers explicitly warn against acidic or abrasive cleaners on polished chrome, brushed nickel, or PVD-coated finishes — they can dull or pit the coating. Detach the aerator first, soak the parts in a separate container, and clean the spout itself with mild soapy water only.
Replace if: the rubber gasket is hardened or cracked, the mesh has tears, you can’t get the parts clean, or the aerator is older than 5–10 years. A replacement aerator costs $2–$8 at any hardware store. Take your old aerator with you to match the size and thread direction.
Match the Right Replacement Size
Knowing how to replace a faucet aerator is one skill; knowing which size to buy is another. Aerators come in a few standard sizes — measure the outside diameter of your old one (or compare to a coin):
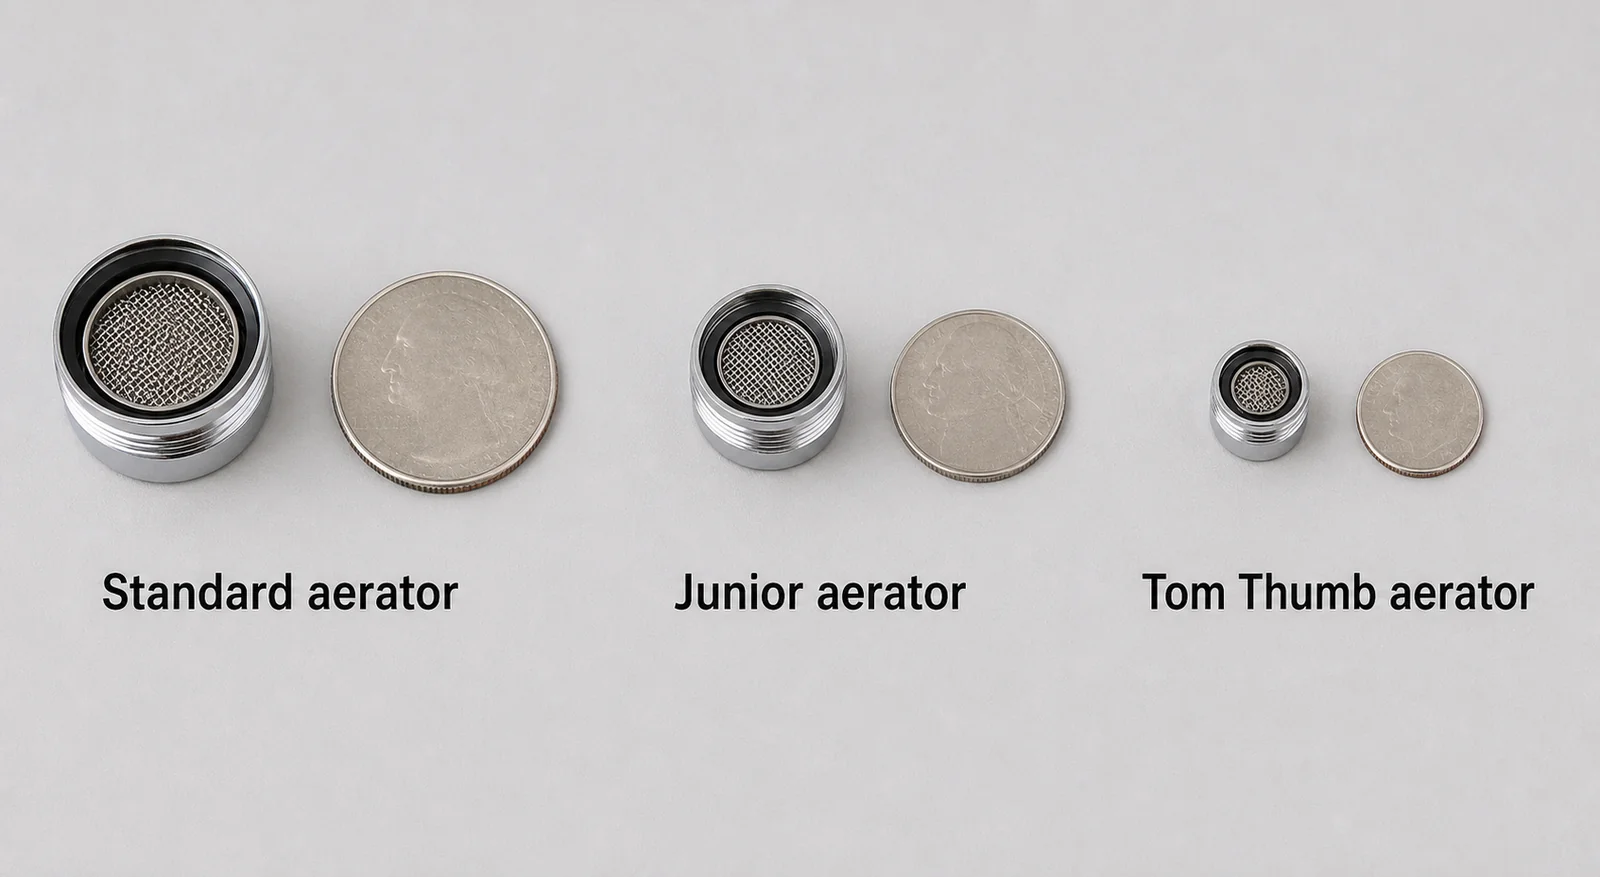
- Regular (15/16″ male thread / 55/64″ female thread, ~25mm OD) — the most common kitchen and bathroom faucet size
- Junior (13/16″ male / 3/4″ female, ~22mm) — common on bar sinks and some bathroom faucets
- Tom Thumb (M18×1 male / M16×1 female, ~19mm) — small-diameter spouts and some European-style faucets
No calipers? Use a coin for a rough read: a regular aerator face is roughly quarter-sized, a junior is about nickel-sized, and a tiny Tom Thumb is around dime-sized. That gets you to the right family; confirm the exact thread against the fractions above before you buy.
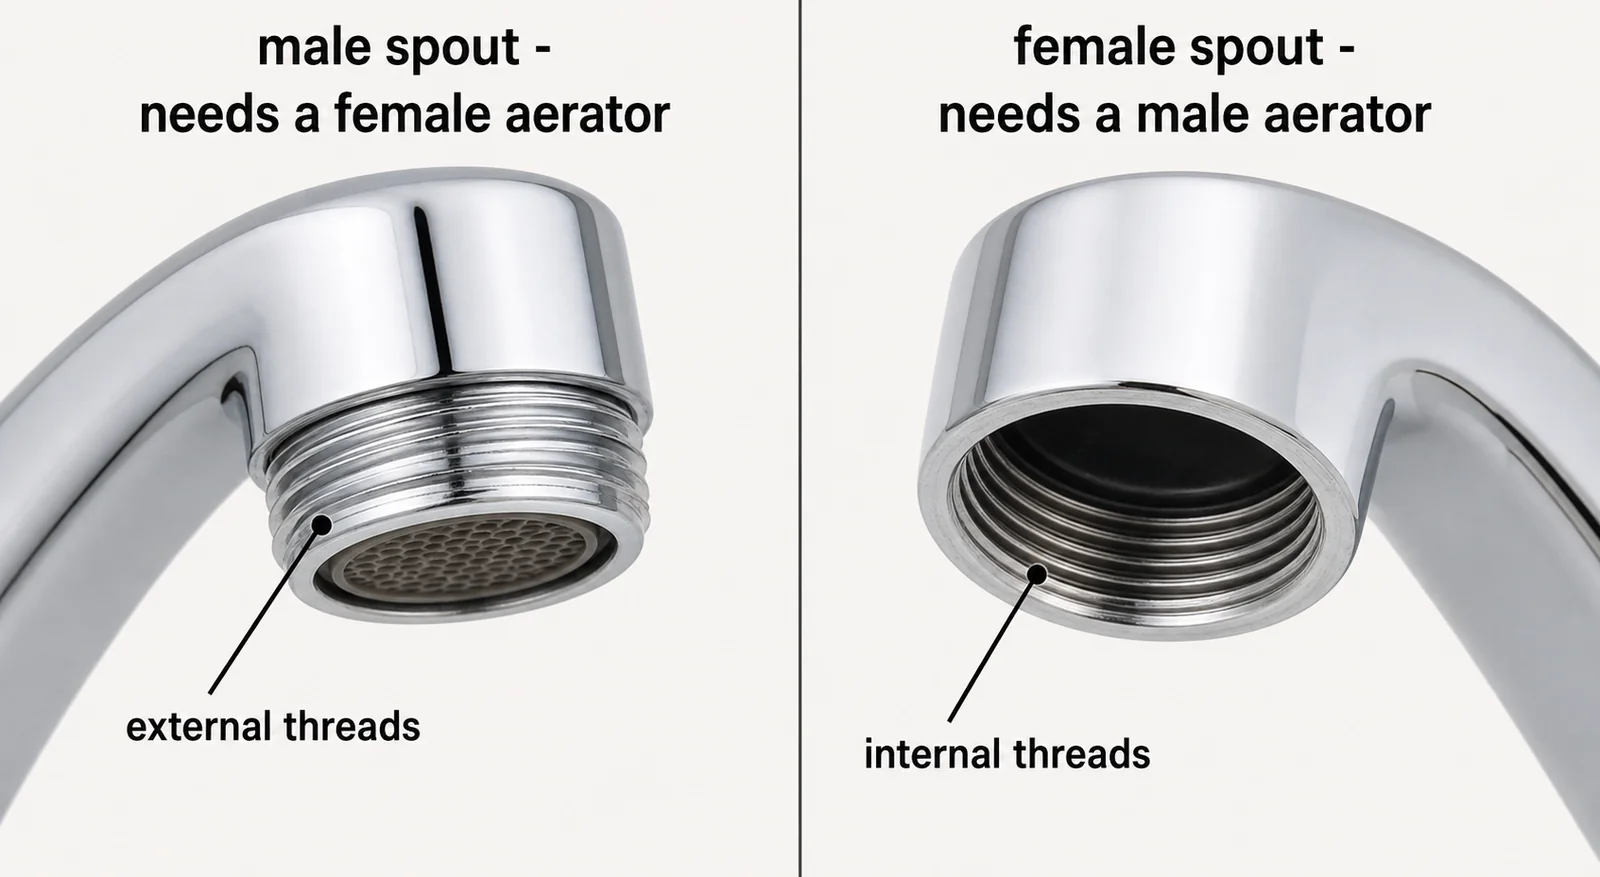
Male vs. female: if your aerator threads onto the OUTSIDE of the spout (the spout has external threads), you need a male-threaded aerator. If it threads INSIDE the spout (the spout has internal threads), you need a female-threaded aerator. The quick rule when measuring: on a female aerator measure its inside diameter (it slips over the spout’s external threads); on a male aerator measure its outside diameter (it threads up inside the spout). Look at your old one — that tells you which.
Most hardware-store aerator kits include adapters for multiple sizes, and a dual-thread aerator fits both male and female spouts — when you genuinely can’t tell which gender you have, that’s the safe buy, and it’s the same price.
Flush the Line, Then Reinstall
This is the step most “how to replace a faucet aerator” guides skip. Before screwing the aerator back on, run the water for 10–15 seconds with the aerator off. This flushes any debris loosened during cleaning out of the supply line and the faucet body — debris that would otherwise lodge in the new aerator and undo your work. Pfister explicitly recommends this step in their troubleshooting docs.
If you cleaned and reassembled the old aerator rather than buying new, stack the parts in the right order before threading it on: the mesh screen sits at the bottom (facing down toward the water exit), the flow restrictor above it, and the rubber gasket on top against the spout. A screen installed upside down can whistle or spray oddly. Then thread the new (or cleaned) aerator back on by hand. Counterclockwise to remove, clockwise to install. Hand-tight plus about a 1/8 turn is the right level of tightness — enough to seal the gasket, not enough to strip the threads or split the spout. Over-torquing with pliers is the most common way a successful aerator replacement turns into a cracked-housing replacement.
Turn the faucet on. The flow should be substantially better, and the spray pattern should be even and forceful instead of weak or sputtering.
When the Aerator Isn’t the Problem
If you went through how to replace a faucet aerator above and the flow is still weak, the problem is upstream. Three most common causes:
- Partially-closed under-sink shut-off valve. Sometimes a bumped or recently-replaced valve isn’t fully open. Look under the sink, find the two valves on the supply lines, and turn each one fully counterclockwise.
- Clogged supply line. Especially common after recent plumbing work — debris kicked loose in the pipes can lodge in the supply lines and restrict flow. Removing and inspecting the supply lines requires shutting off the water and disconnecting at both ends; not a 5-minute fix.
- Worn cartridge inside the faucet body. The cartridge controls flow at the valve; a worn one can restrict flow even when fully open. See the Complete Guide to Faucet Repair for the cartridge replacement walkthrough.
If you went through the aerator replacement and the upstream-cause checklist and the flow is still weak, the problem is likely your household water pressure (check by reading the pressure gauge on your main water line, or call a plumber to test). That’s beyond the scope of a 5-minute aerator fix.
How Often to Replace a Faucet Aerator
There’s no fixed lifespan, and how often you need to replace a faucet aerator depends mostly on your water quality. In areas with soft water, an aerator can last 5–10 years without intervention. In hard-water areas (anything above 10 grains per gallon), expect to clean or replace every 6–12 months.
The signs to act: – Flow noticeably weaker than it used to be – Spray pattern uneven, splattering, or shooting in odd directions – Visible white or brown crust on the outside of the aerator – Faucet starts to whistle or whine at full flow
Treat aerator maintenance like changing your HVAC filter — inexpensive, easy, and prevents bigger problems.
Quick Reference
| Symptom | Most likely cause | Fix |
|---|---|---|
| Weak flow, even at full open | Clogged aerator | Replace or clean the aerator |
| Strong flow but sputters / sprays sideways | Aerator partially clogged or misaligned | Remove, clean mesh + restrictor, reinstall |
| Weak flow + flow doesn’t improve with aerator off | Upstream restriction (shut-off, supply line, cartridge) | Skip aerator; see Complete Guide to Faucet Repair |
| Aerator stuck — won’t unscrew | Mineral fusing | Wrap in cloth, use slip-joint pliers, steady counterclockwise pressure |
| New aerator leaks where it threads on | Worn or missing O-ring / gasket | Replace the gasket (sold separately or in aerator kits) |
How do I know if my aerator needs replacing?
If flow is weak, sprays sideways, or sputters, unscrew the aerator and check it – a clogged or scaled screen is the cause far more often than a pressure problem. If cleaning it doesn’t restore flow, replace it.
Can I just clean the aerator instead of replacing it?
Often yes – soak it in vinegar to dissolve mineral scale, then rinse the screen. Replace it when the screen is torn or corroded, or when cleaning no longer restores a full, straight stream.
How do I know what size aerator to buy?
Aerators come in standard male and female threads and a few common sizes (regular, junior, tom-thumb). Bring the old one to the store or measure it; many replacements are sold as a multi-size kit so you don’t have to guess.
Which way do I turn a faucet aerator to remove it?
Counterclockwise (lefty-loosey) when you’re looking up at the bottom of the spout. On a recessed cache aerator that you key out from underneath, you’re effectively upside down, so the direction can feel reversed – go slowly and watch which way it backs out.
How do I tell if I need a male or female aerator, and what size?
Look at the old one: if the spout has threads on the outside, you need a female aerator; threads on the inside means a male aerator (or buy a dual-thread aerator that fits either). For size, a regular aerator is roughly quarter-sized, a junior nickel-sized, and a Tom Thumb dime-sized – confirm against the exact thread dimensions before buying.
Why is my faucet flow still weak after a new aerator?
Then the aerator wasn’t the problem – look upstream at a clogged supply line, a failing cartridge, a partially closed shutoff valve, or low household water pressure.
How often should I replace a faucet aerator?
There’s no fixed schedule – clean it whenever flow drops and replace it when cleaning stops working. In hard-water homes that’s more often, because scale builds up faster.
What to Do Next
Once your aerator is replaced and the flow is back to normal, you’ve handled one of the most common low-pressure complaints — and now that you know how to replace a faucet aerator, the skill transfers to every faucet in your house.
If the aerator wasn’t the issue, the next diagnostic path is identifying the specific faucet brand and model you have so you can buy the right cartridge or valve part. The brand and model identification guide walks through five reliable methods, including what to do when there’s no visible model sticker.
For the bigger picture on faucet repair — when to DIY, when to call a plumber, and which problems map to which fixes — the Complete Guide to Faucet Repair is the hub.
Sources
This guide draws on manufacturer documentation and federal flow standards. Specific authoritative sources:
- Moen Aerator Support — aerator removal techniques, cleaning recommendations, replacement key sourcing
- Delta Aerator Care — vinegar-soak guidance, finish-preservation timing
- EPA WaterSense bathroom faucet specification — 1.5 gpm flow standard (current as of May 2026; proposed 1.2 gpm revision paused since February 2025)
- PlumbingSupply.com aerator sizing reference — Regular / Junior / Tom Thumb thread sizes and dimensions
- Plumbing trade resources including Family Handyman and This Old House for cross-brand aerator troubleshooting
Pricing reflects typical U.S. big-box retail as of May 2026.
Educational content only. Not a substitute for licensed professional advice. Local plumbing codes vary by jurisdiction. Use of any guidance from this guide is at your own risk.
Get the homeowner’s plumbing repair toolkit checklist — the tools, parts, and decisions every homeowner should have on hand. [Free download — enter your email]
Parts for this repair
As an Amazon Associate, plumbingbythebook earns from qualifying purchases. Links below are affiliate links — they cost you nothing extra.
- Neoperl 1.5 GPM Cache Aerator (Dual-Thread) — Dual-thread fits both male and female faucet spouts — the most widely installed replacement aerator, code-compliant at 1.5 GPM.
Tools for this repair
As an Amazon Associate, plumbingbythebook earns from qualifying purchases. Links below are affiliate links — they cost you nothing extra.
- Neoperl Cache Aerator Key — If the aerator is recessed (a ‘cache’ aerator), the matching plastic key is the only thing that removes it — pliers won’t reach.
- Tongue-and-Groove (Channel-Lock) Pliers — For a standard threaded aerator that’s stuck — wrap the spout in a cloth first so the jaws don’t scratch the finish.
- White Vinegar — Soak a scaled-up aerator to dissolve the mineral buildup — often the fix is cleaning, not replacing.
Related guides
American Standard Faucet Cartridge Identification: Find the Right Part Every Time [2026]
American standard faucet cartridge identification trips up more homeowners than almost any other brand — not because American…
Kohler Cartridge Identification: Complete Guide — GP1016515, GP77005-RP & Rite-Temp [2026]
Ordering the wrong Kohler cartridge is easy to do and hard to undo once you’re already mid-repair. Kohler…
Moen Cartridge Identification: 1222, 1225B, 1200, or 1255? [2026]
Moen Cartridge Identification: 1222, 1225B, 1200, or 1255? [2026] Ordering the wrong Moen cartridge means a wasted hardware-store…