
How to replace a kitchen faucet is the single highest-dollar DIY plumbing job most homeowners can actually pull off in an afternoon. A mid-range pull-down faucet runs $150–$350; a pro install adds another $162–$364 in labor at 2026 Angi rates. That’s $130–$330 in DIY savings on one project — more than enough to justify the $30 basin wrench you’ll buy along the way.
And for weak flow, replacing the aerator is usually all it takes.
This guide walks through how to replace a kitchen faucet end-to-end: the sink-hole check that determines which model to buy, the under-sink shutoff procedure, the basin wrench technique that’s the actual choke point of the job, and the leak-test sequence pros use before they pack up. Most like-for-like swaps take 1–2 hours once you’re set up. The mounting-nut step is where straightforward swaps become two-hour projects — Home Depot specifically calls out the basin wrench as a must-have tool for that reason.
If you’re not sure what brand your current faucet is, the brand and model identification guide covers that. If the symptom that brought you here is a drip rather than a planned upgrade, why your faucet is leaking might save you the whole project. Otherwise, the Complete Guide to Faucet Repair is the broader hub this article sits inside.
How to Replace a Kitchen Faucet: The 60-Second Pre-Check
Before you buy anything, do a one-minute sanity pass on three things — sink, shutoffs, and access. These three checks decide whether this job is a Saturday afternoon or a two-trip headache.
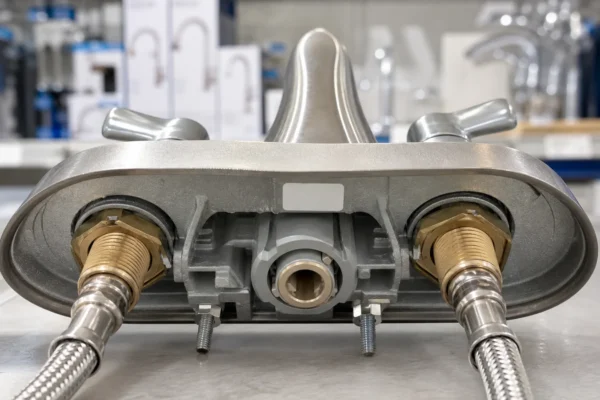
Check 1 — Count the sink holes. Clear the items around the faucet and look down at the sink deck. Count visible holes. A standard kitchen sink has one, three, or four holes. One-hole sinks take a single-handle faucet directly. Three-hole sinks take either a two-handle faucet or a single-handle faucet with a deck plate (escutcheon) covering the unused outside holes. Four-hole sinks add a side sprayer, soap dispenser, filtered-water tap, or air-gap fitting.
If your current faucet has a long base plate underneath it, there are probably three holes hidden under that plate. Kohler’s Simplice spec sheet explicitly says the faucet supports single-hole or three-hole installation with the included escutcheon, and Pfister’s Pfirst pull-out spec lists the same “1 or 3-Hole Installation” with an optional deckplate.
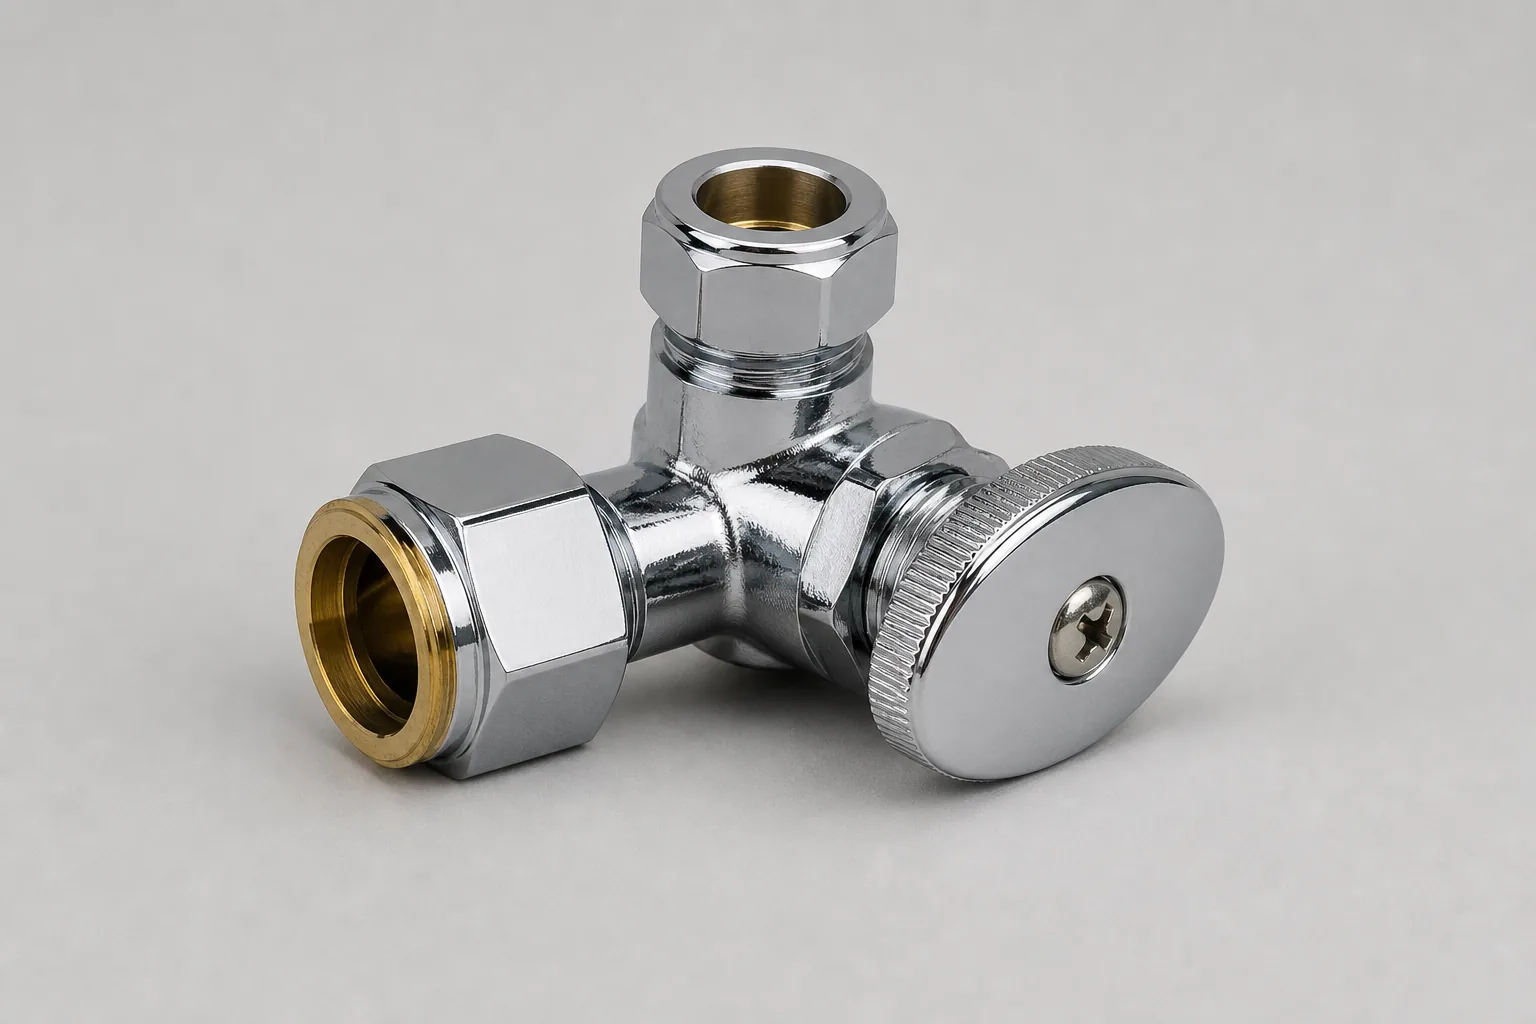
Check 2 — Test the under-sink shutoff valves. Open the cabinet, find the two valves on the hot and cold supply lines, and turn each one clockwise until it stops. Then turn on the faucet. Water should stop flowing within a few seconds. If either valve won’t close all the way, or water keeps trickling, stop here — that’s no longer a faucet swap. This Old House is direct about this: if the sink shutoff is shut and water doesn’t stop, shut off the house supply and replace the shutoff valve before going further.
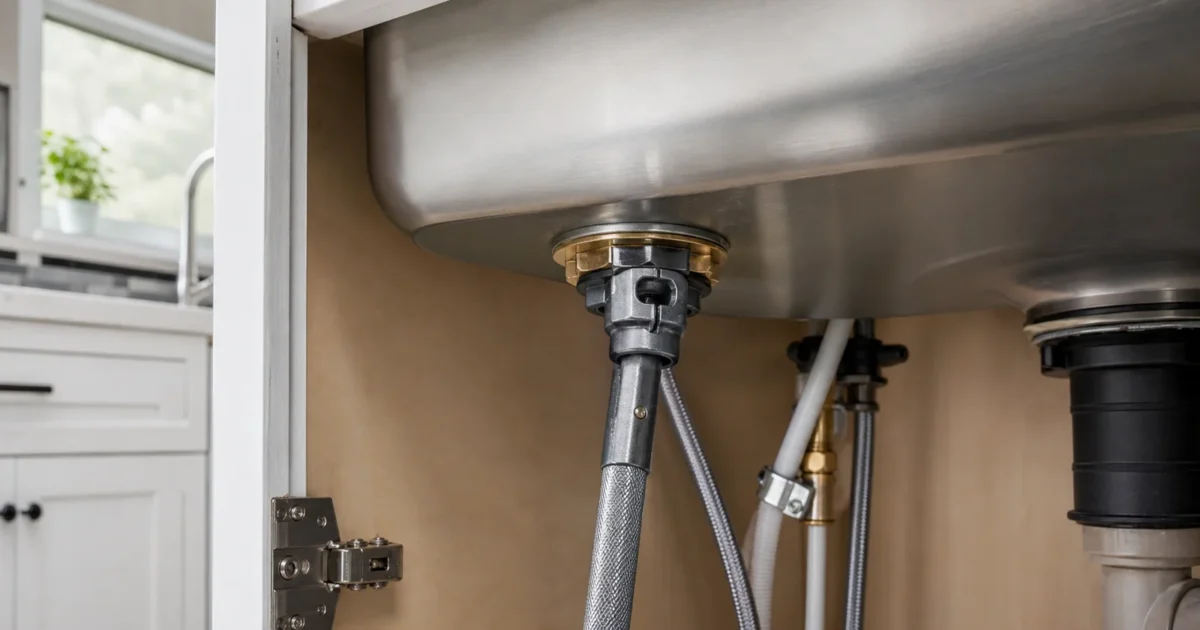
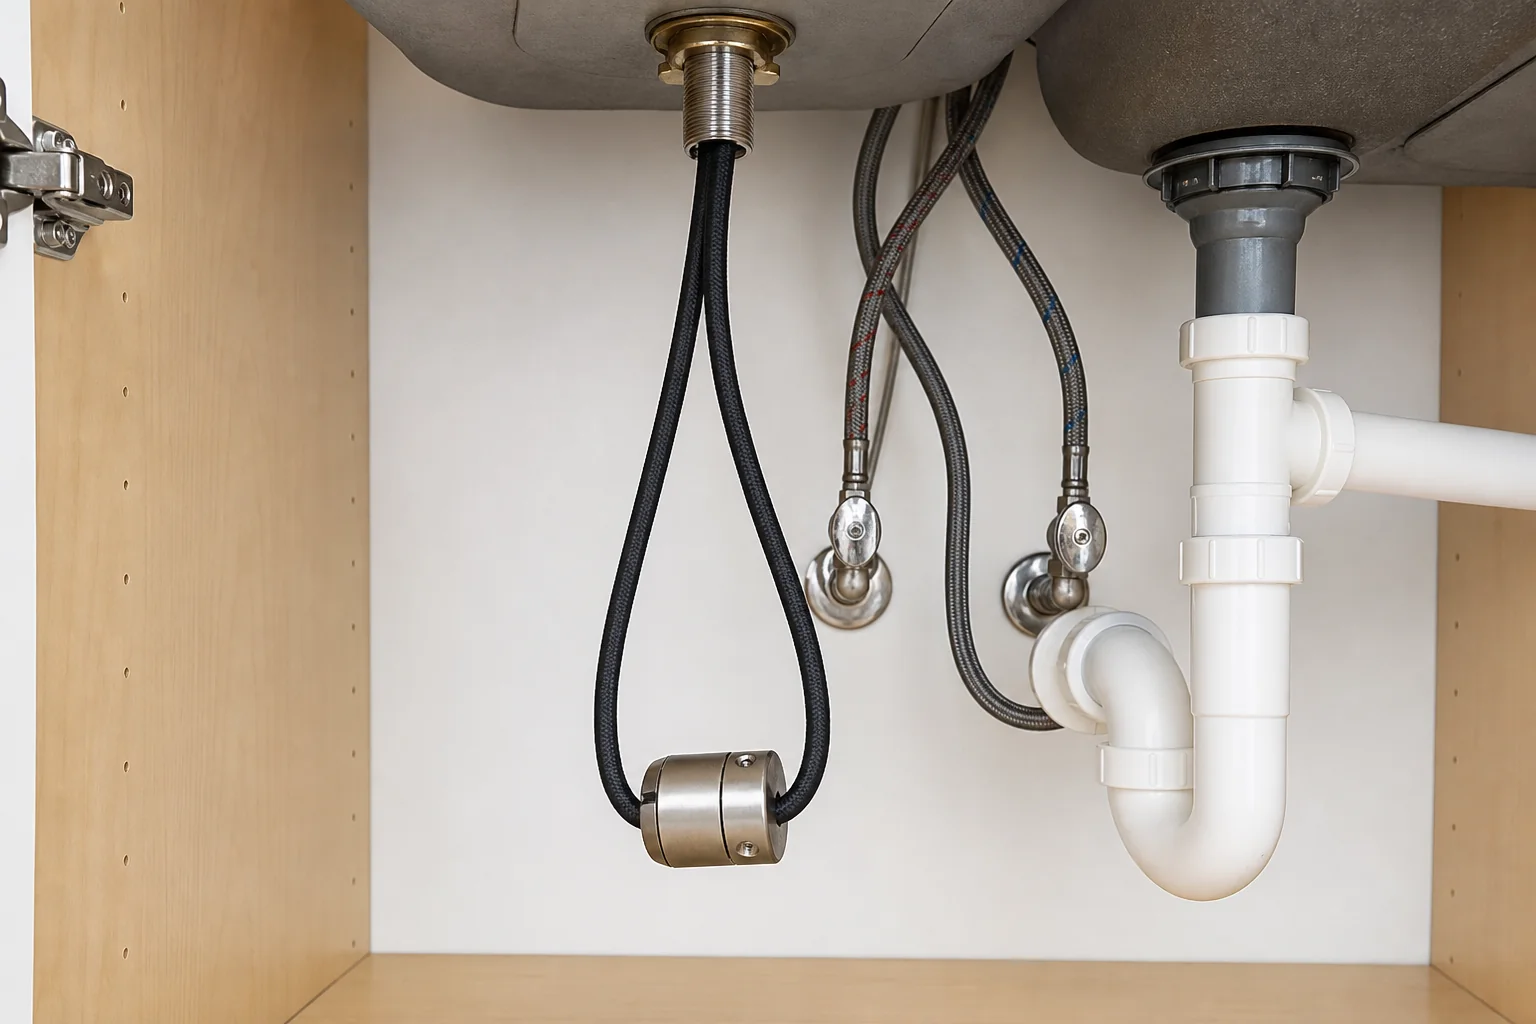
Check 3 — Look under the sink with a flashlight. A garbage disposal, water filter, instant-hot tank, or RO system can block access to the mounting nuts. If anything has to come out to reach those nuts, the job just got longer. Photograph the setup before you disconnect anything.
If all three checks pass, the rest is procedure.
What a Kitchen Faucet Replacement Actually Involves
How to replace a kitchen faucet is really two jobs glued together — getting the old one out, and putting the new one in. The first half is usually the hard half. Home Depot’s installation guide breaks the job into six steps: shut off the supply valves, disconnect the supply lines, remove the mounting hardware, lift the old faucet out, set the new faucet in place, and tighten/connect. Lowe’s how-to library says installing or replacing a kitchen faucet is manageable with common tools, but flags that the removal step usually needs a basin wrench and benefits from a second set of hands.
The reason the removal is harder isn’t the procedure — it’s the conditions. The mounting nuts sit flush against the underside of the sink deck, often behind the bowl, often partially blocked by the disposal, drain trap, or dishwasher hose, and often corroded from a decade of cabinet humidity. This Old House recommends spraying penetrating oil at both ends of the supply lines, both ends of any sprayer hose, and on the large faucet mounting nuts before you start turning — because the alternative is a stuck nut and a finger cramp.
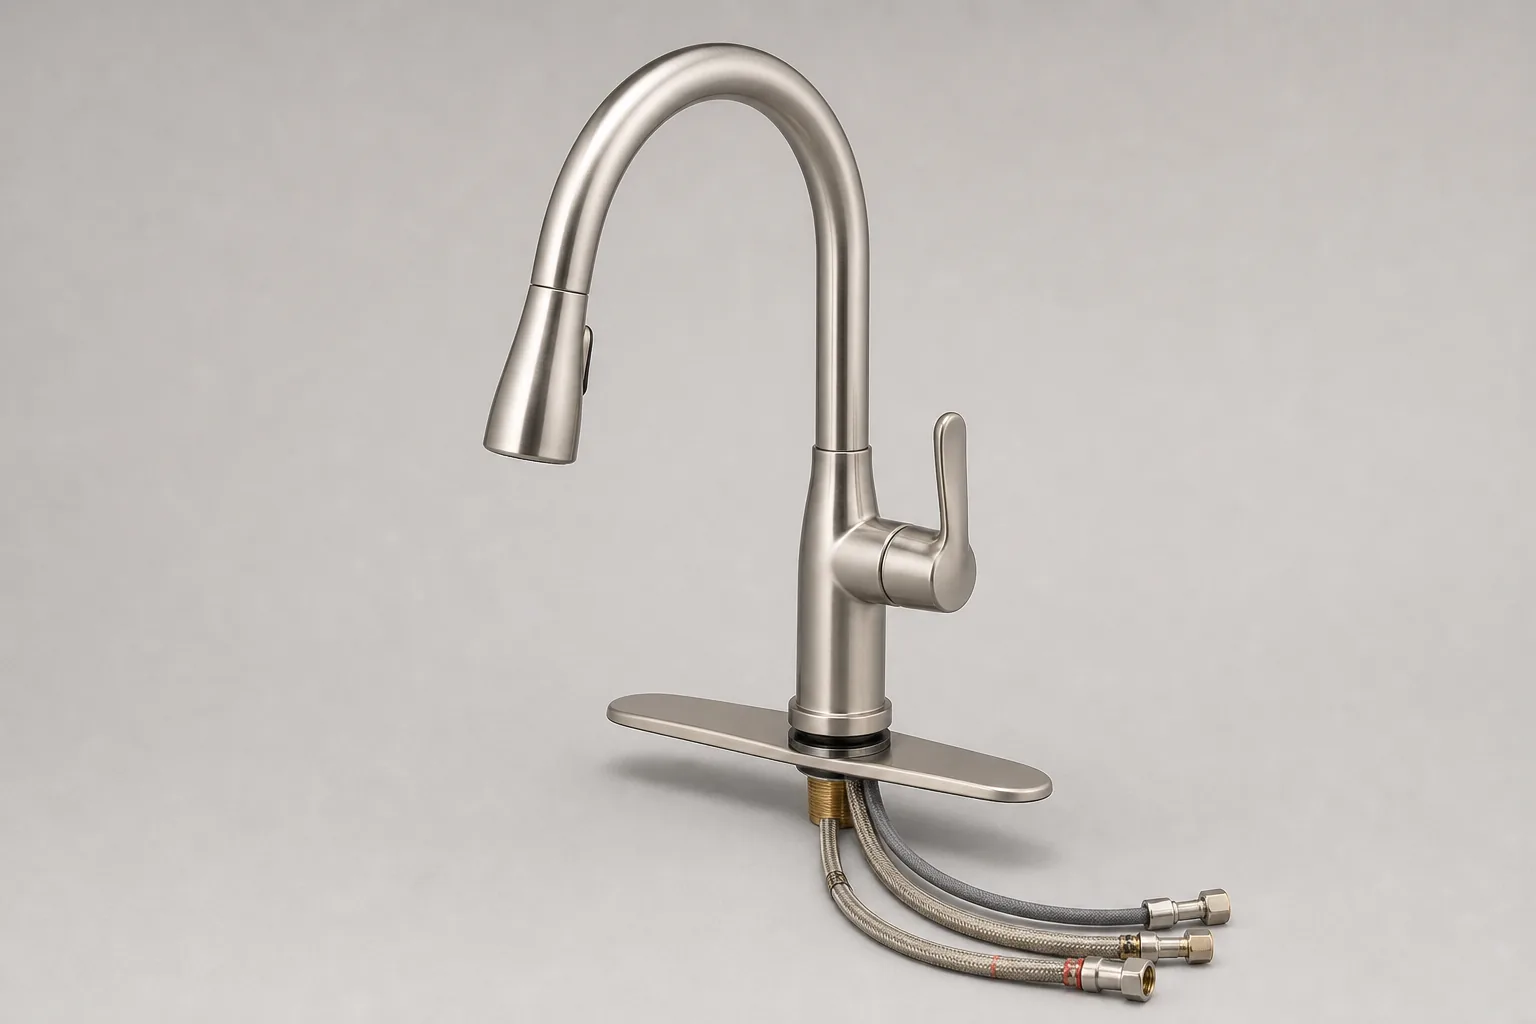
Modern faucets have made the installation half easier. Moen’s 87506SP spec lists Duralock quick-connect installation for the sprayer hose side and flexible supply lines with 3/8-inch compression fittings. Kohler’s Simplice spec includes an installation ring that simplifies the mounting from above. These quick-install systems don’t help with the old faucet’s stuck nut, but they cut the new-faucet half of the job to about thirty minutes for most homeowners.
How to Replace a Kitchen Faucet: The Step-by-Step
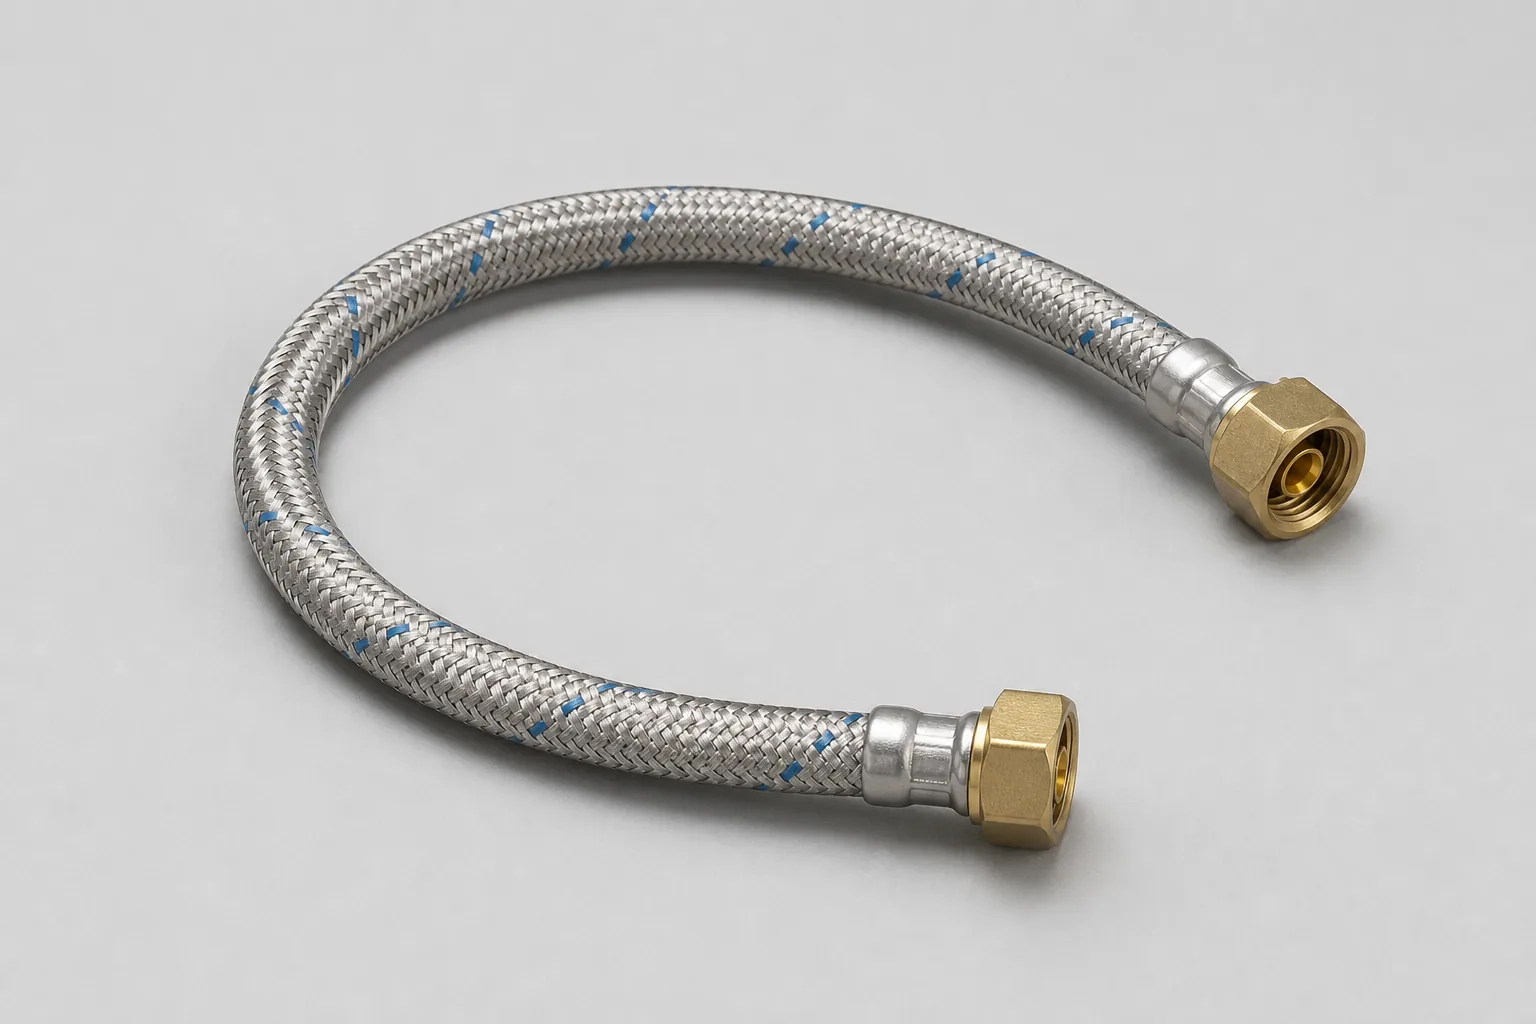
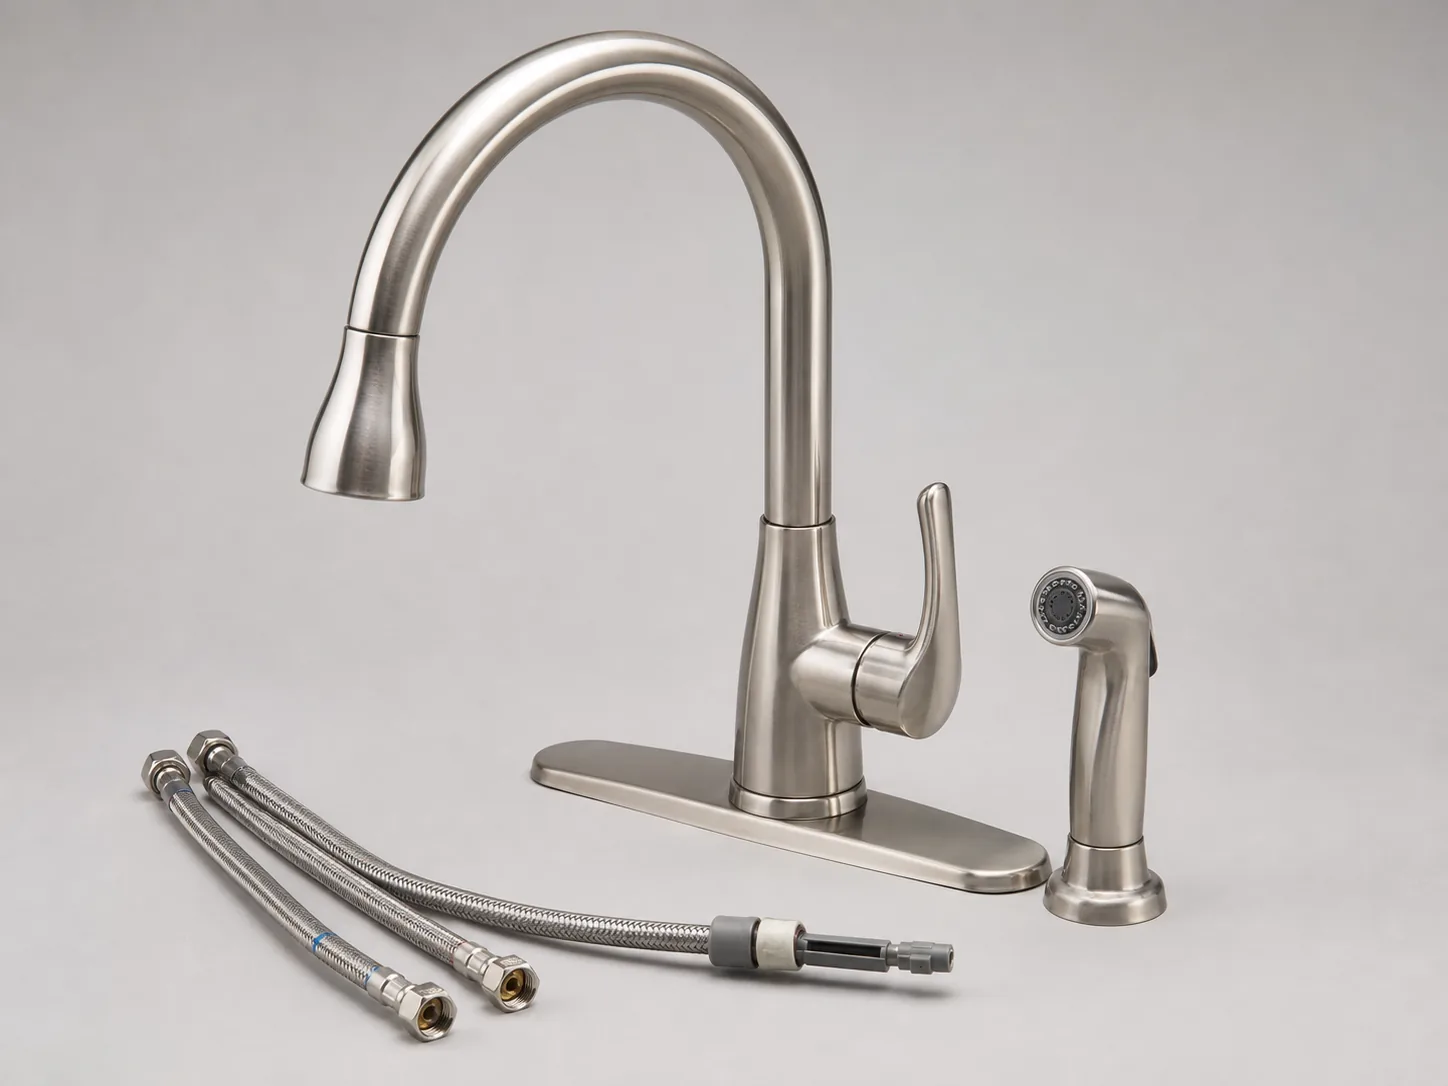
You’ll need: telescoping basin wrench, adjustable wrench, tongue-and-groove pliers (channel-locks), Phillips and flat screwdrivers, a bucket, a stack of towels, a headlamp, safety glasses, a putty knife or scraper for old gasket residue, and penetrating oil like PB Blaster or Liquid Wrench. Add new braided stainless supply lines (3/8-inch compression) if yours are old, kinked, or undersized.
The seven steps below are the complete procedure for how to replace a kitchen faucet on a standard deck-mount sink. Wall-mount setups are different and not covered here. Plan for 1–2 hours on a like-for-like swap; the new-faucet half goes faster than the old-faucet half almost every time.
Shut Off the Water and Drain the Lines
Close both under-sink shutoff valves (clockwise until they stop). Open the kitchen faucet — both handles, or center on a single-handle — and leave it open. Water remaining in the supply lines drains out; pressure releases. Place the bucket under the supplies. A few ounces of water will still dribble when you disconnect things, even with both valves closed.
If either valve won’t fully close, This Old House’s instruction is to shut off the house main and plan to replace the shutoff valve as part of this job. Do not push past a leaking shutoff hoping it’ll seal up under the new faucet — that’s how a faucet swap becomes a flood call.
Disconnect the Supply Lines
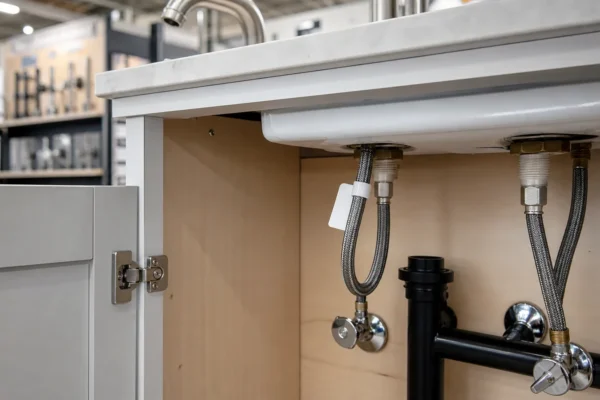
Under the sink, use the adjustable wrench (or channel-locks if the nut is too large for the wrench) on the supply-line coupling nuts where they meet the shutoff valves. Turn counterclockwise — one quarter turn to break, then by hand. The hot and cold lines come off the valves. If your old supply lines are integrated into the faucet body (common on older models), you’ll disconnect them at the faucet end during Step 5 instead. If your faucet has a side sprayer or pull-down hose, find the diverter or quick-connect under the faucet body and disconnect it now too.
Spray Penetrating Oil and Wait
Before you wrestle the mounting nuts, spray penetrating oil at the threads of each mounting nut. This Old House recommends PB Blaster; Home Depot’s installation guide names the same product. Five to ten minutes of soak time is the difference between a nut that breaks free with two turns and a nut that strips. Use the wait to clean up under the sink, lay out your tools, and put on safety glasses — debris falls while you’re working overhead.
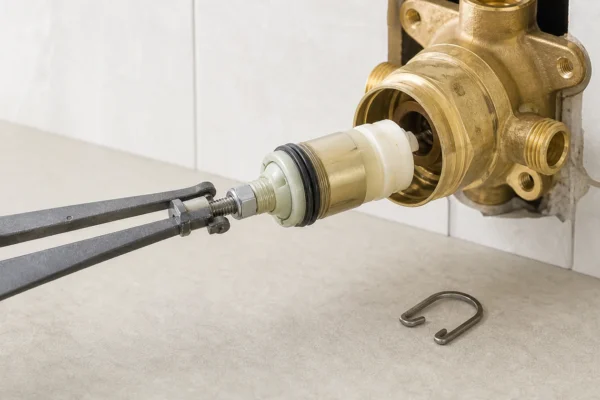
Loosen the Mounting Nuts With a Basin Wrench
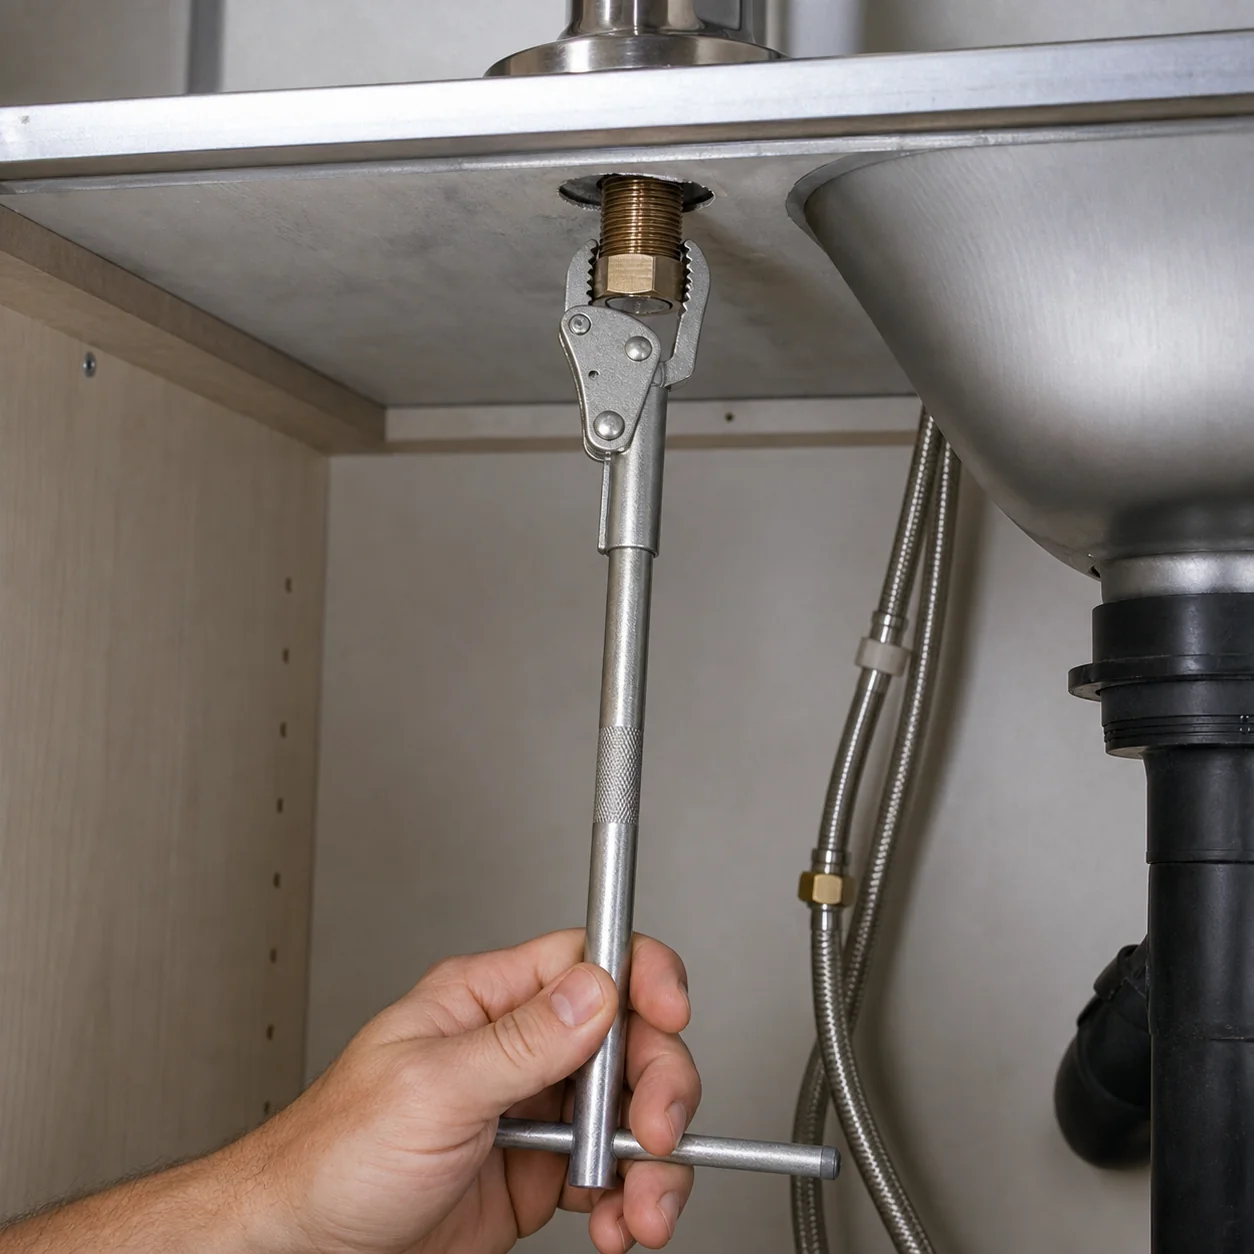
This is where almost every kitchen faucet replacement gets hard. The mounting nuts hold the faucet body to the sink deck from underneath. Normal wrenches can’t swing in that space — there’s six to eight inches of clearance between the sink bottom and the cabinet floor, and the bowl curves into the working area. Home Depot is direct about it: a basin wrench is a must-have tool for this step. Lowe’s Klein Tools 1-1/4-inch adjustable telescoping basin wrench is $29.98 and handles every standard size.
The technique:
- Position the basin wrench head over the mounting nut. The pivoting jaw bites when the handle turns counterclockwise.
- Keep upward pressure on the handle so the jaw stays seated. If you let it drop, the wrench slips.
- Start with small arcs — six to twelve inches of handle sweep, not full half-rotations. The handle’s geometry doesn’t allow more than that anyway.
- When the nut breaks free, switch to hand-finishing as soon as you have enough thread clearance to remove it.
If a mounting nut is corroded solid and penetrating oil alone won’t move it, add heat: play a hair dryer on high over the nut for a minute or two before you turn it. The metal expands and cracks the corrosion’s grip — the same trick that frees a seized aerator. (Use a hair dryer, not an open flame, around supply lines and a faucet you may be reusing.)
A faucet-specific multipurpose tool can be the better choice when the mounting hardware is plastic tab nuts or the supply lines have to pass through the tool body — Home Depot lists the RIDGID EZ Change Faucet and Sink Installer at $29.97, and Lowe’s Klein 12-in-1 faucet wrench at $34.98 handles 2-, 3-, 4-, and 6-tab nuts. If the nut is corroded solid and the faucet is being thrown out anyway, a close-quarters hacksaw is in This Old House’s official tool list — cutting the hardware is sometimes the fastest path.
Lift the Old Faucet and Clean the Deck
With the mounting nuts off, the faucet body lifts straight up out of the sink. Pull from above. The old gasket or putty bead comes with it, or stays stuck to the deck. Either way, scrape the deck clean with the putty knife. Mineral deposits, old silicone, hardened putty, and the dried-up residue of the original gasket all need to come off — the new gasket needs a flat, clean surface to seal against. White vinegar softens mineral scale if scraping alone won’t take it off.
Set the New Faucet and Mount From Above
Read the new faucet’s installation sheet before you start — every manufacturer has small variations. The general sequence:
- If your new faucet uses a deck plate (escutcheon) to cover unused holes on a three-hole sink, install the deck plate’s foam gasket on the sink deck first, then the deck plate.
- Feed the supply lines and faucet shank down through the center mounting hole.
- Align the faucet so the handle ends up where you want it, the spout swings the right direction, and the body sits square on the deck.
- From below, hand-start the mounting bracket or mounting nut on the faucet shank.
- Tighten the mounting nut just until the faucet is stable on the deck. Kohler’s installation sheet says tighten with an adjustable wrench but do not overtighten — overtightening cracks plastic nuts, distorts stainless decks, and can crack stone or composite counters.
Some modern faucets use a quick-install bracket that tightens with a thumbscrew or single bolt from below. Kohler and Moen’s installation rings handle this without a basin wrench. If you’re lucky enough to have one, the new-faucet half of the job is finished in five minutes.
If it’s a pull-down or pull-out faucet, connect the spray hose and clip on the counterweight. The hose drops down through the faucet body; join it to the supply with the quick-connect fitting (push the two halves together until the collar or colored tab clicks — and to release one later, you press that same tab or locking ring and pull straight off). Then clip the cylindrical counterweight onto the hose where the installation sheet shows it, usually low on the loop under the sink. That weight is what retracts the spray head back into the spout — a missing or mis-placed counterweight is the number-one reason a new pull-down sprayer won’t snap back. Make sure the weighted hose swings freely and doesn’t catch on the shutoffs or the drain trap.
Connect Supplies, Flush, and Leak-Test
Thread the hot and cold supply lines onto the shutoff valves. Hot is on the left (most homes), cold is on the right; Pfister’s instructions identify the hot line with a red tag for this exact reason. Hand-tighten the compression nuts, then snug each one with the adjustable wrench — about a quarter turn past hand-tight. Compression fittings seal by deforming the ferrule against the valve seat, not by torque, so over-cranking creates leaks rather than fixing them. One common mistake to avoid: don’t wrap thread-seal (Teflon) tape on a compression connection — the tape belongs only on tapered male pipe threads (NPT), and on a compression nut it actually prevents a clean seal. Save the tape for any threaded adapter that calls for it, not the supply-line coupling nuts.
Before you turn the water back on, remove the aerator or pull off the spray head. Open the faucet at full mixed (center handle position). Then open both shutoff valves slowly. Water flows through with the aerator off, flushing any debris from the cleaning and any solder/sediment that worked into the new faucet during assembly. Kohler explicitly says to flush the supply pipes thoroughly to remove debris before final use. Run for thirty seconds, then close the faucet, reinstall the aerator, and run again at full hot, full cold, and full mixed.
Check under the sink with a headlamp during this. Look at the supply-line nuts at the valves, the supply-line connections at the faucet, the mounting nut area, the deck where the new gasket seals, and the sprayer hose connection. A drip at this stage means tighten — no more than a quarter turn at a time. Delta’s 100 Series manual says to retighten only as necessary and not overtighten. Re-check at the ten-minute mark and again the next day.
When How to Replace a Kitchen Faucet Isn’t a DIY Job
Knowing how to replace a kitchen faucet doesn’t mean every faucet replacement is a DIY job. The procedure sounds straightforward until one of these shows up:
Corroded angle stops that won’t close. Already covered above — this isn’t a faucet job anymore. Replacing a shutoff valve means either a compression-fit fix (push-to-connect like SharkBite or compression-nut replacement, $15–$30) or sweating new copper, which most homeowners reasonably hand to a pro. HomeAdvisor reports plumbers charge $45–$200 per hour, often with minimum charges; a stuck shutoff is worth the hour.
Galvanized or polybutylene supplies. Disturbing old galvanized pipe can break it; touching polybutylene risks the whole supply run. If you see any pipe other than copper, PEX, or modern CPVC at the shutoffs, stop and call a plumber.
Garbage disposal in the way of the mounting nut. Disposals are heavy, hard-wired, and connected to drain plumbing — removing one to access a faucet nut and reinstalling it is a separate project most homeowners reasonably skip.
A new sink or counter on the way in. If you’re drilling stone, fireclay, or cast iron to add a hole the original deck doesn’t have, that’s countertop fabrication work, not faucet work.
Wall-mount faucets. These connect to in-wall plumbing, not under-sink shutoffs. Home Depot’s removal guide specifically suggests considering professional services for wall-mounted kitchen sink faucets.
For everything else — same-hole replacement, working shutoffs, normal under-sink access — this is the DIY project Lowe’s and Forbes Home both describe as manageable with common tools and about an afternoon.
Common DIY Mistakes That Turn 2 Hours Into 5
Most of the failures in how to replace a kitchen faucet aren’t technique problems — they’re sequencing problems. Ranked by how often they bite homeowners:
- Starting before confirming the shutoffs hold. Always test that the valves stop water before you disconnect anything. The cost of the test is a minute; the cost of skipping it is a flood.
- Buying a faucet for the wrong hole count. Single-hole faucet on a three-hole sink with no deck plate, or three-hole faucet on a one-hole sink, both require a return trip. Count first.
- Skipping the basin wrench and trying with channel-locks. It will not reach. Buy the $30 tool. Home Depot, Lowe’s, This Old House, and Forbes Home all call this out as the choke-point tool.
- Forgetting the gasket or deck plate seal. Manufacturer installation sheets show the seal plate, foam gasket, or escutcheon installed before the faucet body. Skip it and water seeps under the faucet during normal use.
- Over-tightening the mounting nut. Kohler’s installation sheet says not to overtighten. Symptoms: cracked plastic nut, warped stainless deck, cracked composite surface. The fix is just enough to prevent the faucet from wobbling.
- Reversing hot and cold supplies. Pfister marks the hot line with a red tag specifically because this happens. If you find it after install, shut off and swap at the supply valves.
- Skipping the flush before final use. Delta and Kohler both call this out. Solder fragments and shipping debris in the new faucet body clog aerators within days if you don’t flush.
Quick Reference
| Situation | Likely Cause | Next Step |
|---|---|---|
| Shutoff valve won’t close | Failed angle stop | Shut house main; replace valve (DIY or pro) |
| Faucet won’t lift after nuts off | Old putty / silicone bonded to deck | Scrape with putty knife; vinegar softens mineral scale |
| Mounting nut won’t break free | Corroded threads | Penetrating oil + wait 10 min; basin wrench in small arcs |
| Garbage disposal blocks the nut | Crowded under-sink | Disconnect/remove disposal (or call a plumber) |
| New faucet leaks at base | Gasket misaligned or missing | Re-seat gasket; clean deck; retighten evenly |
| New faucet leaks at supply | Cross-threaded or under-tightened | Quarter-turn snug; do NOT add tape to a compression nut (it seals on the ferrule) |
| Hot/cold reversed | Supplies swapped at install | Shut off; swap lines at the valves |
What How to Replace a Kitchen Faucet Costs in 2026
Home Depot lists the Delta Foundations two-handle standard kitchen faucet at $79.00 (3-hole 8-inch installation, Delta’s lifetime limited warranty). Lowe’s lists the Moen Adler single-handle pull-down kitchen faucet with deck plate at $149.00. FaucetDepot lists the Delta Foundations B4410LF with side spray at $96.78. Angi’s 2026 cost guide gives kitchen faucet ranges by type: single-handle $150–$350, pull-out $175–$500, pull-down $175–$500, touchless $400–$700, bridge $400–$700, pot filler $150–$500.
Tools, if you don’t already own them: $30 basin wrench (Lowe’s Klein telescoping at $29.98) or $30 multipurpose faucet tool (Home Depot RIDGID EZ Change at $29.97), plus $10–$25 for new braided supply lines if you’re replacing them.
Pro install: Angi’s 2026 data says professional kitchen faucet installation runs $162–$364 with most homeowners paying around $262; labor for a local faucet installer typically ranges $260–$480. Plumbers charge $45–$200 per hour with some minimum-charge floors.
DIY math: a $150 faucet plus a $30 basin wrench is roughly $180 before tax. Paying a pro for the same faucet at Angi’s $162–$364 install range puts the total at $312–$514. DIY savings, $132–$334.
What to Do Next
If the replacement went smoothly and you want to handle the next repair yourself, the Complete Guide to Faucet Repair is the broader hub with diagnostic and repair walkthroughs for cartridges, aerators, sprayer heads, and supply lines.
If you ran into a stuck shutoff or stuck mounting nut and called a plumber halfway through, the brand and model identification guide is worth bookmarking — for the next round, you’ll know exactly what cartridge or rebuild kit your specific faucet uses before you start.
If the leak that drove this project hasn’t actually stopped, the new faucet might not be the fix you needed. Why your faucet is leaking walks through the six most common causes — most of which are repairs, not replacements.
How hard is it to replace a kitchen faucet yourself?
It’s a moderate DIY job most homeowners can do in about two hours. The one real choke point is reaching the faucet mounting nuts in the tight space behind the sink – a basin wrench is what makes that step possible.
What do I need to buy besides the new faucet?
Usually braided stainless supply lines (cheap insurance worth swapping while you’re under there), and a deck plate if you’re putting a single-hole faucet on a 3-hole sink. A basin wrench, thread-seal tape, and sometimes plumber’s putty round out the tools.
How do I know which faucet will fit my sink?
Count the mounting holes in your sink or countertop – 1, 3, or 4. A single-hole faucet covers a 3-hole sink only with a deck plate; a widespread/3-hole faucet won’t fit a single-hole sink. Confirm the hole count before you buy.
When should I call a plumber instead?
When the shutoff valves are seized, corroded, or leak when you try to close them, when the supply stub-outs need soldering, or when the old faucet’s nuts are rusted solid. Those turn a two-hour swap into wall or valve work.
Why is my new faucet leaking underneath after the install?
Almost always a loose or cross-threaded supply connection. Hand-tighten then snug the connections (no tape on compression nuts – they seal on the ferrule), re-seat the deck-plate seal, and run a paper-towel test under each joint.
Why won’t my new pull-down sprayer retract into the spout?
The counterweight on the spray hose is missing, clipped in the wrong spot, or the hose is snagging on the shutoffs or drain trap under the sink. Re-clip the weight where the installation sheet shows it, low on the hose loop, and make sure the hose swings freely – that weight is what pulls the head back home.
Sources
- Home Depot — How to Install a Kitchen Faucet
- Home Depot — How to Remove a Kitchen Faucet
- Lowe’s — How to Install a Kitchen Faucet
- This Old House — How to Remove a Kitchen Faucet
- This Old House — How to Replace an Old Faucet
- Angi — Kitchen Faucet Installation Cost
- Forbes Home — Faucet Installation Cost
- Forbes Home — How to Replace a Sink Faucet
- HomeAdvisor — Plumbing Costs
- Lowe’s — Klein Tools Telescoping Basin Wrench
- Home Depot — RIDGID EZ Change Faucet and Sink Installer
- Lowe’s — Klein 12-in-1 Faucet Wrench
- Home Depot — Delta Foundations 2-Handle Kitchen Faucet
- Lowe’s — Moen Adler Pull-Down Kitchen Faucet
- Kohler — Simplice K-597 Spec Sheet
- Pfister — Pfirst Pull-Out Spec Sheet
- Moen — 87506SP Spec Sheet
- Delta — 100 Series Installation Manual
Educational content only. Not a substitute for licensed professional advice. Local plumbing codes vary by jurisdiction. Use of any guidance from this guide is at your own risk.
Get the homeowner’s plumbing repair toolkit checklist — the tools, parts, and decisions every homeowner should have on hand. [Free download — enter your email]
Parts for this repair
As an Amazon Associate, plumbingbythebook earns from qualifying purchases. Links below are affiliate links — they cost you nothing extra.
- Pull-Down Kitchen Faucet (Single-Handle) — The replacement faucet itself — match your sink's hole count (1-hole needs a deck plate to cover a 3-hole sink) and the sprayer style you want.
- Braided Stainless Steel Faucet Supply Lines (3/8 in. compression) — Replace the supply lines while you're under there — braided stainless almost never bursts the way old plastic or rusted lines do. Match the connector size to your shutoff valves.
- Kitchen Faucet Deck Plate / Escutcheon (10 in.) — Covers the extra holes when you put a single-hole faucet on a 3-hole sink — the cheap part that makes a mismatched hole count work.
Tools for this repair
As an Amazon Associate, plumbingbythebook earns from qualifying purchases. Links below are affiliate links — they cost you nothing extra.
- Ridgid 31005 Telescoping Basin Wrench — The tool that makes the under-sink mounting-nut step possible — the actual choke point of a faucet swap.
- Harvey 1/2-inch PTFE Thread Seal Tape (Teflon Tape) — Seal the supply-line threads on reassembly — cheap insurance against a slow connection leak.
- Oatey Hercules Plumber's Putty (14 oz) — For sealing the deck plate or sink-flange seat on faucets that call for putty (not plastic-base models).
Related guides
How to Identify Your Delta Faucet: Model, Trim, and Cartridge [2026]
How to identify your Delta faucet starts with a decision most homeowners get wrong the first time: ordering…
How to Replace a Moen 1225 Cartridge: A Homeowner’s Step-by-Step Guide [2026]
How to Replace a Moen 1225 Cartridge: A Homeowner’s Step-by-Step Guide [2026] A dripping single-handle Moen faucet, a…
American Standard Faucet Cartridge Identification: Find the Right Part Every Time [2026]
American standard faucet cartridge identification trips up more homeowners than almost any other brand — not because American…