Most toilet repairs are a worn $5 to $30 part a homeowner can swap in under an hour — a flapper for a running toilet, a fill valve for slow or phantom refills, or a wax ring for a leak at the base. Identify the issue by what you see (running water, weak flush, base leak), match the part to your toilet’s brand and model, then replace it. Call a pro for plumber-only jobs like a tank-to-bowl leak a new part won’t fix.
A toilet is the most-used fixture in a home and probably the most-failed. Tank parts wear out, rubber seals stiffen and leak, things clog the trapway, and old fixtures use more water per flush than current code allows.
The good news is that most of what fails is a small replaceable part costing $5 to $30 — flapper, fill valve, supply line, lever — that a careful homeowner can swap in under an hour. This toilet repair guide covers the eleven most common problems ranked by frequency, the difficulty ladder from five-minute fixes to plumber-only work, real 2026 cost ranges for DIY versus professional service, and a symptom-first index so you can find the right per-issue article without diagnosing your toilet from scratch.
The toilet repair guide is structured around what you actually see — water running, weak flush, base leak — not around part names you don’t recognize yet. Each section of this toilet repair guide closes with a specific next step: a tool to try, a part to check, or a per-issue article that covers that problem in depth.
Free Tools for Your Toilet Repair
Two free tools settle the two questions every toilet repair raises — is it worth fixing, and what will it cost. No sign-up, no app:
- Toilet Water-Waste Calculator — a running or pre-1994 toilet can waste thousands of gallons a year; see what yours costs annually and whether a repair or a replacement pays for itself.
- Repair Cost Estimator — the honest DIY-parts cost versus a plumber’s price for common toilet repairs, so you know before you call.
How a Toilet Actually Works
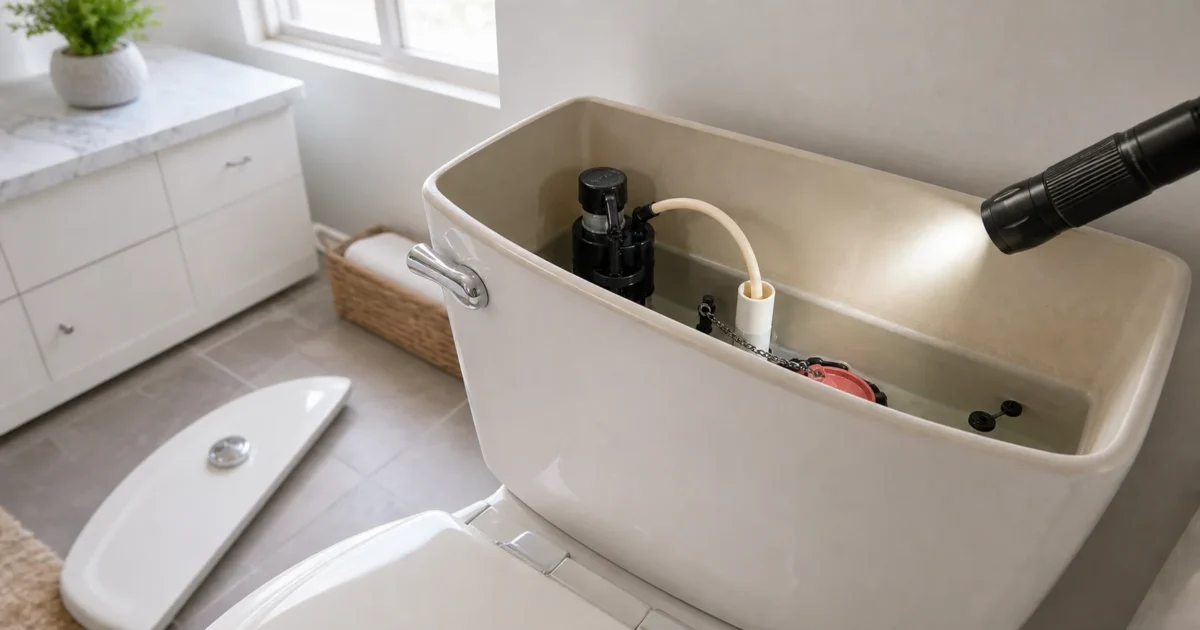
Before diving into the rest of the toilet repair guide, here’s the mechanical baseline you’ll need. A gravity toilet — the standard residential design — is a two-part fixture. The tank stores clean water for the next flush. The bowl and trapway route waste through the closet flange into the building drain system. Inside the tank you’ll find a fill valve, float, refill tube, overflow tube, flush valve seat, flapper or canister seal, trip lever, chain or lift rod, tank bolts, tank-to-bowl gasket, supply connector, and shutoff stop. Most modern toilets use a compact float-cup fill valve rather than the old ballcock-and-float-arm design.
The refill cycle starts at the angle stop under the toilet, passes through a flexible supply connector, enters the fill valve, and is shut off by the float when the tank reaches the designed waterline. During refill, a small refill tube sends water into the overflow tube so the bowl refills after the flush. If that refill tube is disconnected, aimed incorrectly, or submerged too far into the overflow tube, bowl refill and anti-siphon behavior break in subtle ways.
The flush cycle starts when you push the tank lever. The lever lifts a chain connected to the flapper, water rushes from the tank through the flush valve into the bowl, rim jets and a siphon jet start the bowl siphon that pulls waste through the internal trapway. The flapper drops back onto the seat, the fill valve refills tank and bowl, and the float shuts the water off at the set level. That’s it — the whole repeating cycle is mechanical, gravity-fed, and almost entirely powered by water weight.
The failure-prone interfaces are mostly rubber, threaded, or alignment-dependent parts rather than the porcelain itself. Flappers warp, mineral-scale, or stop sealing against the flush valve seat (the running toilet). Fill valves clog with sediment, misread water level, hiss, or fail to shut off (the slow-fill or noisy toilet). Tank-to-bowl bolts and gaskets leak because they pass through wet porcelain. Wax rings, closet bolts, and flanges fail at the floor connection. Porcelain itself usually outlives the building.
Pressure-assisted toilets use the same bowl and drain concept but store incoming water under air pressure in a sealed vessel inside the tank. Bidet seats and intelligent toilets add electrical supply, electronic controls, and sometimes integrated pumps. Both categories sit outside the universal-parts world of this toilet repair guide — repairs need to follow the manufacturer’s model-specific support documentation.
The current federal standard for new residential toilets is 1.6 gallons per flush, and EPA WaterSense-labeled tank-type toilets must average no more than 1.28 gallons per flush (for a dual-flush model, the average of two reduced flushes and one full flush) while meeting flushing performance criteria. That’s the regulatory backdrop for the repair-versus-replace decision on older fixtures.
The 11 Most Common Toilet Problems, Ranked
This toilet repair guide ranking is editorial — based on manufacturer troubleshooting categories, retailer how-to library prominence, plumber service-call patterns, and recurring symptom patterns in trade forums. Numbers 1 through 5 cover roughly 80 percent of what homeowners actually deal with.
1. Clogged toilet or repeated clogs. A one-time clog is a bowl or trapway obstruction. Repeated clogs point at low-flow fixture limits, partial obstruction deeper in the trap, or a drain or vent problem upstream of the toilet. Start with a flange plunger. If multiple fixtures back up at the same time, the problem isn’t the toilet at all.
2. Running toilet, phantom flush, or water cycling. Usually a flapper that no longer seals, a chain too short or too long, a water level spilling into the overflow tube, or a fill valve that won’t shut off. If you hear the tank refilling when nobody flushed, this is your category.
3. Weak flush, incomplete flush, or double flush. Low tank water, restricted rim holes, chain slack, a closing flapper, wrong flapper type, clogged trapway, or a poorly matched low-flow fixture. If the bowl doesn’t clear unless you hold the handle down, start here.
4. Slow-filling, noisy-filling, or no-fill toilet. Shutoff valve, supply connector, fill valve screen, float adjustment, or fill valve itself. If the tank takes minutes to refill or makes a high-pitched noise after flushing, the fill valve is the leading suspect.
5. Handle, chain, or trip-lever failure. A stuck handle, broken lever, disconnected chain, or chain with too much slack stops the flapper from lifting or keeps it from closing. If the handle feels loose, sticks down, or needs jiggling, this is a $10 part and a five-minute fix.
6. Leaking supply line, shutoff valve, or fill-valve connection. Water on the floor near the wall side of the toilet usually points at a loose supply connector, failing washer, cracked fill-valve shank, or leaking angle stop.
7. Leak at the base, sewer smell, or failed wax ring. Water around the toilet base after flushing often points at a failed wax ring, loose closet bolts, a cracked flange, or a toilet that rocked enough to break the seal. Sewer odor at the base is the same category.
8. Tank-to-bowl leak or loose tank. Water dripping from the underside of a two-piece tank traces to tank bolts, bolt washers, or the tank-to-bowl gasket. Outside of the tank is dry; water forms underneath.
9. Wobbly toilet, broken flange, or loose closet bolts. Toilet rocks under body weight or the bolts spin without tightening. Usually a damaged flange, loose bolts, uneven floor, or missing shim.
10. Cracked tank or bowl. Porcelain cracks leak clean water from the tank, wastewater from the bowl, or hidden water into the floor. Skip the small-part repair — this is replacement territory.
11. Pressure-assist, bidet-seat, or intelligent-toilet fault. Specialized systems with vessel cartridges, actuators, electronics, or wash-system failures. Use manufacturer support, not universal-part advice.
The Toilet Repair Difficulty Ladder
Sorting the toilet repair guide by difficulty helps you self-locate before you start pulling parts.
Trivial (five minutes, no tools or just your hands): adjusting a chain that’s too long, reconnecting a chain to the lever, opening a partly closed shutoff valve, repositioning a refill tube. These are good homeowner repairs when water isn’t on the floor and porcelain is intact.
Easy (under an hour, basic tools): replacing a flapper, installing a universal fill valve, replacing a tank lever, swapping a supply connector, using a flange plunger. Shut off the water, drain the tank, don’t overtighten plastic-to-porcelain connections, test for leaks after.
Moderate (one to three hours, lifting or brand-specific parts): replacing a flush valve, tank-to-bowl gasket, tank bolts, wax ring, wax-free seal, or closet bolts. The tank or whole toilet may need to come off. Moves into harder territory when the toilet is heavy, the shutoff valve doesn’t work reliably, or the model uses a canister seal instead of a universal flapper.
Hard (four-plus hours or specialty judgment): flange repair, subfloor damage around the toilet, chronic backups, drain or vent troubleshooting. A homeowner can install a simple flange repair ring, but rotten flooring or a flange that’s too low after remodeling becomes a bigger plumbing-and-carpentry job.
Professional-only or strong pro recommendation: cracked porcelain replacement, hidden water damage, multiple-fixture sewage backups, pressure-assist vessel work, intelligent-toilet electrical failures. Anything that alters drain, vent, supply, framing, or electrical systems may also trigger local permit and code requirements — check the authority having jurisdiction rather than guessing.
Toilet Repair Cost: DIY vs Pro
Cost framing for this toilet repair guide: most simple repairs land in the broad national range of $150 to $400 for a pro service call, with parts at the low end and leak or flange problems higher. Toilet replacement runs from a few hundred dollars to more than $800 depending on toilet type, labor, and added work. The article-safe approach is ranges, not single prices — regional labor, urgency, store-by-store parts pricing, and added complications all move the number.
| Issue | DIY parts only | DIY with tools | Mid-range pro | Premium pro / complication |
|---|---|---|---|---|
| Clog | $8-$35 (plunger) | $35-$80 (3-6 ft closet auger) | $150-$300 | $300-$700+ if drain or main line |
| Running toilet / flapper | $5-$20 | $15-$45 + dye tablets | $150-$250 minimum call | $250-$400 if flush-valve seat or canister seal |
| Fill valve / slow fill | $10-$30 (universal) | $25-$60 + supply connector | $175-$300 | $300-$450 if shutoff valve also fails |
| Handle / chain / lever | $6-$25 | $15-$45 + pliers | $150-$225 minimum call | $225-$350 if brand-specific |
| Weak flush | $0-$25 (adjustments) | $25-$90 + descaler + auger | $175-$350 | $400-$900+ if replacement is better |
| Supply line / stop leak | $6-$20 (braided line) | $20-$70 + pliers + bucket | $175-$350 | $300-$600 if shutoff valve replacement |
| Tank-to-bowl leak | $8-$30 (gasket kit) | $25-$75 + wrench | $200-$350 | $350-$600 if bolts seized or porcelain risk |
| Wax ring / base leak | $3-$15 basic, $10-$40 wax-free | $35-$120 + bolts + shims | $225-$450 remove-and-reset | $450-$1,000+ if flange or flooring damage |
| Flange / rocking toilet | $10-$60 (bolts + shims + repair ring) | $50-$180 + wax-free seal | $300-$600 flange + reset | $700-$1,500+ if subfloor or pipe |
| Cracked toilet | (replacement category) | $200-$600+ homeowner-bought | $400-$800+ pro replacement | $800-$2,000+ with shutoff, flange, floor work |
| Pressure-assist / electronic | $20-$150+ model-specific parts | $50-$250+ diagnostic parts | $250-$600 trained diagnosis | $600-$2,500+ if vessel, bidet, or fixture replaced |
In many U.S. markets, high-cost coastal metros run noticeably above these ranges and smaller inland markets run below. Treat the table as homeowner budgeting ranges, not as quotes.
When to Repair vs Replace
The toilet repair guide threshold question: when does fixing stop making sense and replacing become the better call? Repair a tank-part problem first when the bowl and tank are intact, the toilet flushes adequately once adjusted correctly, and the failed part is a flapper, fill valve, lever, chain, or supply connector. Those are routine $5 to $30 replacements with universal-fit options from Fluidmaster or Korky.
Replace instead when small tank parts have been replaced repeatedly and the toilet still clogs, runs, or weak-flushes — at that point, in our view, the underlying fixture design or trapway performance is the recurring limitation, and EPA describes a WaterSense-labeled toilet as a high-performance, water-efficient option worth considering.
For running toilets in this toilet repair guide, the first threshold is water waste. A leaking flapper or fill valve can waste hundreds of gallons per day, so a $5 to $30 part should not be postponed. Replacement-level triggers: damaged flush-valve seat, cracked tank, model that needs discontinued proprietary parts, or a pre-1994 fixture old enough that a current toilet gives better efficiency and reliability.
For clogs and weak flushing, one isolated clog is a repair event. Repeated plunging is a replacement-or-drain-diagnosis decision. If other fixtures also back up or gurgle, replacing the toilet is premature — the problem is downstream drainage. If only one old toilet clogs often and a plumber rules out the drain, replacement with a WaterSense-labeled model is the right call.
For base leaks, a single wax-ring failure is usually worth repairing because the seal is cheap and the toilet can be reset. Replacement becomes more sensible when the porcelain outlet is cracked, the toilet rocks because the base is damaged, flange repair is extensive, or water damage pushes total repair cost close to new-toilet installation cost.
For pressure-assist and intelligent toilets, the threshold is model-specific. Repair when the failed part is available and the manufacturer support path is clear. Replace when vessel, electronics, or proprietary control parts push the job near replacement cost — or when the manufacturer’s support library points to discontinued parts.
A homeowner-friendly threshold rule for the whole toilet repair guide: repair cheap rubber and mechanical parts on a good fixture; replace cracked porcelain immediately; strongly consider replacement for old, inefficient, chronic-problem toilets; and diagnose the drain before replacing a toilet for whole-house backups.
Tools Every Homeowner Should Have
Tooling for the toilet repair guide goes in three tiers. The $30 starter kit handles maybe 70 percent of toilet repair situations: a flange plunger, adjustable wrench or tongue-and-groove pliers, bucket, sponge, towels, nitrile gloves, flashlight, and food coloring (or leak-detection tablets) for tank-leak tests. Add a universal flapper to that kit and you’re ready for clogs, chain adjustment, flapper swaps, and basic tank inspection without a hardware-store run.
The $200 mid-tier kit moves you from tank-only repairs into toilet reset, wax-ring replacement, tank-to-bowl gasket replacement, and most non-damaged-flange work. Add: a 3-6 ft closet auger, 10-12 inch tongue-and-groove pliers, mini hacksaw, nut driver set, putty knife, level, plastic toilet shims, wax-free seal, braided supply connector, universal fill valve, and a tank-to-bowl repair kit.
Professional-grade is less about exotic tools and more about diagnostic capacity and risk control. A pro kit includes a professional closet auger, small inspection camera, wet/dry vacuum, tubing cutter, basin wrench, flange repair assortment, drain-cleaning equipment, and manufacturer-specific parts for Kohler, TOTO, and Flushmate systems. Don’t buy pro drain machines for a one-time toilet clog — main-line clearing is better priced as a service call once a plunger and closet auger fail.
Brand anchors for 2026 sourcing: Fluidmaster and Korky for universal flappers, fill valves, levers, seals, and tank repair kits. Oatey for wax rings, flanges, and floor-connection components. RIDGID and similar plumbing-tool brands for closet augers at big-box retailers.
Toilet Repair Guide: Symptom-First Decision Tree
This toilet repair guide is organized symptom-first because most homeowners know what they’re seeing before they know the part name. Use the symptom you actually see, not the part you think might be wrong. Each entry routes you to the per-issue article that covers that problem with full step-by-step procedure.
| Symptom | Start with this per-issue article | Why |
|---|---|---|
| Bowl rises, drains slowly, you need to plunge | Clogged Toilet: Plunger, Auger, and When to Call a Plumber | Clogs are cleared first with a flange plunger, then a closet auger |
| Water runs after the flush or tank refills by itself | Why Is My Toilet Running? 6 Common Causes | Running toilets trace to flapper/seal, chain, water level, or fill valve |
| Handle jiggles, sticks, or does nothing | Toilet Handle and Chain Repair | The lever and chain control whether the flapper opens and closes |
| Tank fills slowly, hisses, or won’t fill | Toilet Fill Valve Repair and Replacement | Slow, noisy, no-fill symptoms are fill-valve and supply diagnostics |
| Bowl won’t clear unless you hold the handle | Weak Flush and Double-Flush Fixes | Checks include water level, chain, flapper, rim holes, and trapway |
| Clean water near the wall or under the tank side | Toilet Supply Line and Shutoff Valve Leaks | Supply connectors and shutoffs are separate leak points |
| Water appears around the base after flushing | Toilet Leaking at Base: Wax Ring or Flange? | Base leak after flushing points at wax ring, flange, or rocking toilet |
| Tank drips from bolts or the joint between tank and bowl | Tank-to-Bowl Gasket and Bolt Repair | Two-piece toilets use serviceable bolts and tank-to-bowl gaskets |
| Toilet rocks or closet bolts won’t tighten | Wobbly Toilet and Flange Repair | The flange and closet bolts anchor the toilet to the drain opening |
| Visible crack in tank or bowl | Toilet Replacement: When Repair Stops Making Sense | Cracked, leaking porcelain is replacement territory |
| Tank has a sealed pressure vessel | Pressure-Assist Toilet Troubleshooting | Pressure-assist uses model-specific vessels and parts |
| Seat washes, heats, dries, or has a remote | Bidet Seat and Intelligent Toilet Troubleshooting | Electronic toilet features need model-specific support |
Common Mistakes (and How to Avoid Them)
Even with a thorough toilet repair guide in hand, these six mistakes derail more DIY jobs than any others.
Overtightening plastic-to-porcelain connections. Fill-valve shanks, tank bolts, and supply connectors all thread into porcelain. Crack the tank by forcing the wrench and you’ve turned a $20 fix into a replacement. Snug, not tight — then test for leaks and tighten an eighth-turn more if you see drips.
Not shutting off the water first. Sounds basic, but plenty of running-toilet repairs go wrong because somebody started pulling parts before turning the angle stop. Always shut off, drain the tank, sponge out the bottom inch, and verify no water flow at the supply connector before disassembling anything.
Mixing flapper types (universal vs OEM). Universal flappers fit most standard 2-inch flush valves. They don’t fit Kohler canister-flush toilets, Toto G-Max valves, American Standard Champion 4 valves, or 3-inch flush valves. Match the existing flapper to the new part — Korky and Fluidmaster both publish compatibility guides on their packaging and websites.
Forcing a closet auger past resistance. A 3-foot closet auger clears clogs in the bowl and trap. If it won’t pass at a certain depth, the obstruction is deeper than the toilet — likely in the branch drain or main line. Forcing it can damage the porcelain glaze and turn a clog repair into a replacement.
DIY-ing pressure-assist or electronic toilets. These are model-specific systems with proprietary parts, electrical components, and vessel safety considerations. Use the manufacturer’s support path (Flushmate for pressure-assist, Toto/Kohler for electronic features) before buying generic tank parts.
Skipping the drain diagnosis when multiple fixtures back up. The toilet repair guide rule here: if the toilet clogs AND the shower drain is slow AND the kitchen sink gurgles, replacing the toilet won’t fix anything — the drainage system needs attention. A plumber’s $200 diagnostic call beats a $400 replacement that doesn’t solve the problem.
Why start with the toilet? In our data study of 227 real homeowner plumbing posts, toilets were the single most common problem — 36%, more than faucets and drains combined. If yours is running, leaking, or due for a part swap, you are in very good company.
Not sure which part you need? Try our free Faucet, Shower & Toilet Repair Finder – answer a few questions and it points you to the likely part, including the honest flapper-vs-seat call.
How long does a toilet last?
The toilet repair guide answer: porcelain itself can last 30-50+ years. Rubber parts (flappers, fill valves, supply lines) wear out in 5-10 years and need replacement. There’s no universal “replace the toilet at age X” rule — replace porcelain when cracked, replace small parts as they fail, and consider full replacement for pre-1994 inefficient fixtures or chronically-problematic toilets.
Can I use any flapper to replace mine?
This toilet repair guide answer: no. Most 2-inch flush valves accept universal flappers, but 3-inch flush valves, Kohler canister-flush valves, Toto G-Max, and several other modern designs need brand-specific parts. Take a photo of your existing flapper to the store and match it.
Why does my toilet randomly flush itself when nobody’s in the bathroom?
Phantom flushing. The flapper is leaking slowly enough that tank water drops over time, the fill valve kicks on to refill, and you hear it as a random flush. Replace the flapper.
Should I use a chemical drain cleaner on a toilet clog?
No — the toilet repair guide is firm on this one. Chemical drain cleaners don’t dissolve the kinds of obstructions toilets typically clog with (paper, waste, foreign objects), and they can damage porcelain glaze with prolonged contact. Use a flange plunger first, then a closet auger.
Is a $30 toilet just as good as a $400 one?
The toilet repair guide answer depends on what you mean by “good.” Both flush waste effectively if installed correctly. Premium toilets typically have larger trapways (fewer clogs), better glaze (less staining), quieter fills, and more uniform bowl rinses. For a chronic-clog problem, an upgraded fixture often outperforms repairs on the old one.
Do I need a permit to replace my toilet?
Most U.S. jurisdictions don’t require a permit for like-for-like toilet replacement. Permits typically come into play when you’re moving plumbing, changing the rough-in dimensions, or doing work in a finished space subject to inspection. Check your local authority having jurisdiction if you’re unsure.
Why does my new toilet still clog as much as the old one?
Likely a downstream drain issue — branch line, vent, or main. Have a plumber camera the drain before replacing again. Also possible: the new toilet is a low-performing model. Look for EPA WaterSense-labeled fixtures with verified flushing performance.
My toilet base smells like sewage. What’s wrong?
The toilet repair guide diagnostic: failed wax ring, broken closet flange, dry P-trap (rare for toilets — usually only after the toilet’s been unused for weeks), or a vent problem. Start with the wax ring — that’s the cheap fix and the most common cause.
Where to Go Next in This Toilet Repair Guide
If you came to this toilet repair guide from a faucet problem instead, the faucet side of plumbing is already covered in our faucet repair pillar — same approach, same symptom-first structure, currently 5+ published articles covering identification, diagnosis, and the most common repairs.
Before you order parts, find the toilet’s model number. How to Identify Your Toilet Brand and Model walks through the five places to read the tank or bowl number on Kohler, TOTO, American Standard, Gerber, and Mansfield – buying the right flapper, fill valve, or seat the first time saves a return trip to the hardware store.
For broader brand-and-model identification (works across faucets and toilets), How to Identify Faucet Brand and Model covers the identification methods that also apply to your toilet’s tank or fill valve labeling.
And if the problem turns out to be a slow drip you can’t quite locate, Why Is My Faucet Leaking covers the diagnostic patterns that work for any leak-detection puzzle.
The per-issue toilet guides are listed below.
Toilet type and brand identification
- How to Identify Your Toilet Brand and Model [2026]
- What Size Flapper Do I Need? How to Choose the Right Toilet Flapper and Fill Valve [2026]
- How to Identify Your Toilet Fill Valve [2026]
- How to Identify Your Glacier Bay Toilet Parts (the Fluidmaster and Niagara Components Inside) [2026]
- How to Identify Your Toilet Flush Valve [2026]
- How to Identify Your Toilet Flapper by Brand [2026]
- How to Find Your Toilet Model Number [2026]
- How to Identify Kohler Toilet Parts (Canister, AquaPiston, and the Tank Number) [2026]
Step-by-step toilet repair walkthroughs
- How to Replace a Toilet Fill Valve (Stop a Running or Slow-Filling Toilet) [2026]
- How to Replace a Toilet Flush Valve: Step-by-Step Guide [2026]
- How to Replace a Toilet Flapper: The $10 Fix for a Running Toilet [2026]
- How to Adjust Toilet Tank Water Level: Step-by-Step Guide [2026]
- How to Fix a Leaky Toilet Tank: Stop Internal Runs and External Drips [2026]
- How to Fix a Leaky Toilet Bowl: Replace the Wax Ring [2026]
- How to Unclog a Toilet: Plunger, Auger, and What Not to Do [2026]
Tools and replacement parts
Coming soon.
Troubleshooting and diagnostics
Costs and when to hire a pro
- When to Replace the Whole Toilet (vs. Repair) [2026]
- How Much Does It Cost to Replace a Toilet? [2026]
- Cost to Repair a Toilet Flange: DIY vs. Plumber [2026]
Sources
- Fluidmaster toilet problems library
- Korky toilet troubleshooting guide
- Kohler service parts and diagrams
- Toto toilet technology and WASHLET support
- Sloan Flushmate pressure-assist support
- EPA WaterSense residential toilets
- Home Depot how to fix a running toilet
- Home Depot how to unclog a toilet
- Home Depot how to install a toilet
- Lowe’s diagnose and repair toilet problems
- Angi toilet repair cost guide
- Angi toilet installation cost guide
- HomeAdvisor plumber cost guide
- Oatey wax ring gaskets and bolts
- ICC International Plumbing Code
Educational content only. Not a substitute for licensed professional advice. Local plumbing codes vary by jurisdiction. Use of any guidance from this guide is at your own risk.