
The flush valve is the center assembly in your toilet tank — the overflow tube, the valve seat, and the rubber seal (flapper or canister) that holds water until you flush. When the seat corrodes, the overflow tube cracks, or the valve body fails, the toilet runs constantly and no flapper swap will fix it. How to replace a toilet flush valve is a tank-off repair — you need to lift the tank off the bowl — but it’s beginner-appropriate for a standard two-piece gravity toilet once you have the right part. Budget $7 to $30 for parts (depending on valve type) and 1 to 2 hours for the repair (Home Depot, This Old House).
How to Replace a Toilet Flush Valve: Confirm the Diagnosis First
The most common avoidable over-repair in toilet troubleshooting is replacing the entire flush valve when the flapper is the real problem. Home Depot’s guidance is direct: try replacing the flapper first — only replace the flush valve if that doesn’t stop the leak (Home Depot).
Run a dye test before opening anything. Put food coloring in the tank and wait 10 minutes without flushing. Color in the bowl means water is leaking through the valve — but the leak is often the $5 flapper, not the $20 flush valve. Start with a flapper swap. If the flapper is clearly new, or if you’ve replaced the flapper multiple times and the running recurs, inspect closer: a corroded seat, cracked overflow tube, or damaged valve body means the flush valve itself needs replacing (EPA WaterSense).
Also rule out the fill valve. If water is rising into and over the overflow tube — not leaking past the seat — that’s a fill-valve problem, not a flush-valve problem. See our fill valve replacement guide for that repair. A running toilet wastes significant water regardless of cause — use our Water-Waste Calculator to see what the leak is adding to your water bill before deciding which repair to start with.
Which Flush Valve Fits Your Toilet
The most important step before buying anything is identifying your valve family. There are three, and they are not interchangeable.
Standard 2-inch flapper-style valves. The majority of homes built before roughly 2010 use this design. A Fluidmaster 507A ($6.52 at Home Depot) covers a basic replacement; the more complete Fluidmaster 507AKP7 kit ($15.59 at SupplyHouse, includes valve, flapper, brass tank bolts, and gasket) is the better buy if you want everything in one box (Home Depot, SupplyHouse).
Large 3-inch or 4-inch flapper-style valves. Common in many post-2000 two-piece toilets. The Korky 5030BP ($21.50 to $22.49 depending on retailer) fits most of these — it adjusts from 7 to 11¼ inches without tools and includes the valve, flapper, gasket, and hardware (SupplyHouse, Korky). Critical caveat: the Korky 5030BP does not fit Kohler toilets (Korky).
Canister/tower valves (Kohler AquaPiston, American Standard Champion). Proprietary designs that need brand-specific parts. For Kohler Cimarron and similar Class 3/5/6 models, Kohler K-1083980 runs $21.33 at SupplyHouse to $29.03 direct from Kohler (Kohler, SupplyHouse). OEM matters here — Kohler’s instructions require aligning canister tabs and rods with a matching base that aftermarket parts don’t replicate (Kohler service PDF).
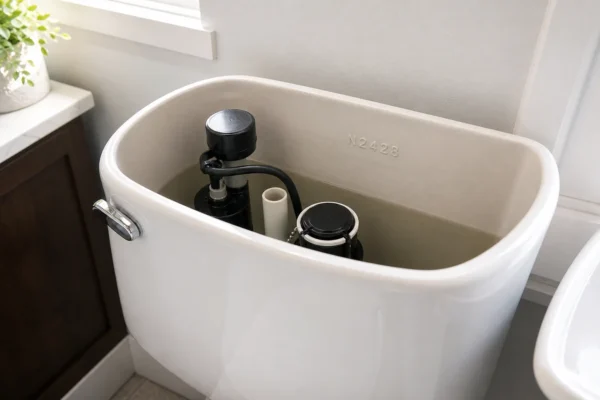
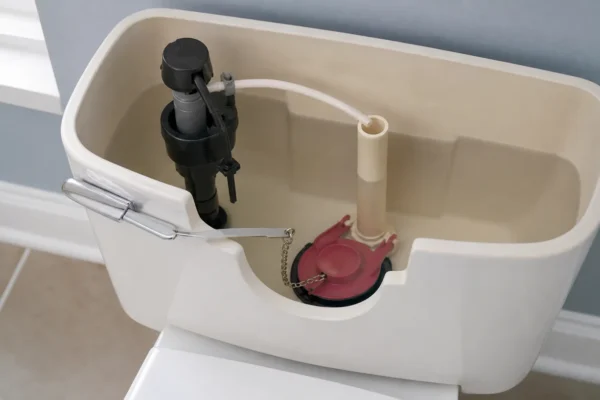
To tell the valve families apart: remove the tank lid and look at the opening at the bottom. A 2-inch circular seat with a standard rubber flapper = first family. A larger 3-inch opening with a flapper = second. A tall cylinder or tower rising from the center with no flapper = canister valve. Also read the model number stamped or printed on the inside back wall of the tank — Kohler specifically says to look there before buying K-1083980 (Kohler).
Tools and Materials
Every how to replace a toilet flush valve job uses the same core set of tools. Gather everything below before starting — a mid-repair supply run means a wet floor.
- Replacement flush valve kit (matched to your valve family, with tank-to-bowl gasket and hardware)
- Slip-joint (channel-lock) pliers or a spud wrench — for the large plastic flush-valve nut
- Adjustable wrench — for supply-line and tank-bolt nuts
- Slotted screwdriver — to hold tank bolt heads inside the tank
- Sponge or wet/dry vacuum — for residual tank water
- Towels and a small bucket
- Phone or camera — to photograph chain attachment and refill-tube routing before removal
Home Depot specifically lists a spud wrench or slip-joint pliers as essential for the flush-valve nut; the regular adjustable wrench handles everything else (Home Depot).
How to Replace a Toilet Flush Valve: Step-by-Step
Before starting the how to replace a toilet flush valve repair, photograph the inside of the tank — chain attachment point, refill-tube routing, overflow height — so you have a reference for reassembly.
Shut off water and drain the tank
Turn the stop valve behind the toilet clockwise until it stops. Flush and hold the handle down to drain as much water as possible, then sponge out the remaining inch at the bottom. Set towels under the supply connection. Disconnect the supply line from the fill-valve shank (by hand, or with a wrench if needed). Disconnect the refill tube from the overflow tube and unhook the flapper chain or canister linkage from the trip lever (Home Depot, This Old House).
Remove the tank
From underneath the bowl rim, unscrew the tank-to-bowl nuts while holding the bolt heads inside the tank with a screwdriver so they don’t spin. Once both nuts are off, lift the tank straight up and set it upside down on a folded towel — you need access to the flush-valve nut from the underside (Home Depot).
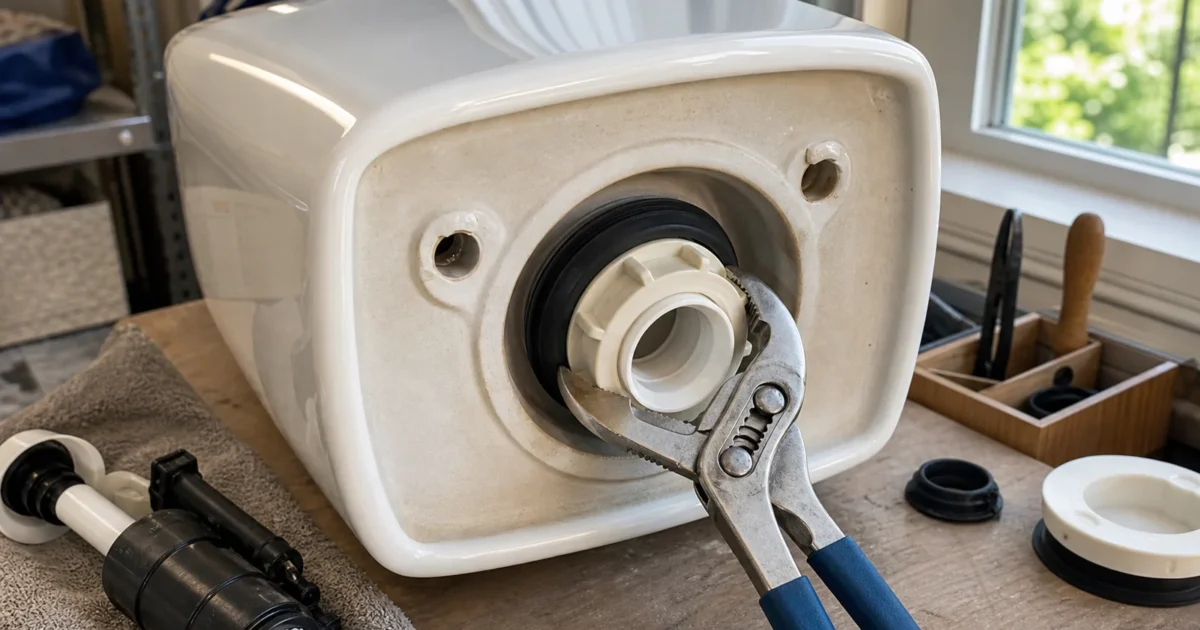
Remove the old flush valve
Peel off the old tank-to-bowl gasket — the sponge-rubber ring around the flush-valve outlet. With slip-joint pliers or a spud wrench, unscrew the large plastic flush-valve nut counterclockwise and lift the old valve out through the top of the tank. Clean the porcelain opening thoroughly, remove any old gasket residue, and inspect for cracks before continuing (This Old House).
Set the overflow height before tightening (critical)
For a standard Fluidmaster-style 2-inch valve, pre-set the overflow tube height before any tightening. Fluidmaster’s instructions require the top of the overflow tube to sit 1 inch below the bottom of the tank lever hole, with the water level set at ½ inch below the overflow top (Fluidmaster 507AK instructions). Setting this wrong after installation means draining and disassembling again.
Insert the valve through the tank hole with the overflow tube oriented toward the back of the tank and not covering the tank bolt holes. Thread the large plastic locknut from below by hand, then tighten it exactly ½ turn beyond hand-tight with pliers — stop there. Fluidmaster expressly warns that overtightening distorts the gasket and causes the leak you’re trying to fix (Fluidmaster 507AK instructions). Place the new tank-to-bowl gasket over the locknut so the gasket covers it.
Reinstall the tank
Replace the tank bolts and rubber washers if the old ones are corroded. Set the tank-to-bowl gasket squarely on the flush-valve outlet, lower the tank straight onto the bowl, and start the nuts finger-tight. Alternate between sides when tightening — snug both evenly rather than fully torqueing one side at a time. Overtightening tank nuts cracks porcelain — both This Old House and American Standard call this out (This Old House).
Reconnect and test
Reconnect the refill tube to the overflow tube. Reconnect the supply line. Open the stop valve slowly and check with dry tissue around the supply nut, fill-valve shank, tank bolts, and tank-to-bowl joint. Flush several times and confirm water stops below the overflow tube top. If the original symptom was ghost flushing, run the dye test again — EPA WaterSense recommends flushing after the test to avoid staining (EPA WaterSense).
Brand-Specific Notes: Kohler, American Standard, and Large-Valve Korky
The standard how to replace a toilet flush valve procedure above covers most two-piece gravity toilets. The notes below apply when the toilet deviates from the standard design.
Kohler canister toilets: don’t automatically remove the valve base. Kohler states the base may not need replacement and is difficult to remove — a worn seal may need only the canister portion replaced. Kohler’s canister removal procedure: shut off water, flush until empty, disconnect the trip-lever chain, lift the canister, grasp the rod, turn it ¼ turn, and remove. If the base must come out, Kohler says to apply dish soap between the gasket and replacement-base flange, align the tabs with tank slots, compress, turn until the tabs secure, then realign the canister and turn the rod ¼ turn to lock it (Kohler service PDF). Again — Korky’s 5030 does not fit Kohler (Korky).
American Standard Champion two-piece toilets: Champion uses specific parts — hair-pin cotters, clevis pins, vent-tube orientation, and refill-tube trimming are all spelled out in the model instructions. Install with the vent tube positioned as shown, trim 2 inches from the refill tube, tighten the locknut hand-tight plus ¾ turn (American Standard’s spec differs from Fluidmaster’s ½ turn), and align the locknut flat parallel to the back edge of the tank (American Standard FAQ, Champion4 instructions).
Korky 5030 large valve: adjust overflow height using the built-in adjustment — it goes from 7 to 11¼ inches without tools or a hacksaw. The rest of the removal, tightening, and test workflow is the same as the standard 2-inch replacement. The Korky 5030BP kit includes the flush valve, flapper, tank-to-bowl gasket, nuts, bolts, and washers (Korky).
Common Mistakes to Avoid
Five mistakes come up repeatedly in how to replace a toilet flush valve jobs — and every one is preventable.
Replacing the valve before the flapper. A $5 to $15 flapper swap fixes most running toilets. Dye-test first; flush valve replacement is the right call only when a new flapper doesn’t stop the leak or when the seat/tube is visibly damaged (EPA WaterSense, Home Depot).
Buying the wrong valve family. A 2-inch Fluidmaster won’t seat in a 3-inch opening. The Korky 5030 won’t fit a Kohler canister toilet. Read the tank model number and measure the flush-valve opening before purchasing.
Overtightening the flush-valve nut. Fluidmaster says hand-tight plus ½ turn — stop there. Overtightening distorts the gasket and leaks. American Standard’s spec is hand-tight plus ¾ turn. Two different specs for two different valve systems — follow the instructions for the part you have (Fluidmaster 507AK instructions, Champion4 instructions).
Setting the overflow tube too high or low. Too high: water runs constantly over the tube into the bowl. Too low: tank fills below normal. Fluidmaster’s spec is 1 inch below the tank lever hole — set this before tightening the nut (Fluidmaster 507AK instructions).
Using in-tank chlorine drop-in cleaners after the repair. Bleach tablets degrade rubber seals and can void warranties — Fluidmaster warns against them explicitly, and Kohler’s installation literature says in-tank cleaners void coverage (Fluidmaster, Kohler PDF).
Avoiding these five mistakes is what separates a clean how to replace a toilet flush valve job from a second trip to the hardware store.
When to Call a Plumber Instead
A standard two-piece gravity toilet is beginner-appropriate for how to replace a toilet flush valve — Home Depot rates this repair as “beginner” and “under 2 hours” (Home Depot). Call a plumber if:
- The stop valve won’t fully close, is frozen, or weeps at the stem when you try to shut it off (Angi notes stuck shutoffs are a common complication on toilet valve work) (Angi)
- The supply line is rigid copper or soldered
- Tank bolts are rusted solid
- You see cracks in the porcelain tank when you lift it
- The toilet is one-piece, wall-hung, pressure-assist, or a commercial flushometer design
- The model number is unreadable and you can’t confirm the valve family before disassembly
- The toilet is a pre-2000 lowboy or specialty design where generic valves may not balance correctly (Terry Love)
If you call a plumber, expect $50 to $150 for the valve replacement itself — within a service-call visit that typically runs $150 to $250. Angi puts running-toilet repairs in the $100 to $400 range, with labor at 60% to 75% of the total cost (Angi).
What to Do Next
If this how to replace a toilet flush valve walkthrough fixed the running toilet, the rest of the toilet repair cluster is at The Complete Guide to Toilet Repair.
If the toilet still runs after the repair, the next check is our running toilet diagnostic guide — there may be a fill-valve level issue or a residual flapper problem.
| Symptom | Most likely cause | First check |
|---|---|---|
| Toilet runs constantly; dye appears in bowl | Flapper or flush-valve seat | Dye test — replace flapper first |
| Toilet still runs after new flapper | Flush-valve seat corroded or damaged | Inspect seat; replace flush valve |
| Water overflows the overflow tube | Fill valve or water level too high | Adjust fill valve — not flush valve |
| Weak flush after valve replacement | Overflow tube set too high | Lower tube to 1 in. below lever hole |
| Leak at tank-to-bowl joint | Gasket misaligned or nut overtightened | Re-seat gasket; back off nut slightly |
| Phantom flush (brief runs at intervals) | Flapper not sealing; chain slack wrong | Dye test; adjust chain to ½ in. slack |
Use this table alongside the how to replace a toilet flush valve steps above to identify which part is causing the symptom before ordering a part.
Frequently Asked Questions: How to Replace a Toilet Flush Valve
Can I replace just the flapper instead of the whole flush valve? Yes — and you should try that first. How to replace a toilet flush valve is a tank-off repair; a flapper swap is not. The flush valve is the full center assembly; the flapper is just the rubber seal at its base. A new flapper costs $5 to $15 and takes 15 minutes. A full flush valve replacement costs $7 to $30 and requires removing the tank. Home Depot’s advice is clear: try the flapper first, and replace the flush valve only if the problem persists.
How do I know if I have a 2-inch or 3-inch flush valve? Remove the tank lid and look at the opening at the bottom. Measure the hole the flapper covers. A roughly 2-inch opening takes a standard 2-inch valve (Fluidmaster 507A series). A larger opening around 3 inches takes a large-valve kit (Korky 5030BP for most non-Kohler toilets). If you’re unsure, read the model number off the inside back wall of the tank and look it up on the manufacturer’s parts page.
Does Kohler use a standard flush valve? No. Kohler’s AquaPiston and similar canister toilets use a tower/canister design — no standard flapper. Generic aftermarket valves like the Korky 5030BP explicitly exclude Kohler. For Kohler canister toilets, use OEM part K-1083980 for Cimarron-style models, or look up your exact model on Kohler’s parts finder.
Can in-tank bleach tablets damage a new flush valve? Yes. Fluidmaster explicitly warns against in-tank drop-in cleaners containing bleach or chlorine — they degrade rubber seals and can lead to the same running problem you just fixed. Kohler’s installation literature says in-tank cleaners void warranty coverage. Switch to liquid or clip-on rim cleaners after the repair.
How long does replacing a toilet flush valve take? Home Depot rates how to replace a toilet flush valve as under 2 hours for a beginner. This Old House estimates 30 to 60 minutes for the flush-valve work once the water is shut off and the tank is drained. First-timers should add time to read the specific manufacturer instructions, dry the tank interior before lifting it, and run the post-repair dye test.
Sources
- Home Depot: How to Install a Flush Valve
- This Old House: How to Repair a Noisy Toilet
- EPA WaterSense: Home Maintenance (dye test and water use)
- EPA WaterSense: Residential Toilets
- Fluidmaster 507AK Installation Instructions
- Fluidmaster: Protect Toilet Parts from Automatic Cleaners
- Korky 5030BP Large 3-Inch/4-Inch Flush Valve Kit
- Kohler K-1083980 3-Inch Canister Flush Valve Kit
- Kohler Canister Flush Valve Service Instructions (PDF)
- Kohler In-Tank Cleaner Warranty Note (PDF)
- Kohler: Running/Leaking Toilet Troubleshooting
- American Standard Champion Flush Valve FAQ
- American Standard Champion4 Instructions (ManualsLib)
- Angi: Toilet Repair Cost Guide
- Angi: Fill Valve Guide (stuck shutoff caution)
- SupplyHouse: Fluidmaster 507AKP7 Complete Flush Valve Kit
- SupplyHouse: Korky 5030BP Large 3-Inch Adjustable Flush Valve Kit
- SupplyHouse: Kohler K-1083980 3-Inch Canister Flush Valve Kit
- Terry Love: Generic Parts Discussion (older/lowboy toilets)
Educational content only. Not a substitute for licensed professional advice. Local plumbing codes vary by jurisdiction. Use of any guidance from this guide is at your own risk.
Get the homeowner’s plumbing repair toolkit checklist — the tools, parts, and decisions every homeowner should have on hand. [Free download — enter your email]
Parts for this repair
As an Amazon Associate, plumbingbythebook earns from qualifying purchases. Links below are affiliate links — they cost you nothing extra.
- Fluidmaster 507AKP7 Complete 2-Inch Flush Valve Kit — The standard universal 2-inch kit — includes valve, flapper, brass tank bolts, and tank-to-bowl gasket. Fits virtually all 2-inch flapper-style toilets.
- Korky 5030BP Large 3-Inch Adjustable Flush Valve Kit — For most non-Kohler toilets with a 3-inch flush valve. Height adjusts 7–11¼ in. without a hacksaw. Does NOT fit Kohler toilets.
- Kohler K-1083980 3-Inch Canister Flush Valve Kit — OEM canister kit for Kohler Cimarron and similar Class 3/5/6 toilets. Use OEM — aftermarket canisters don’t align tabs correctly.
Tools for this repair
As an Amazon Associate, plumbingbythebook earns from qualifying purchases. Links below are affiliate links — they cost you nothing extra.
- Slip-Joint (Channel-Lock) Pliers — Essential for breaking loose the large plastic flush-valve locknut under the tank — the wrench that does the heavy lifting here.
- Adjustable Wrench — Supply-line coupling nut and tank-bolt nuts — the supporting cast for the channel-lock’s starring role.
- Sponge and Bucket Set — Sponge out the last inch of tank water before lifting the tank. Skipping this step creates a mess on the floor.
Related guides

When to Replace the Whole Toilet (vs. Repair) [2026]
If your toilet just needs a $10 flapper, replacing the whole thing is a waste of money. But…
How to Identify Your Glacier Bay Toilet Parts (the Fluidmaster and Niagara Components Inside) [2026]
How to Identify Your Glacier Bay Toilet Parts (the Fluidmaster and Niagara Components Inside) [2026] The whole trick…
What Size Flapper Do I Need? How to Choose the Right Toilet Flapper and Fill Valve [2026]
Your toilet is running, ghost-flushing, or refilling every few minutes with no one touching the handle. You’ve pulled…