
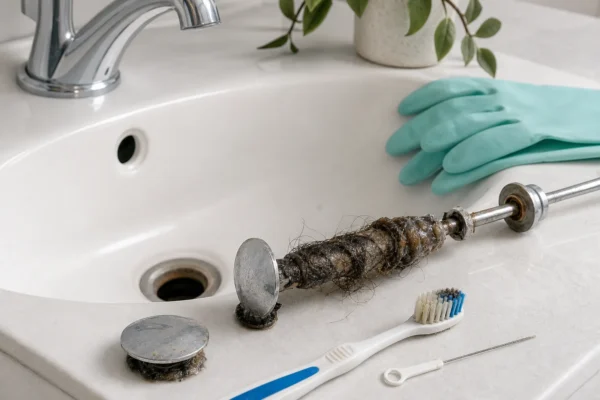
A slow-draining sink or a backed-up tub is one of those problems that feels urgent — and knowing how to use a drain snake correctly makes the difference between clearing the line in 20 minutes and making things worse. The technique is not complicated, but a handful of non-obvious mistakes — using the wrong tool for the fixture, forcing the cable when it stops turning, feeding the cable through the wrong access point in a bathtub — can scratch porcelain, kink the cable, or turn a simple clog into a bigger repair.
If the snake will not clear it, that is a sign of a deeper blockage and when to call a plumber.
This guide on how to use a drain snake covers the right tool for each fixture, the safety gear you actually need, the step-by-step procedure for sinks, tubs, showers, and toilets, and the seven most common mistakes. Every procedure here is sourced directly from RIDGID’s published operator manuals and manufacturer product pages, not plumbing forum lore. Every step reflects RIDGID’s actual instructions on how to use a drain snake on each fixture type.
Time: 20–45 minutes per fixture. Cost: $0 if you already own the right tool; $35–$110 to purchase (see the pricing table below). Skill level: beginner-friendly with a few non-obvious cautions.
How to Use a Drain Snake: Know Your Tool Before You Start
Not all drain snakes are interchangeable — and picking the wrong one is the most common mistake homeowners make. Two categories cover almost every household clog:
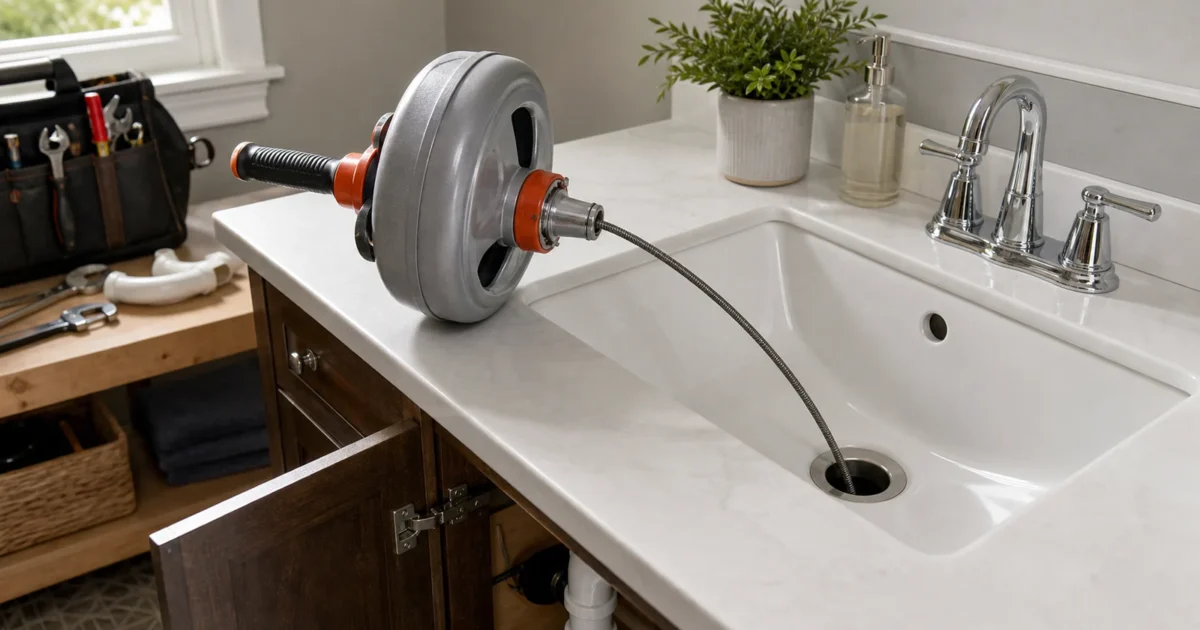
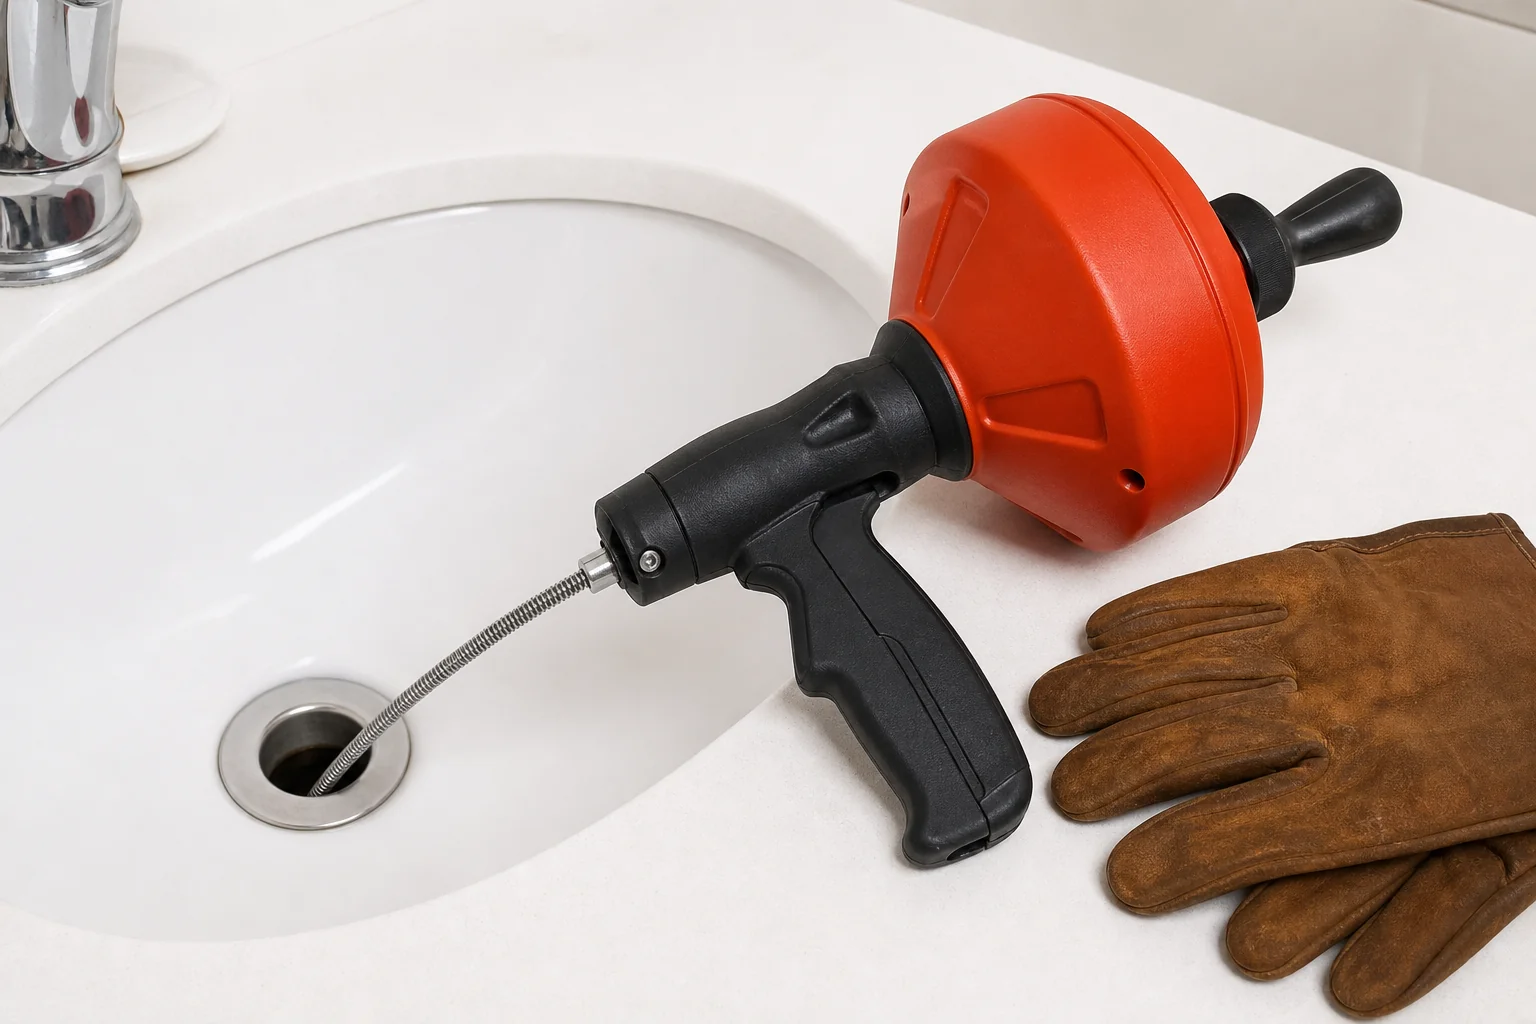
Hand spinners (hand augers, drum augers) — for sinks, tubs, and shower branch drains. The RIDGID POWER SPIN+ (catalog #57043) is the standard homeowner model: a 1/4-inch by 25-foot MAXCORE cable with AUTOFEED advance and retract, rated for 3/4-inch to 2-inch pipe. RIDGID’s operator manual explicitly states it is not recommended for toilets. The geometry of a toilet’s internal trap binds hand-spinner cable, and an unsheathed cable rubbing against porcelain causes scratches. The RIDGID KWIK-SPIN+ (#57038) is a lighter option suited to smaller sink and shower clogs in drains up to 1-1/2 inches.
Toilet augers (closet augers) — for toilets only. The RIDGID K-3 (#59787) is the go-to homeowner model: a 3-foot, 1/2-inch cable with a vinyl guide tube that keeps the cable sheathed against the porcelain until it reaches the drain opening. The RIDGID K-6P (#56658) extends reach to 6 feet with optional battery-drill drive — better when the clog is past the toilet’s internal trap but still within auger range.
The practical rule: if it has a guide tube and a bent housing designed to enter a toilet drain, it’s a toilet auger. Everything else is a hand spinner. If you own only a hand spinner and are facing a toilet clog, stop and get a toilet auger before proceeding.
What You’ll Need
RIDGID’s POWER SPIN+ operator’s manual requires eye protection and leather work gloves before handling or operating the cable. Add latex or rubber gloves under the leather gloves if chemical residue, bacteria, or other hazardous material may be present in the drain — and if you poured a liquid drain cleaner before trying the snake, that condition applies.
Required: – The correct auger for the fixture (hand spinner for sink, tub, or shower; toilet auger for toilets) – Leather work gloves (required per RIDGID manual) – Safety glasses or goggles – A bucket and old towels to catch trap water – A flashlight
Optional but useful: – A battery drill (RIDGID POWER SPIN+ and K-6P support drill drive; maximum 500 RPM — RIDGID explicitly prohibits corded drills due to electrical shock risk near water) – A headlamp to keep both hands free – Slip-joint pliers and a flathead screwdriver to remove pop-up drain plugs or shower drain covers – A small container for P-trap water when removing a trap for access – A drain camera for lines that clog repeatedly or have unknown pipe conditions
Before inserting the cable, inspect the auger for missing parts, cable flats, excessive kinks, stretched cable, or corrosion. RIDGID’s manual says these conditions weaken the cable and increase the risk of kinking or breaking during use — replace a damaged cable before starting.
How to Use a Drain Snake on a Sink, Tub, or Shower
Check for chemicals in the pipe
Determine whether a liquid drain cleaner was poured before you arrived. RIDGID’s manual instructs users to identify any chemicals present and contact the chemical manufacturer for safety guidance before proceeding. If a chemical cleaner is in the line, wear full PPE, avoid splashing, and ventilate the area — or escalate to a plumber and tell them exactly what product was used.
Access the drain
Bathroom sink with a pop-up drain plug: remove the lift rod from the drain body and pull out the drain plug. Place a bucket under the P-trap or cleanout to catch water that will spill when the trap is opened or the cable enters.
Kitchen or utility sink without a pop-up: thread the cable directly through the drain crossbars, or remove the P-trap if the clog is seated in the trap itself.
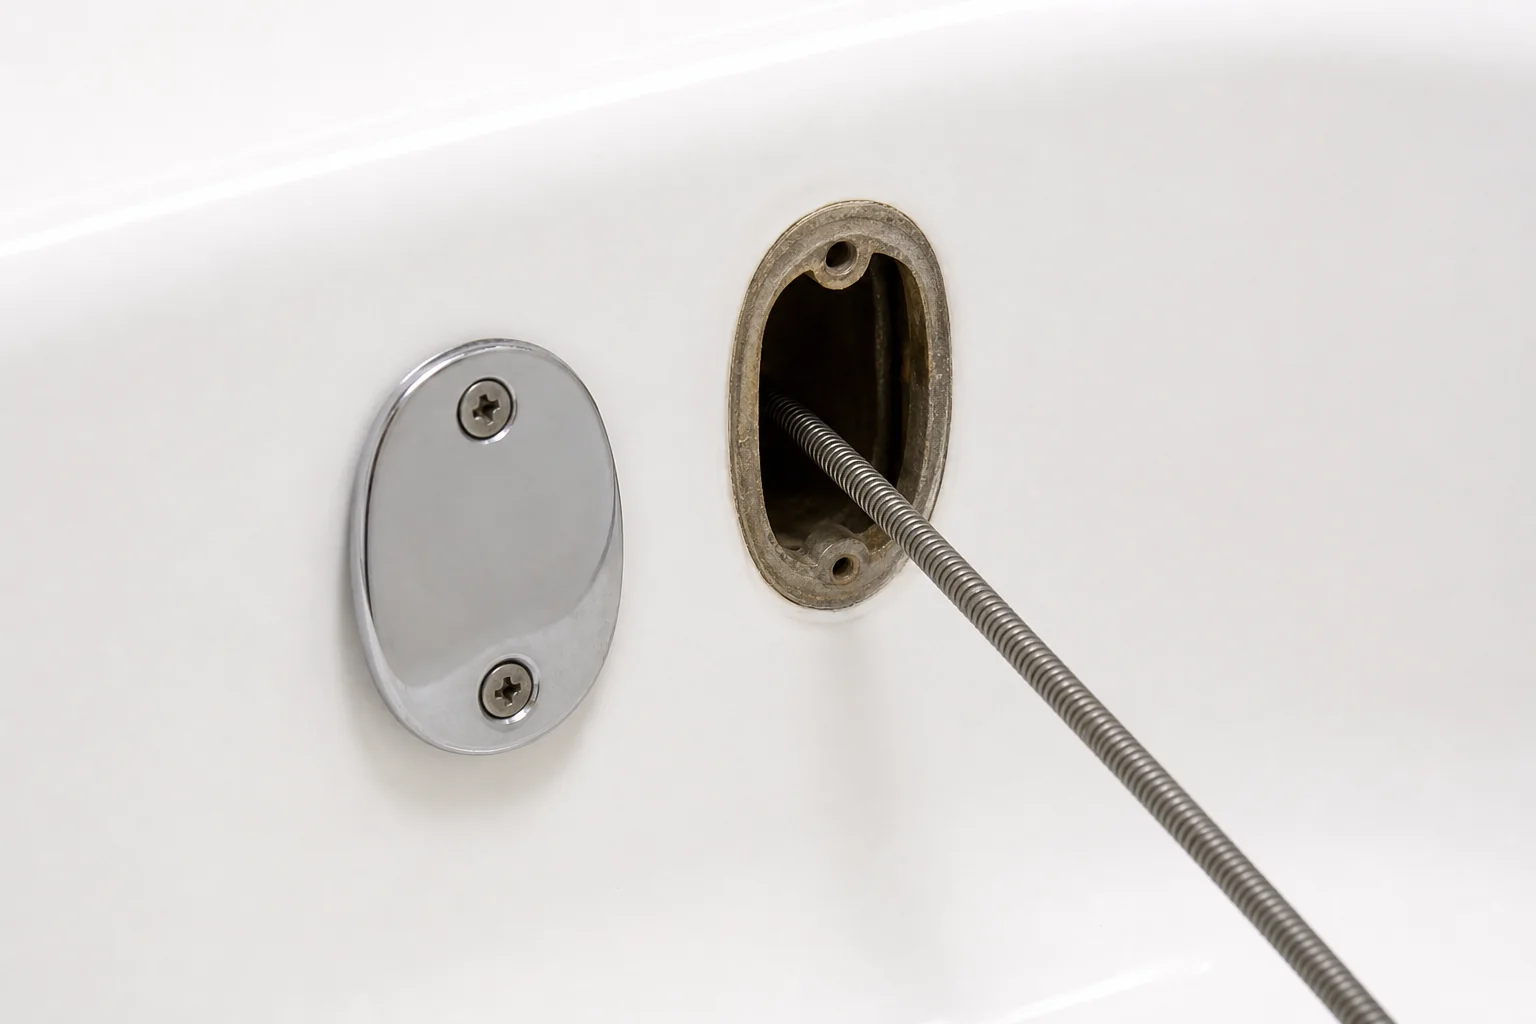
Bathtub: do not enter through the drain opening. RIDGID’s manual states that going through the bathtub drain opening will damage the cable. The correct entry point is the overflow plate — the oval or round chrome cover on the interior tub wall above the waterline, typically held by two screws. Remove the plate and pull out the overflow mechanism, then feed the cable through that opening.
Shower: Remove the drain strainer (most unscrew or pry out with a flathead). The cable feeds directly down through the drain opening.
Position the tool and feed the cable
Position the RIDGID POWER SPIN+ drum within 4 inches of the drain opening throughout the job — RIDGID’s manual specifies this distance to prevent the exposed cable between the drum and the drain from whipping or buckling. Pull cable from the drum and push it into the pipe until you have at least 1 foot inside the drain before you begin rotation, so the cable cannot flip back out.
Rotate the drum clockwise and squeeze the AUTOFEED trigger to advance. For battery-drill drive: forward (clockwise) rotation, low-speed setting, under 500 RPM. Keep hands dry before inserting the drill battery.
Work the clog
Continue advancing until you feel resistance. At that point, stop advancing — RIDGID’s manual says a cable that stops turning freely is not cleaning the drain. Instead:
- Spin in place at the clog to break up soft material
- Try short, sharp in-and-out thrusts while rotating — this helps the cable negotiate the angles in a trap
- Advance very slowly if the material is soft enough to compress and allow progress
If the cable catches and won’t retract freely: stop rotation immediately, back the cable out with reverse rotation (briefly — RIDGID warns extended reverse damages cable), remove any debris from the cable end, inspect for kinks, and restart from that position.
Do not continue rotating a stuck cable. Both the POWER SPIN+ manual and the K-6P instructions warn that a stuck cable that keeps rotating will twist, kink, and eventually break.
Flush and retract
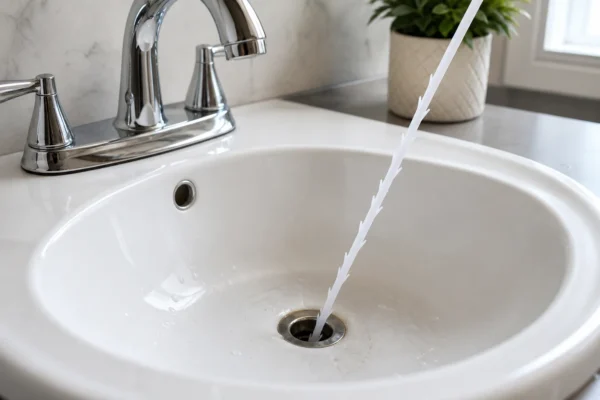
Once the drain runs freely, turn on a strong stream of water to flush debris down the line. RIDGID recommends several passes through the line for thorough cleaning — run the cable in a second time after the initial clear.
To retract: rotate the drum counterclockwise while squeezing the trigger. Stop rotation completely before pulling the cable end out of the drain.
After use, flush the cable, drum, and AUTOFEED mechanism thoroughly with water, and tip the drum forward to drain any trapped water inside. Wash any exposed skin with hot soapy water. RIDGID’s manual also says not to eat or smoke while handling drain-cleaning equipment.
How to Use a Toilet Auger (Closet Auger)
A toilet clog requires a different tool — a closet auger — and a different technique. Here is the procedure for the RIDGID K-3 or K-6P.
Retract the cable fully into the guide tube before inserting the auger into the toilet. Tilt the housing as needed to align the guide tube end with the drain opening at the bottom of the bowl — RIDGID’s K-6P instructions say the guide tube end must be inside the drain at all times to support the cable and prevent whipping, and they warn that both the cable and cutter can damage porcelain if they contact the bowl surface without the guide tube in position.
Rotate the crank handle clockwise while pushing it toward the guide tube to advance the cable. RIDGID says sharp in-and-out thrusts — with and without rotation — help the cable navigate the toilet’s internal trap geometry. Use reverse rotation only briefly while advancing through the trap; the K-6P instructions warn that prolonged reverse operation damages cable.
To retrieve the cable, reverse the process: maintain clockwise forward rotation while slowly drawing the cable back toward the guide tube. Do not remove the guide tube from the drain until the cable is fully retracted and rotation has completely stopped. Flush the cable with clean water after use to prevent corrosion from drain-cleaning compounds.
If the toilet auger repeatedly catches on an obstruction but cannot clear it — particularly if the blockage feels rigid rather than compressible — stop and escalate. A solid object (toy, tool, bottle cap) in a toilet trap requires a grappler hook or removal of the toilet itself, not more auger force. Continued forcing risks cracking the porcelain or breaking the internal toilet trap.
7 Drain Snake Mistakes That Make Things Worse
Understanding how to use a drain snake correctly means avoiding the following seven errors — any one can damage the equipment, scratch the fixture, or turn a simple clog into a bigger repair.
1. Using a hand spinner in a toilet. The toilet’s trap geometry binds hand-spinner cable, and an unguarded cable scratches porcelain. Toilet auger only, every time.
2. Forcing the cable. When the drum becomes hard to rotate or the cable stops advancing, it is kinking — not cleaning. Back off, spin in place, advance slowly.
3. Too much cable unsupported outside the drain. More than 4 inches of unsupported cable between the drum and the drain opening buckles and whips. Keep the drum close.
4. Entering a bathtub through the drain opening. The geometry of the tub drain damages the cable immediately. Always remove the overflow plate and enter through that opening.
5. Using a corded drill. Both the POWER SPIN+ manual and the K-6P instructions prohibit corded drills due to shock risk. Battery drill only, under 500 RPM.
6. Continuing to rotate a stuck cable. A stuck cable that keeps rotating will kink or break. Stop, back out with brief reverse rotation, clear debris from the cable end, and restart.
7. Ignoring chemicals already in the pipe. A pipe that contains liquid drain cleaner is a splash hazard the moment the cable enters. Full PPE is required, and the cable disturbance can force chemical-laden water back toward you. When in doubt, escalate.
When to Call a Plumber Instead of Snaking Yourself
Knowing how to use a drain snake means recognizing when it is the right tool. A hand auger or toilet auger is the right tool for a single clogged fixture that hasn’t been dosed with chemicals, where the cable advances without repeated binding — but it is not the right tool for several other situations.
Multiple fixtures clogged at once is a main-line warning sign. Angi’s 2026 drain-cleaning cost data identifies multiple clogged drains, water backing up into a tub or shower when a toilet flushes, sulfur odor, bubbling or gurgling drains, yard depressions, and soggy grass as indicators of a sewer-main problem. A hand auger reaches the branch drain for one fixture — it cannot address a main-line failure, and attempting to snake past the branch into the main risks losing the cable in the larger pipe.
Old or fragile pipe material raises the risk of damage during cleaning. RIDGID’s manual specifically warns that drains in poor condition — galvanized steel, cast iron, lead bends, brittle plastic, corroded traps — can be damaged by drain cleaning. RIDGID says camera inspection is the best way to evaluate pipe condition before cleaning. For pre-1960 homes with original drain plumbing, a camera inspection before snaking is the safer first step.
Repeated cable binding in the same spot suggests a root intrusion, collapsed section, or severe mineral scaling — none of which a hand auger resolves. Professional drain cleaning with a camera assessment costs $147 to $352 according to Angi’s 2026 data, with an average of about $246. That cost covers diagnosis that a hand tool cannot provide.
For a full framework on when to DIY drain problems versus escalating — including how to use a drain snake safely on aging pipe materials — see the complete drain repair guide.
Quick Reference: Tool, Entry Point, and Key Caution by Fixture
The table below summarizes how to use a drain snake for each fixture type, with the correct entry point and the single most important caution.
| Fixture | Correct tool | Entry point | Key caution |
|---|---|---|---|
| Bathroom sink | Hand spinner (RIDGID POWER SPIN+) | Drain opening or P-trap cleanout | Remove pop-up plug first; keep drum within 4 in. of drain |
| Kitchen sink | Hand spinner | Drain opening or remove P-trap | Trap often holds grease — remove it for direct cable access |
| Bathtub | Hand spinner | Overflow plate opening — not the drain | Cable through the drain opening damages immediately |
| Shower | Hand spinner | Drain opening (remove strainer cover) | Straightforward entry; remove hair strainer first |
| Toilet | Closet auger ONLY | Toilet drain opening | Guide tube must remain in the drain; no hand spinners |
Pricing Guide: What Drain Snakes Cost in 2026
Once you know how to use a drain snake, matching the right tool to the job is the next step. Manufacturer pages provide specifications and retailer links but not stable MSRP fields — verify current pricing at checkout.
| Tool | Use case | Key specs | 2026 price range | Notes |
|---|---|---|---|---|
| RIDGID POWER SPIN+ (#57043) | Sinks, tubs, showers | 1/4 in. × 25 ft cable; 3/4–2 in. pipe capacity; battery-drill compatible | ~$55–$75 | Available at Home Depot, Lowe’s, authorized RIDGID retailers |
| RIDGID KWIK-SPIN+ (#57038) | Light sink/shower clogs | 25 ft of 1/4 in. MAXCORE cable; 1/2–1-1/2 in. drain capacity | ~$35–$50 | Better for minor clogs; less reach than POWER SPIN+ |
| RIDGID K-3 (#59787) | Toilets | 3 ft, 1/2 in. cable; vinyl guard; bulb head | ~$45–$65 | Correct homeowner tool for ordinary toilet-trap clogs |
| RIDGID K-6P (#56658) | Deeper toilet clogs | 6 ft, 1/2 in. cable; battery-drill compatible | ~$75–$110 | For clogs past the trap; bulb-head or drop-head variants |
| RIDGID replacement cable (#42163) | POWER SPIN+ cable replacement | MAXCORE 1/4 in. cable | ~$20–$35 | OEM replacement for POWER SPIN+; RIDGID identifies 42163 as the correct cable |
Can I use a regular drain snake in a toilet?
No. The first rule of how to use a drain snake is matching the tool to the fixture: a standard hand spinner — including the RIDGID POWER SPIN+ — is explicitly not recommended for toilets per RIDGID’s operator manual. The toilet’s internal trap geometry binds hand-spinner cable, and the unsheathed cable scratches porcelain. Use a closet auger (toilet auger) with a protective guide tube for any toilet clog.
What do I do if the cable gets stuck in the drain?
The stuck-cable situation is one of the most important limits to understand when you learn how to use a drain snake. Stop rotating immediately — continuing to turn a stuck cable twists and kinks it, sometimes permanently. Use reverse rotation briefly to back the cable out, remove any debris clinging to the cable end, inspect the cable for damage (flats, kinks, corrosion), and restart. If the cable repeatedly catches without passing the obstruction, the blockage may be a solid object or structural damage that requires a plumber.
How far should I run the cable?
Cable depth is one of the key safety boundaries to know when you learn how to use a drain snake. For a sink, tub, or shower branch drain, most clogs sit within 5–15 feet of the fixture. The RIDGID POWER SPIN+’s 25-foot cable covers typical household branch-drain distances. RIDGID’s manual warns against overrunning the cable into a larger main drain — cable entering a larger pipe has room to knot and can cause additional damage.
Can I use a corded drill with my drain snake?
No. RIDGID’s POWER SPIN+ manual and K-6P instructions both prohibit corded drills due to electrical shock risk near water. Use a battery drill only, set to the lowest speed, under 500 RPM. Keep hands dry before inserting the battery pack.
How do I know the drain is actually clear?
After retracting the cable, run a strong stream of hot water for at least 60 seconds. If it drains as fast as you’re adding water, the line is clear. If it still pools or drains slowly, make two or three additional passes — RIDGID recommends several passes for thorough cleaning. A drain that clears briefly but backs up within a day suggests the clog was only partially broken up, or there is a deeper structural issue. This flushing confirmation is the final step every time you learn how to use a drain snake on a new fixture.
When should I call a plumber instead of snaking?
Knowing when to stop is part of how to use a drain snake responsibly. Call a plumber when more than one fixture is draining slowly at the same time, when sewage backs up into a tub or shower when you flush the toilet, when you smell sulfur or hear gurgling from multiple drains, when the cable repeatedly binds in the same spot, or when your home has old galvanized or cast-iron drain lines. These situations are beyond the reach of a homeowner hand auger.
Sources
- RIDGID POWER SPIN+ Product Page
- RIDGID POWER SPIN+ Operator’s Manual
- RIDGID KWIK-SPIN+ Product Page
- RIDGID K-3 Toilet Auger Product Page
- RIDGID K-6P Toilet Auger Product Page
- RIDGID K-6P Instructions
- RIDGID Drain Cleaning Tools Category
- Home Depot: RIDGID POWER SPIN+ (Cat. 57043)
- Home Depot: RIDGID K-3 Toilet Auger (Cat. 59787)
- Angi: Drain Cleaning Cost Guide (2026)
Educational content only. Not a substitute for licensed professional advice. Local plumbing codes vary by jurisdiction. Use of any guidance from this guide is at your own risk.
Get the homeowner’s plumbing repair toolkit checklist — the tools, parts, and decisions every homeowner should have on hand. [Free download — enter your email]
Parts for this repair
As an Amazon Associate, plumbingbythebook earns from qualifying purchases. Links below are affiliate links — they cost you nothing extra.
- RIDGID POWER SPIN+ Drain Auger (Cat. 57043) — for sinks, tubs, and showers — The RIDGID POWER SPIN+ is a 1/4-inch x 25-foot cable hand spinner rated for bathroom sinks, kitchen sinks, tubs, and shower drains. AUTOFEED advance/retract; optional battery-drill drive at under 500 RPM.
- RIDGID K-3 Toilet Auger (Cat. 59787) — for toilets only — The RIDGID K-3 is a 3-foot closet auger with a vinyl guide tube that protects the porcelain bowl. The right homeowner tool for toilet-trap clogs — never use a hand spinner in a toilet.
- RIDGID K-6P Toilet Auger (Cat. 56658) — for deeper toilet clogs — The RIDGID K-6P extends reach to 6 feet with optional battery-drill drive — better when the clog is past the toilet trap but still within auger range.
Related guides
Why Are My Drains Slow? Causes, Diagnosis, and 3 DIY Fixes [2026]
If you’re asking why are my drains slow, the answer almost always starts with one question: is it…
Why Does My Drain Smell Like Sewage? 8 Causes and Fixes [2026]
Why does my drain smell? It is one of the most common plumbing questions homeowners ask — and…