
Your toilet is running, ghost-flushing, or refilling every few minutes with no one touching the handle. You’ve pulled the tank lid and you’re staring at a rubber flap, a chain, a tall fill valve — and you’re not sure which part is failing, let alone which replacement to buy. What size flapper do I need? That question — plus a fast check on whether the fill valve is also going — is what this guide answers. Three identification steps, five minutes of looking, and you’ll know exactly what to buy before you leave for the hardware store.
What Size Flapper Do I Need? Start by Opening the Tank
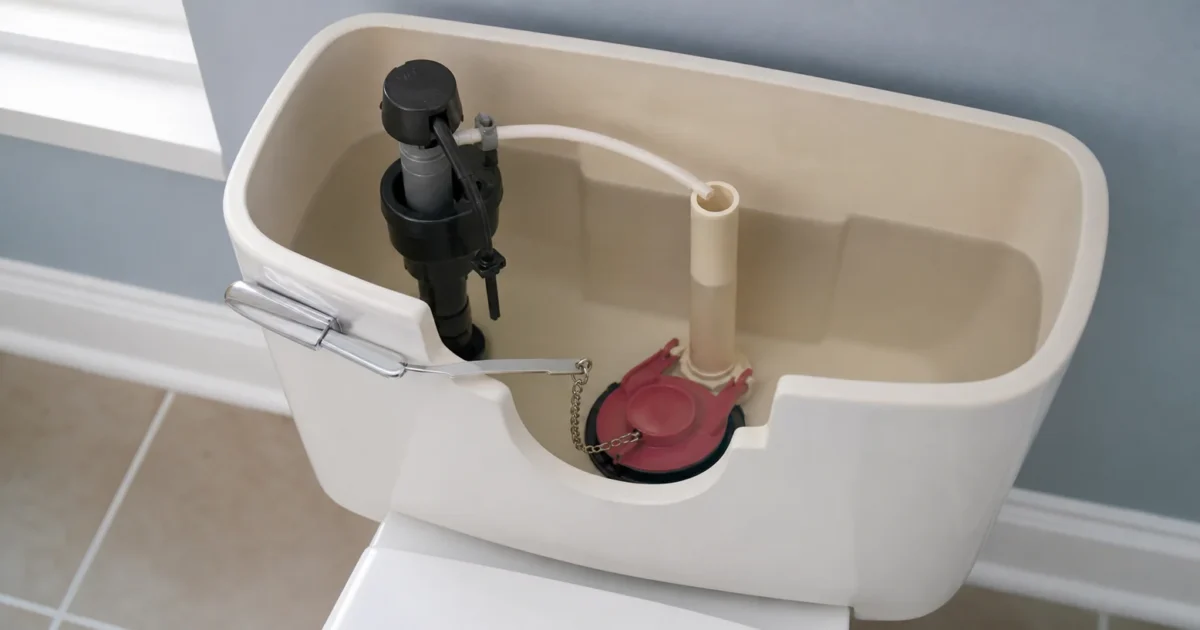
Pop the tank lid and rest it on a towel. You’re looking for two things: what type of flushing mechanism your toilet uses (traditional hinged flapper or tower/canister seal), and the size of the opening the part covers.
A running toilet means water is seeping from the tank into the bowl continuously — the fill valve cycles back on to replace what leaks past. A ghost flush is the same leak showing up intermittently: the tank drops slowly until the fill valve triggers, then you hear a brief refill with no one flushing. The EPA WaterSense Fix a Leak Week program flags worn toilet flappers as one of the most common household leaks and recommends replacing them at least every five years.
Before working through the identification steps below, rule out two fast red flags: is there water on the floor around the base or under the tank bolts? Is the toilet wobbling? If yes to either — stop, that’s a separate structural problem, covered in “When a Flapper or Fill Valve Won’t Fix It” below.
Method 1: Is It a Flapper or a Canister Seal?
Look at the bottom center of the tank. What you see there determines whether standard 2-inch/3-inch flapper sizing applies at all — or whether you need a model-matched seal instead.
Traditional rubber flapper: A hinged rubber disc with two ears that snap onto pegs on either side of the flush valve, connected to the handle arm by a chain. When you flush, the chain lifts the flapper off its seat, water rushes into the bowl, and the flapper drops back down to seal. This is the design the 2-inch/3-inch sizing rule applies to, and it’s the most common type in North American gravity-tank toilets.
Tower/canister seal: A vertical cylindrical tower that lifts straight up during a flush — no traditional flapper ears, no standard peg attachment. Korky’s flush-valve seal guide identifies these designs in specific toilet lines: American Standard Champion 4 and Eljer Titan 4; Kohler Class Five and Class Six and American Standard Champion 3; Mansfield 210/211; and some dual-flush toilets including certain TOTO and American Standard designs. If your toilet uses a canister tower, you need a model-specific flush-valve seal — not a 2-inch or 3-inch flapper. Find the model number (usually stamped inside the tank on the back wall or on the underside of the tank lid), then use the manufacturer’s parts lookup to confirm — Kohler’s service-parts page is the fastest route for Kohler toilets.
The “wrong-fix-first” mistake here is buying a standard flapper for a canister toilet. The part simply won’t attach, or — worse — will appear to fit but leak immediately because the geometry is wrong.
If the toilet definitely has a traditional hinged flapper with ears and pegs, continue to Method 2.
Method 2: Size the Flush Valve Opening
With the tank lid off, look at the flush-valve seat — the circular rim at the very bottom center of the tank where the flapper sits and seals. Compare the opening’s diameter to two everyday objects:
- Orange or baseball sized → standard 2-inch flush valve → buy a 2-inch flapper
- Grapefruit or softball sized → large 3-inch flush valve → buy a 3-inch flapper
According to Korky’s flapper-size guide, most toilets manufactured before 2000 use a 2-inch flush valve, while many toilets manufactured after 2000 use the larger 3-inch opening — though there is no hard year cutoff, so eyeballing or measuring is more reliable than guessing by age. If the toilet has a brand label inside the tank, you can also look up the model number at the manufacturer’s site to confirm the spec before buying.
Replacement flappers run $5–$15 at hardware stores depending on brand and whether you buy a simple replacement or a kit. If you’re unsure between sizes after eyeballing, remove the old flapper (takes 30 seconds — unhook the chain and slide the ears off the pegs) and bring it to the store for a physical comparison.
Method 3: Check the Chain Before Buying Anything
Before driving to the hardware store, spend 30 seconds checking the chain. A misadjusted chain causes a running toilet just as reliably as a worn flapper — and fixing it costs nothing.
The correct chain slack is one to two links between the handle arm and the top of the flapper when the flapper is sitting closed on the seat. Too little slack: the chain holds the flapper slightly open, letting water trickle past the seat continuously. Too much slack: the chain can bunch up or slip under the flapper during a flush and prevent a complete seal.
Korky’s running-toilet guide specifically calls out chain interference as a cause of running after a new flapper is installed — the homeowner has the right part but the wrong slack. Set the chain to one to two links first, flush a few times, and wait an hour. If the toilet stops running, you didn’t need a new flapper at all.
Does the Fill Valve Also Need Replacing?
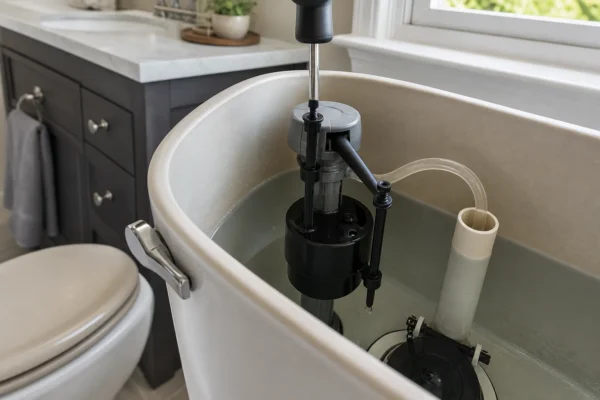
The fill valve — the tall assembly on the left side of the tank — is a separate part that controls when and how fast water enters after a flush. It’s a second candidate if:
- Water is flowing into the overflow tube after the tank appears full — the fill-valve height is set too high, or the valve isn’t shutting off cleanly
- The tank hisses continuously even after confirming the flapper is new and correctly seated
- The tank fills slowly — and you’ve already confirmed the shutoff valve behind the toilet is fully open and the supply line isn’t kinked or damaged
- The valve is over five to seven years old — Korky’s fill-valve guide gives 5–7 years as a reasonable service life, noting that sediment and calcium buildup can restrict performance before visible failure
For most gravity-tank toilets, a universal adjustable fill valve is the correct retail replacement. Home Depot listed the Fluidmaster 400A at $9.98 and the Fluidmaster PerforMAX — which adds separate tank and bowl adjustment dials — at $14.98 on their 2026 product pages. Either fits most residential toilets. If the PerforMAX’s bowl-refill dial sounds like overkill, it isn’t: a misadjusted bowl-refill rate can affect flush performance and water use, and having a physical dial to adjust it is genuinely useful.
One installation note that causes continuous running after a fill-valve swap: the refill tube. Korky’s installation guide is explicit — clip the refill tube to the rim of the overflow tube, do not push it down inside. A tube inserted into the overflow tube creates a siphon that keeps the fill valve running even when everything else is correct.
If you’re trying to figure out how much a running toilet is actually costing you in water, use our Water-Waste Calculator to put a dollar figure on the leak before deciding how urgently to fix it.
Quick Decision Tree: Flapper, Seal, or Fill Valve?
Work through these in order — the first “yes” is your answer:
- Water on the floor, wobbling base, cracked tank or bowl, or soft floor near the toilet? → Stop. Call a plumber. This is not a tank-parts problem.
- Running, ghost-flushing, hissing, or refilling when idle? → Run the dye test: add a few drops of food coloring to the tank and wait 10 minutes. Color in the bowl = tank-to-bowl leak. No dye available? Mark the tank water level after a refill, shut off the supply valve, and return in 25 minutes — a lower mark confirms a tank leak.
- Does the tank have a hinged rubber flapper with ears and pegs? → Yes: go to step 4. No (canister/tower): match the replacement seal to your toilet model, not a standard flapper.
- Is the flush-valve opening orange/baseball sized? → Buy a standard 2-inch flapper. Is it grapefruit/softball sized? → Buy a large 3-inch flapper.
- New correct-size flapper installed — still running? → Check chain slack (target 1–2 links). Clean any debris or mineral buildup from the flush-valve seat. Inspect the seat for cracks or warping. Then check step 6.
- Water flowing into the overflow tube? → Adjust fill-valve height down so the water line sits about ½ inch below the tube top. If the valve won’t hold the right height, replace it.
- Tank fills slowly after confirming the shutoff valve is open and supply line is unkinked? → Service or replace the fill valve.
- Flush is weak but tank holds water fine? → Check chain slack, adjustable-flapper dial setting, refill-tube attachment, and fill-valve float height. If tank parts check out, inspect rim jets for mineral buildup or look for a partial bowl-outlet clog.
How to Replace the Right Part (Step-by-Step)
Flapper or flush-valve seal replacement — under 20 minutes:
- Shut off the water supply valve behind the toilet. Flush and drain most of the tank.
- Unhook the chain from the flapper, slide the flapper ears off the flush-valve pegs. Bring the old flapper to the store or photograph it next to a ruler — physical matching beats guessing.
- Confirm the new flapper matches the flush-valve opening size (2-inch for baseball-sized; 3-inch for grapefruit-sized). If the toilet has a canister tower, match the replacement seal to the toilet model using the manufacturer’s parts diagram.
- Install the new flapper on the pegs, reconnect the chain, and set 1–2 links of slack.
- Turn the water back on, let the tank refill fully, then flush. Confirm the flapper lifts completely, drops cleanly, and seals without chain interference.
- Wait 10 minutes, then run the dye test to confirm the seal holds.
Fill valve replacement — 30 to 45 minutes:
- Shut off the supply valve, flush and hold the handle to drain the tank, then sponge out remaining water from the tank bottom.
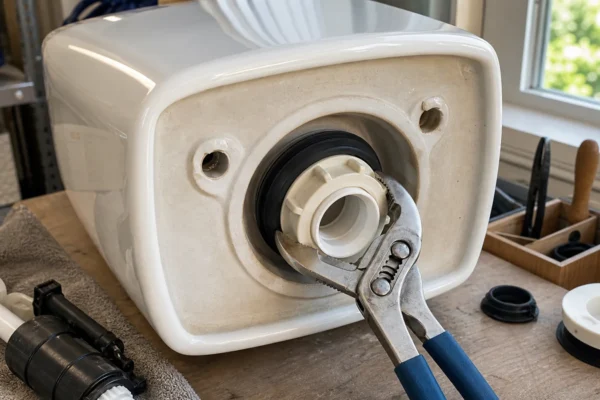
- Disconnect the supply line under the tank. Remove the mounting nut under the tank and lift out the old fill valve.
- Set the new fill-valve height so the water level will sit about ½ inch below the top of the overflow tube — too high causes overflow into the tube and continuous running; too low causes a weak or incomplete flush.
- Insert the valve through the tank hole, hand-tighten the mounting nut under the tank, and reconnect the supply line. No tape or sealant needed.
- Clip the refill tube to the rim of the overflow tube — not inside it.
- Turn the water on slowly, let the tank fill, then adjust the bowl-refill setting if the valve has a dial.
Most DIY flapper and fill-valve jobs land in the $5 to $30 parts range total, per The Spruce’s plumber-reviewed hissing-toilet guide. For context: HomeAdvisor’s toilet repair cost guide (updated June 17, 2026) puts professional running-toilet repair at $100–$400 and valve repairs at $50–$150, with plumbers billing $45–$200 per hour plus an emergency surcharge of $100–$300. A $10 flapper or $14 fill valve versus a $150 service call is one of the clearer DIY value cases in home maintenance.
When a Flapper or Fill Valve Won’t Fix It
Call a plumber — don’t keep swapping parts — if any of these apply:
- Water on the floor at tank bolts, between tank and bowl, or around the base → tank-to-bowl gasket, wax ring, flange, or subfloor issue. According to Korky’s tank-to-bowl leak guide, this requires a different repair path entirely.
- Wobbling base or soft floor → Korky’s wobbling-toilet guide is direct: a cracked or damaged closet flange must be replaced; sealant is not a fix.
- No water flows from the supply line during a bucket test → Korky says little or no supply flow indicates a blockage in the line or incoming supply and recommends a licensed plumber.
- Multiple slow-draining fixtures or a toilet that backs up repeatedly after plunging → the restriction is downstream of the tank; tank parts won’t fix a drain-line problem.
- Visible crack in the tank or bowl → The Spruce’s hissing-toilet guide lists visible cracks as a replacement indicator, not a repair target.
- Specialty toilet — pressure-assisted, wall-hung, concealed-tank, smart/electronic, or commercial flushometer designs → the 2-inch/3-inch universal flapper rule applies only to common gravity-tank toilets. For specialty fixtures, start at the manufacturer’s parts diagram and don’t assume universal parts fit.
For the full picture on toilet problems — including when any symptom warrants a professional call — see our Toilet Repair Guide and our diagnostic deep-dive at Why Is My Toilet Running?.
What size flapper do I need for my toilet?
Look at the flush-valve opening at the bottom center of the tank. An opening about the size of an orange or baseball is a standard 2-inch and takes a 2-inch flapper. An opening about the size of a grapefruit or softball is a large 3-inch and takes a 3-inch flapper. If the toilet uses a canister or tower flush valve instead of a hinged flapper, you need a model-specific flush-valve seal — not a standard 2-inch or 3-inch flapper.
How do I know if my toilet needs a new flapper or a new fill valve?
A flapper problem shows as water leaking from the tank into the bowl when the toilet is idle — confirmed by the dye test (food coloring in the tank; color in the bowl within 10 minutes = leak). A fill-valve problem shows as water flowing into the overflow tube, the tank hissing continuously after it’s full, or the tank filling unusually slowly after confirming the shutoff valve is open. Most running-toilet repairs need only a new flapper; the fill valve is the secondary check when the flapper fix doesn’t hold.
How often should I replace a toilet flapper?
EPA’s WaterSense program recommends replacing toilet flappers at least every five years. Korky’s maintenance guidance extends that to a 5-to-10-year range depending on water quality. In areas with hard water and high mineral content, lean toward the shorter end of that interval — mineral deposits accelerate seat and flapper degradation.
Can I use a universal flapper on any toilet?
A 2-inch or 3-inch universal flapper fits most traditional flapper-type toilets, but it will not work on tower/canister flush valves found in Kohler Class Five/Six, American Standard Champion 4, Mansfield 210/211, and some dual-flush designs. On those toilets, the ears and peg attachment system simply doesn’t exist — you need the model-matched flush-valve seal instead.
What fill valve should I buy for a standard residential toilet?
For most gravity-tank toilets, either the Fluidmaster 400A or Fluidmaster PerforMAX is a reliable universal replacement. Home Depot listed the 400A at $9.98 and the PerforMAX at $14.98 in 2026. Both adjust to fit standard tank heights. The PerforMAX adds separate tank and bowl refill dials, which is worth the extra $5 if the previous valve’s bowl-refill rate caused flush complaints.
When should I call a plumber instead of replacing tank parts myself?
Stop DIY repairs and call a plumber if there is water on the floor, the base wobbles, the floor feels soft near the toilet, the tank or bowl is visibly cracked, the supply line delivers no flow, or the toilet is a specialty type such as pressure-assisted or electronically controlled. Those conditions either indicate structural damage or put the job outside standard tank-part replacement.
Sources
- EPA WaterSense — Fix a Leak Week
- Korky — What Size Flapper Do I Need?
- Korky — How to Fix a Running Toilet
- Korky — What Flush Valve Seal Do I Need?
- Korky — How to Replace Toilet Fill Valve
- Korky — How to Fix a Slow Filling Toilet
- Korky — How to Fix a Slow or Weak Flushing Toilet
- Korky — How to Fix Leak Between Toilet Tank and Bowl
- Korky — How to Fix a Wobbling Toilet
- Kohler — Service & Replacement Parts
- Home Depot — Fluidmaster 400A Universal Toilet Fill Valve
- Home Depot — Fluidmaster PerforMAX Universal High Performance Toilet Fill Valve
- HomeAdvisor — How Much Does Toilet Repair Cost? (Updated June 17, 2026)
- The Spruce — Why Your Toilet Is Hissing and How to Fix It
Educational content only. Not a substitute for licensed professional advice. Local plumbing codes vary by jurisdiction. Use of any guidance from this guide is at your own risk.
Get the homeowner’s plumbing repair toolkit checklist — the tools, parts, and decisions every homeowner should have on hand. [Free download — enter your email]
Parts for this repair
As an Amazon Associate, plumbingbythebook earns from qualifying purchases. Links below are affiliate links — they cost you nothing extra.
- Fluidmaster 400A Universal Toilet Fill Valve — Universal fit for most gravity toilets. Around $9–$12 at most hardware stores.
- Korky 2-Inch Universal Toilet Flapper — Standard 2-inch replacement. Fits most pre-2000 and many post-2000 toilets with a baseball-sized opening.
- Korky 3-Inch Toilet Flapper — Large 3-inch replacement. For toilets with a grapefruit/softball-sized flush valve opening.
Related guides
How to Replace a Toilet Flush Valve: Step-by-Step Guide [2026]
The flush valve is the center assembly in your toilet tank — the overflow tube, the valve seat,…
How Much Does It Cost to Replace a Toilet? [2026]
The cost to replace a toilet runs about $300 to $800 installed, with a national average near $372,…
How to Adjust Toilet Tank Water Level: Step-by-Step Guide [2026]
If your toilet is running constantly or flushing weakly, the fix is often a single adjustment screw inside…