
If your toilet is running constantly or flushing weakly, the fix is often a single adjustment screw inside the tank. How to adjust toilet tank water level depends on which fill valve your toilet uses — a Fluidmaster float-cup, a Korky twist-lock, a TOTO top-dial, or an older ball-float — but the five-step procedure takes under 15 minutes with a screwdriver and costs nothing if adjustment alone does the job.
Different fill valves adjust differently, so it helps to identify your toilet brand and model — the brand and fill-valve type are often linked.
TL;DR: Remove the tank lid. Locate the fill valve. Adjust the float height so the tank fills to about 1/2 inch below the top of the overflow tube — or to the stamped waterline if your tank has one. Flush to confirm. Done.
How to Adjust Toilet Tank Water Level: Find the Right Target First
Before touching anything inside the tank, you need to know where the water should stop — because the entire fix depends on whether you’re moving the float up or down.
The fill valve controls tank water level through a float mechanism. When the float drops during a flush, the valve opens and water refills the tank. When the float rises to the set height, the valve shuts off. If that shutoff point is set too high, water spills into the overflow tube and the toilet runs continuously — wasting water every minute. If it’s set too low, there isn’t enough stored water to complete a full flush.
The target for most toilets is about 1/2 inch below the top of the overflow tube — the tall vertical tube connected to the flush valve in the center of the tank. Kohler’s homeowner guides use about 1 inch below the overflow as a conservative starting point (Kohler running-toilet guide). Some tanks also have a stamped or molded waterline on the inside wall; when that line is present, it overrides the 1/2-inch general rule and you follow the manufacturer’s mark instead (TOTO installation manual, Lowe’s weak-flush guide).
A quick diagnostic flush shows you which direction to move: remove the tank lid, flush once, and watch where the water settles. If it creeps up to or past the overflow tube, the float is set too high. If the flush feels weak and the water stops more than an inch below the overflow, the float is too low.
If a running toilet has been wasting water for weeks, our free Water-Waste Calculator can show you the daily and monthly impact so you know what this fix is actually saving you.
Identify Your Fill Valve Type Before Adjusting
Modern toilets use one of four fill-valve designs, and the adjustment method is different for each. Remove the tank lid, set it flat on a towel somewhere safe, and identify which type you have:
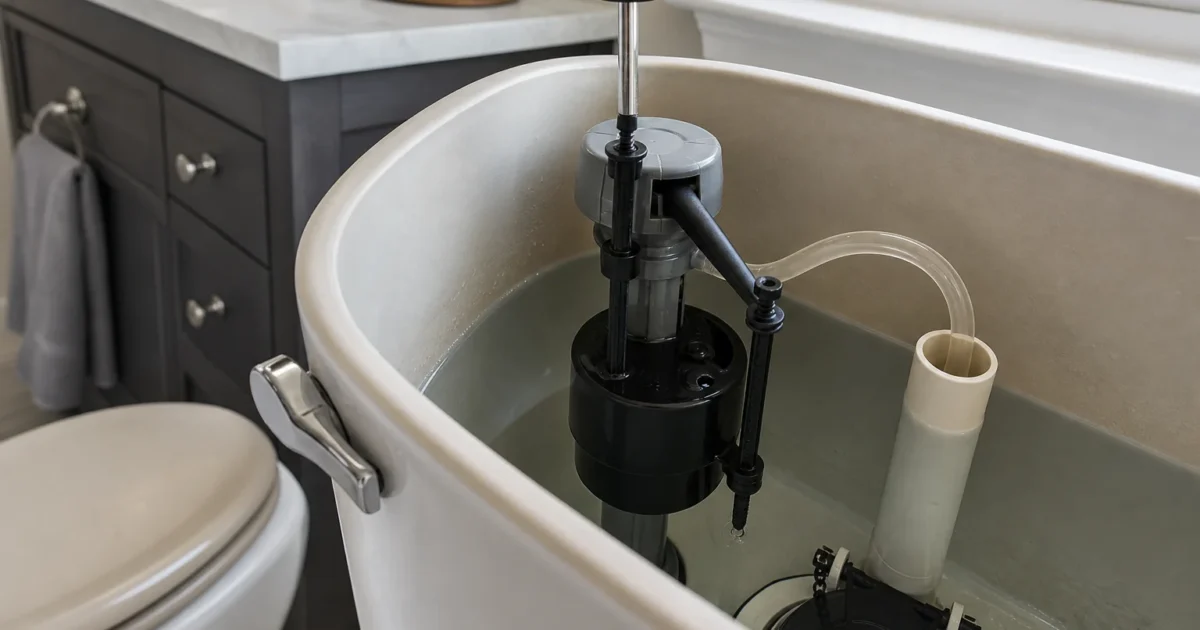
Fluidmaster 400A / 400H (float-cup valve) — The most common valve in North American toilets. It’s a vertical cylinder with a round plastic float that slides up and down on the valve body. There’s an adjustment screw at the top. The 400H adds a separate bowl-refill dial on the side for HET toilets (Fluidmaster 400A instructions).
Korky 528 / 528MP (twist-lock valve) — A taller fill valve with a similar float mechanism, but height adjustment is done by twisting the upper half counterclockwise to unlock it, sliding the valve body to the target height, and twisting back to lock (Korky 528 instructions).
TOTO fill valve (top-dial adjuster) — TOTO’s proprietary fill valve has a dial at the very top marked “+” to raise the level and “−” to lower it. You turn it with a flathead screwdriver (TOTO installation manual).
American Standard universal fill valve — Works like the Fluidmaster float-cup style. Turn the adjustment screw clockwise to raise the level, counterclockwise to lower it; American Standard targets 1/4 to 1/2 inch below the overflow tube (American Standard FAQ).
Old ball-float valve — A horizontal arm with a bulb float at the end. Common on toilets made before the mid-1990s. The TOTO Japan service guide specifies bending the float arm at its midpoint — never near the threaded base — because bending at the base can crack the assembly and destroy the valve (TOTO Japan tank-water service page).
How to Adjust Toilet Tank Water Level: Step-by-Step
You’ll need: a flathead or Phillips screwdriver, a towel, and about 10–15 minutes.
Remove the lid and assess
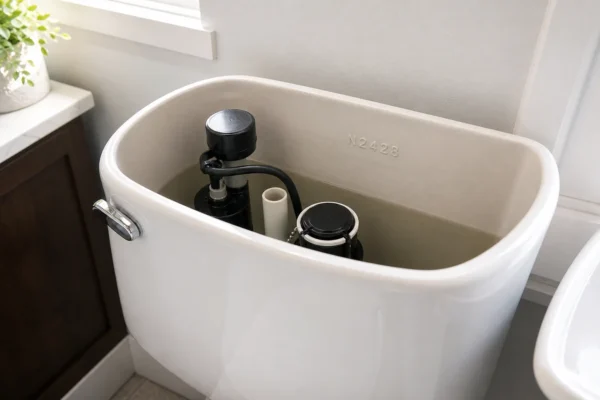
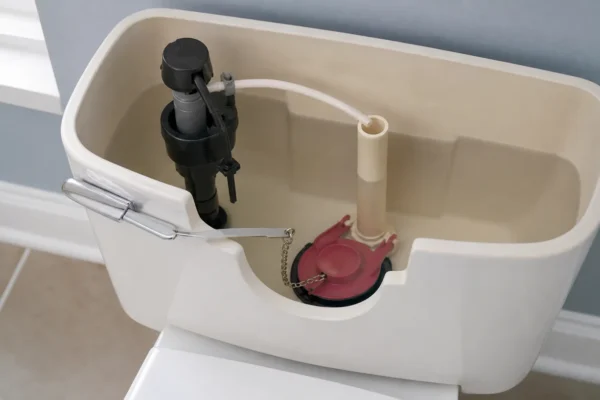
Lift the tank lid with both hands and set it flat on a towel away from foot traffic — a cracked tank lid can cost $50–$200 to replace. Look inside and identify the fill valve, the overflow tube, and the float mechanism.
If water is actively running over the top of the overflow tube, turn the shutoff valve clockwise to cut tank pressure before making any adjustment — it’s much easier to see where the level stabilizes when the valve isn’t fighting you (TOTO Japan tank-water service page). If the shutoff valve feels frozen, corroded, or won’t close fully, stop and call a plumber before proceeding — a failed stop valve turns a simple tank adjustment into a house-shutoff job.
Flush and mark the current level
Turn the water on fully if you closed it. Flush the toilet and watch the refill cycle. Use a pencil to mark where the water stops on the inside wall of the tank or on the overflow tube itself. This gives you a reference point and tells you exactly how far to move the float — and in which direction.
Before adjusting, also check whether the fill valve is cycling on and off on its own without anyone flushing. If it is, that pattern — called phantom flushing — points to a leaking flapper rather than a fill-valve calibration problem. Mark the tank level, close the shutoff valve, wait 10 minutes, and check whether the water has dropped. If the level drops while the valve is off, you have a flapper leak, not a water-level issue (Fluidmaster 400A instructions).
Adjust the float for your valve type
Fluidmaster 400A/400H: Turn the adjustment screw at the top of the fill valve — clockwise raises the water level, counterclockwise lowers it. Fluidmaster’s own instructions note that eight full turns of the screw moves the float approximately 1/2 inch, so make gradual adjustments and flush between each change to confirm the new stopping point. On a 400H with a bowl-refill dial, use only the tank-level screw for tank height — the bowl dial is a separate control for how much water goes to the bowl after a flush and has no effect on tank water level (Fluidmaster 400A instructions, Fluidmaster 400H guide).
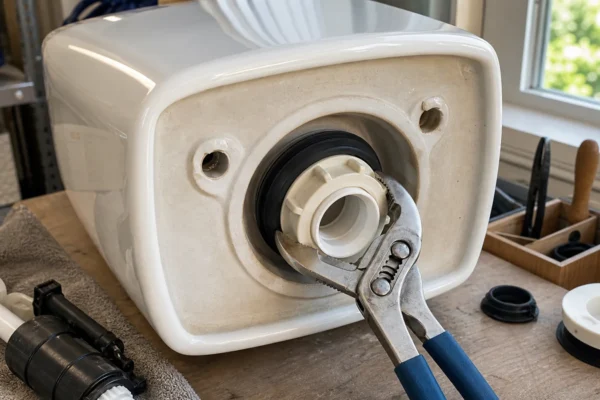
Korky 528: Shut off the water supply. Twist the upper half of the valve body counterclockwise to unlock it. Slide the entire valve body up or down until its waterline mark sits about 1/2 inch below the overflow tube. Twist the upper half clockwise until the ribs lock firmly into the pegs. Reinstall with the beveled side of the mounting nut facing upward and hand-tighten only — Korky explicitly warns that overtightening the mounting nut is the most common installation mistake (Korky 528 instructions).
TOTO: Use a flathead screwdriver at the top of the fill valve. Turn clockwise toward “+” to raise the water level, counterclockwise toward “−” to lower it. Flush after each adjustment and let the tank fully refill before assessing the result (TOTO installation manual).
American Standard: Turn the adjustment screw clockwise to raise the level, counterclockwise to lower it. Target 1/4 to 1/2 inch below the overflow tube and flush to confirm (American Standard FAQ).
Old ball-float: Gently bend the float arm slightly upward at its midpoint to raise the water level, or downward to lower it. Work in small increments — overbending is difficult to reverse. Never bend at the threaded end closest to the valve body.
Check the refill tube position
Before replacing the lid, verify that the thin refill tube — the small flexible hose running from the fill valve to the overflow tube — is clipped so it discharges into the top of the overflow from above the waterline, not submerged inside it. When the refill tube is pushed down inside the overflow below the water surface, it creates a siphon path that slowly drains the tank and triggers repeated fill cycles — exactly the symptom you were trying to eliminate (Terry Love siphon thread, Korky 528 instructions).
One exception: Mansfield tower-style flush valves don’t use the standard refill clip. On those toilets, the refill tube inserts into a dedicated hole at the top of the flush-valve cap rather than clipping to the overflow tube.
Test, confirm, and check for drips
Turn the water supply on fully and let the tank fill to the new level. Confirm the fill valve shuts off cleanly. Flush twice and watch where the water settles each time — if it consistently lands at the target line and the valve closes without cycling, the adjustment is complete. Also inspect below the tank at the supply connection and the base of the fill valve for any drips, especially if you loosened the mounting nut during adjustment (Home Depot fill-valve guide, Korky 528 instructions).
Common Mistakes That Make the Problem Worse
Manufacturer instruction booklets and plumbing forums — particularly Fluidmaster’s own 400A guide and the Terry Love forum — identify the same set of mistakes recurring across DIY attempts:
Misdiagnosing a flapper leak as a water-level issue. Fluidmaster’s 400A instructions specifically call this out: a fill valve that cycles on and off by itself usually means the tank is losing water through the flapper or flush-valve seat, not that the float needs adjustment. The dye test is the fastest way to confirm — and spending time on float adjustment when the flapper is the real culprit wastes an afternoon without fixing anything.
Setting the level too high. Even a level that sits flush with the overflow rim — not visibly running over — can cause slow, continuous drainage into the bowl. The fill valve then cycles on every few minutes to top off the tank. Target a clear 1/2-inch gap between the waterline and the overflow top (Kohler running-toilet guide, This Old House common tank failures).
Overtightening plastic mounting or coupling nuts. Both Korky and Fluidmaster warn against over-torquing the plastic mounting nut at the base of the fill valve. Cracked plastic doesn’t seal — it leaks. Hand-tighten, then add at most one additional quarter-turn of snugging if specified by the manufacturer (Korky 528 instructions, Fluidmaster 400H guide).
Submerging the refill tube inside the overflow. Even 1/2 inch of submersion below the tank waterline creates a siphon. This produces phantom refills that are impossible to resolve with float adjustment alone.
Using the bowl-refill dial instead of the tank-level screw (400H only). The Fluidmaster 400H has two separate controls — one for tank water height and one for bowl refill volume. Turning the bowl dial when you meant the tank screw produces no change in tank level and can leave the bowl underrefilling after every flush (Fluidmaster 400H guide).
When the Problem Isn’t the Water Level
Not every running or cycling toilet needs a float adjustment. Two failure modes look like water-level problems but aren’t:
Phantom flushing — tank refills without anyone flushing. The most common cause is a leaking flapper, not the fill-valve calibration. Water seeps past the rubber seal into the bowl; the tank level drops below the float shutoff; the fill valve kicks on to top it off. Run the food-coloring test (a few dye tablets in the tank, 15 minutes without flushing, check the bowl). Color in the bowl = flapper leak. See our guide to replacing a toilet flapper for the step-by-step fix — it’s a $5–$15 part and 15 minutes of work.
Water level drops after you close the shutoff valve. This eliminates the fill valve as the cause. If the level was correct and water still disappears with the supply shut off, the leak is below the waterline — most commonly the flapper, but possibly a cracked flush-valve seat or overflow tube. Float adjustment won’t solve it.
Fill valve won’t shut off regardless of float position. When the valve keeps running at every float height, the valve itself is clogged, worn, or internally failed. Adjustment won’t help — replacement is the repair (Kohler running-toilet guide).
Call a plumber when: the shutoff valve is frozen or won’t close, the tank shows any visible cracking, the toilet is pressure-assisted (a steel pressure vessel sits inside the tank rather than open water), or the fill-valve mounting nut won’t budge without the tank flexing or shifting. Angi specifically notes that pressure-assisted toilets are rarely a DIY repair and usually need a plumber (Angi toilet repair cost guide).
Replacement Fill Valves and Pricing
When the existing valve won’t hold an adjustment or won’t close cleanly, replacement is the repair — not more adjustment. Home Depot rates fill-valve replacement as a beginner project, and parts cost $8–$57 depending on brand:
| Valve | Price range (2026) | Best for |
|---|---|---|
| Fluidmaster 400A | ~$9–$10 (Home Depot, SupplyHouse) | Most standard gravity toilets; pre-1994 models |
| Fluidmaster 400H PerforMAX | ~$14–$15 (Home Depot, Lowe’s) | HET (1.28 GPF) and high-efficiency models |
| Korky 528 QuietFILL | ~$8–$9 (Home Depot, SupplyHouse) | Most standard gravity toilets; quieter refill |
| Korky 528MP QuietFILL Platinum | ~$9–$10 (Lowe’s, SupplyHouse) | Post-1994 toilets, 1.6 GPF or less |
| Kohler GP1138930 | ~$20–$25 (Kohler direct, Home Depot) | Kohler toilets with gray shank |
| TOTO TSU99A.XR | ~$51–$57 (Lowe’s, SupplyHouse) | TOTO toilets (TSU99A.X discontinued Oct 2023) |
If you’d rather have a plumber handle it: Angi lists running-toilet repair at $100–$400 and fill-valve replacement specifically at $70–$150 in labor, with plumbers charging $45–$200/hour (Angi toilet repair cost guide, HomeGuide toilet repair cost guide).
Quick Reference: Symptom → Cause → Fix
| Symptom | Most likely cause | Fix |
|---|---|---|
| Toilet runs continuously | Float set too high — water spills into overflow | Lower the float 1/2 inch at a time |
| Weak or incomplete flush | Float set too low — not enough water stored | Raise the float; flush after each adjustment |
| Intermittent phantom refill | Flapper leak OR siphoning refill tube | Dye test; clip refill tube above overflow waterline |
| Water level correct, toilet still runs | Flapper not sealing or flush-valve seat worn | Replace flapper; inspect seat |
| Fill valve won’t shut off at any float height | Failed or clogged fill valve | Replace fill valve ($8–$25 parts) |
| Drip below tank after adjustment | Cracked or overtightened mounting nut | Replace fill valve and nut |
How much does it cost to adjust toilet tank water level?
If your existing fill valve responds to adjustment, the parts cost is $0 — just a screwdriver and 10 minutes. If the valve is failed and needs replacement, expect $8–$25 for a Fluidmaster or Korky fill valve. A plumber doing the full job charges $70–$150 in labor.
How do I know the correct toilet tank water level?
Most toilets target about 1/2 inch below the top of the overflow tube. Some tanks have a stamped or molded waterline mark on the inside wall — when that mark is present, use it instead of the 1/2-inch rule. Kohler’s homeowner guides use 1 inch below the overflow as a conservative starting point; American Standard targets 1/4 to 1/2 inch below.
Why does my toilet keep running after I adjusted the float?
The most common reason is a leaking flapper rather than a fill-valve problem. Run the dye test: add food coloring to the tank, wait 15 minutes without flushing, and check the bowl. Color appearing in the bowl confirms the flapper is leaking — the float adjustment won’t fix that.
Can I adjust a Fluidmaster 400A without shutting off the water?
Yes. For a simple float-screw adjustment, you don’t need to close the supply valve. You only need to shut off the water if you’re changing the valve body height (as with the Korky 528 twist-lock) or replacing the entire fill valve.
What happens if the refill tube is pushed down into the overflow tube?
It creates a siphon: water slowly drains from the tank back through the tube, the fill valve keeps cycling to compensate, and you get a continuously running or phantom-flushing toilet. Clip the refill tube so it discharges from above the overflow top — not submerged inside it.
When should I replace the fill valve instead of adjusting it?
Replace it when the valve won’t shut off regardless of float position, when the adjustment mechanism is stripped or cracked, or when the valve produces mineral-fouled or erratic shutoffs. Replacement valves start at about $8 for a Korky 528 or $10 for a Fluidmaster 400A — a worthwhile trade for a valve that’s been in service 10+ years.
Sources
- Fluidmaster 400A Installation Instructions
- Fluidmaster 400H PerforMAX Fill Valve Manual
- Korky 528 QuietFILL Instructions
- Korky: How to Replace a Toilet Fill Valve
- TOTO USA Installation Manual
- TOTO Japan: Tank Water Adjustment Guide
- American Standard: Fill Valve FAQ
- Kohler: How to Fix a Running Toilet
- Lowe’s: Fix a Weak-Flushing Toilet
- Home Depot: How to Replace a Fill Valve
- This Old House: How to Fix a Running Toilet
- This Old House: Common Toilet Tank Failures
- Terry Love Plumbing: Refill Tube Siphon Thread
- Angi: Toilet Repair Cost Guide
- HomeGuide: Toilet Repair Cost
Educational content only. Not a substitute for licensed professional advice. Local plumbing codes vary by jurisdiction. Use of any guidance from this guide is at your own risk.
Get the homeowner’s plumbing repair toolkit checklist — the tools, parts, and decisions every homeowner should have on hand. [Free download — enter your email]
Parts for this repair
As an Amazon Associate, plumbingbythebook earns from qualifying purchases. Links below are affiliate links — they cost you nothing extra.
- Fluidmaster 400A Universal Fill Valve — The most common toilet fill valve in North America — $9–10 at most hardware stores; adjusts with a single screwdriver.
- Fluidmaster 400H PerforMAX Fill Valve — Upgraded version with a separate bowl-refill dial for HET toilets — $14–15.
- Korky 528 QuietFILL Fill Valve — Twist-lock design for quiet, tool-free height adjustment — $8–9.
Related guides
How to Identify Your Glacier Bay Toilet Parts (the Fluidmaster and Niagara Components Inside) [2026]
How to Identify Your Glacier Bay Toilet Parts (the Fluidmaster and Niagara Components Inside) [2026] The whole trick…
What Size Flapper Do I Need? How to Choose the Right Toilet Flapper and Fill Valve [2026]
Your toilet is running, ghost-flushing, or refilling every few minutes with no one touching the handle. You’ve pulled…
How to Replace a Toilet Flush Valve: Step-by-Step Guide [2026]
The flush valve is the center assembly in your toilet tank — the overflow tube, the valve seat,…