
Your Moen Posi-Temp shower is dripping, the handle is stiff, or you’re getting cold water when you expected hot — the Moen 1222 cartridge is almost certainly the cause. You can replace Moen 1222 Posi-Temp shower cartridge yourself — it is a genuine DIY repair: the cartridge costs $71.68 at Home Depot, the job takes 45–90 minutes, and Moen publishes an official step-by-step procedure. The catch is a handful of specific mistakes — a frozen cartridge, a dropped retainer clip, an improperly seated cartridge body — that strand homeowners mid-repair. This guide walks through every step in the right order, with the recovery moves for the four most common failure points built in.
Is This the Right Repair? Confirm Your Moen 1222 Posi-Temp Valve
Before you buy the 1222 cartridge, confirm your shower uses a Posi-Temp valve. A Moen Posi-Temp valve is a single-handle pressure-balanced shower valve — one handle controls both temperature and volume. Moen’s own procedure documentation identifies the 1222 cartridge as specifically for a “single handle PosiTemp valve shower.”
The critical distinction: a Moen 1225 cartridge fits a Moen single-handle standard valve shower, not a Posi-Temp. Lowe’s product listing for the 1225 explicitly states it excludes Posi-Temp and ExactTemp valves. The two cartridges are not interchangeable, and the procedures differ in important ways. If you’re unsure which valve you have, read how to identify your shower valve and cartridge before buying parts.
Newer Moen M-CORE valves use a 1214 cartridge with an entirely different procedure — including tightening a cartridge nut hand-tight plus one-quarter turn with a wrench — which the 1222 Posi-Temp procedure does not have. If your shower is recent construction and you see a cartridge nut inside the valve body, you’re on a different valve family.
What You Need Before You Start
Parts — what to buy:
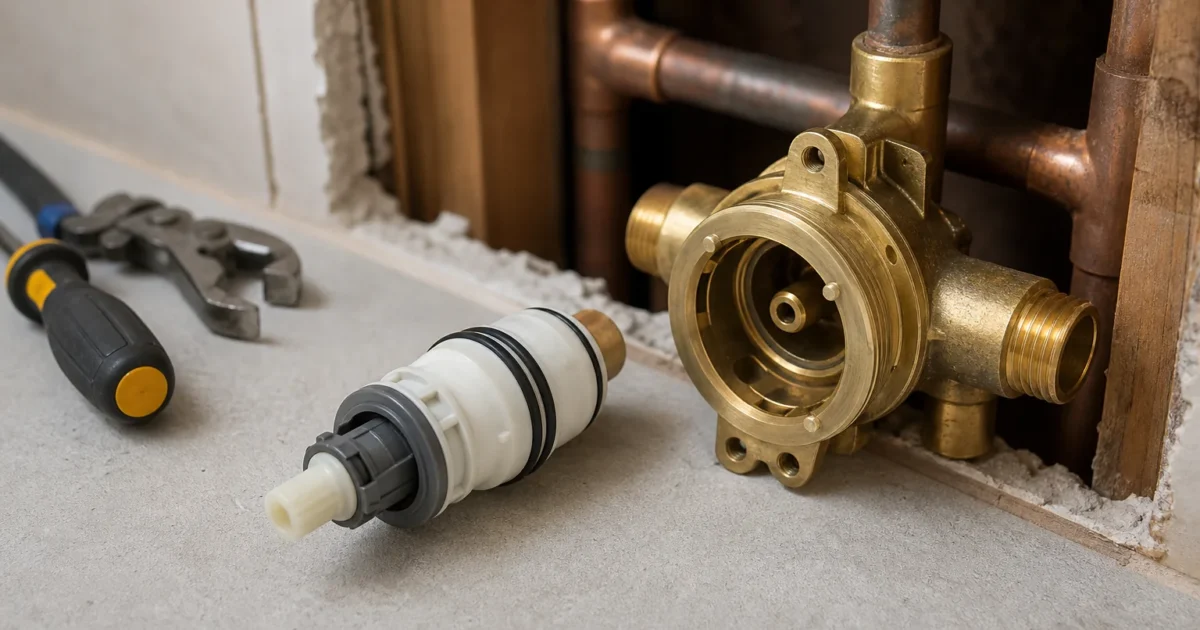
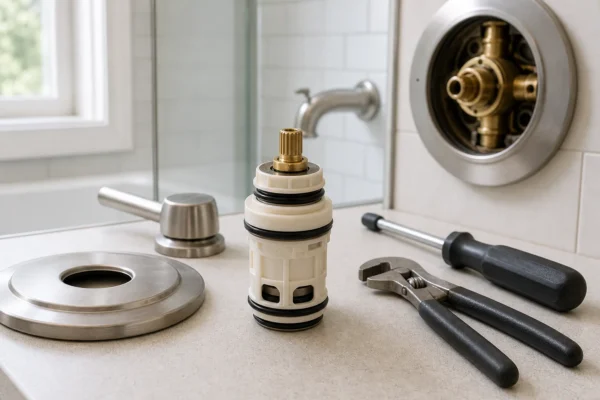
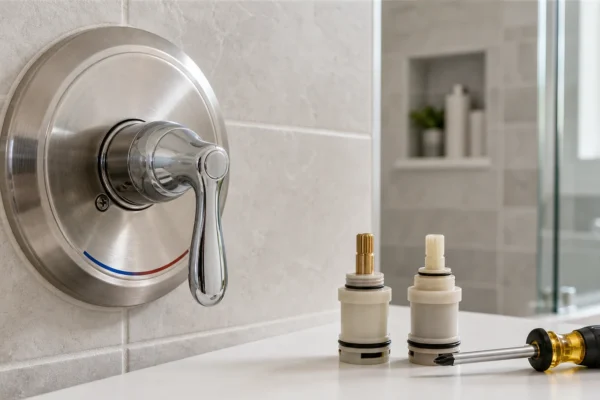
The OEM Moen 1222 Posi-Temp pressure-balanced shower cartridge retails at $71.68 at Home Depot (Model #1222, Store SKU #253045). The kit includes the retainer clip, the plastic twisting cap, and silicone lubricant — keep all three in the packaging until you need them. Use the OEM Moen cartridge, not an aftermarket substitute: the oval rubber grommets, H/C tab orientation, stem notch, and retaining-clip fit are calibrated to Moen’s brass valve body.
The Danco 86712 cartridge puller at $17.98 is sold separately. Home Depot recommends a puller for the Moen 1222, and Danco’s listing confirms it fits Moen 1200, 1222, and 1225 cartridges. If your shower has been in service for five or more years, buy the puller before you start — a frozen cartridge is common, and pulling without the proper tool risks cracking the valve body.
Not sure whether you have a 1222 or a 1225? Find your exact cartridge with our free Repair Finder before you order.
Tools you’ll need: – Phillips screwdriver (for escutcheon screws) – Needle-nose pliers (to remove the retainer clip) – Large pliers or channel-lock pliers (to pull the cartridge stem) – Nylon bristle brush and paper towels (valve body cleaning) – Towel or drain cover (loss prevention for small parts)
No basin wrench needed. The Moen 1222 Posi-Temp procedure does not involve a bonnet nut — that’s a different valve-family step.
How to Replace Moen 1222 Posi-Temp Shower Cartridge: Step-by-Step
Shut off the water
Moen’s shutoff documentation states that any repair to a Moen faucet requires shutting off the water supply — failure to do so risks flooding or injury. For a shower, look for a dedicated shutoff behind an access panel in the adjacent wall, closet, or ceiling. If there’s no dedicated shutoff, use the home’s main supply valve at the meter, in the basement, or on an exterior wall.
After closing the valve, turn the shower handle to the open position and confirm the water stops completely before touching anything else.
Cover the drain
Place a small towel or a drain cover in the tub or shower base. Moen specifically recommends this step before disassembly — the retainer clip and handle screws are small enough to vanish down an open drain.
Remove the handle and trim
Moen’s 1222 procedure assumes the handle and trim pieces have already been removed and directs you to your product-specific faucet guide for handle-assembly details, since trim styles vary. The typical sequence: remove the decorative cap over the handle screw, back out the handle screw with a Phillips screwdriver, slide off the handle, and remove any sleeve or adapter behind it.
Expose and remove the retainer clip
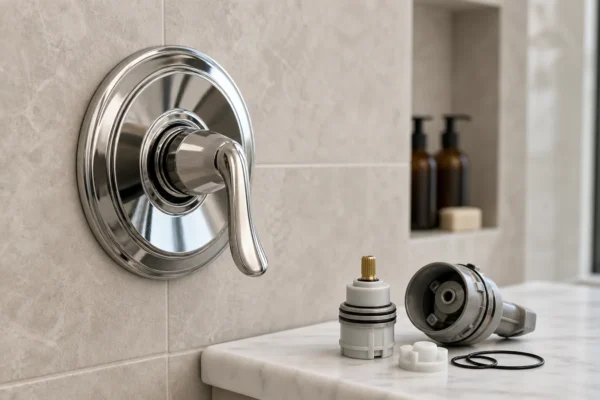
Remove the escutcheon screws with a Phillips screwdriver and pull the escutcheon plate away from the wall. You’ll now see the retainer clip — a thin, U-shaped metal bracket sitting in a slot at the top of the brass valve body. It’s what locks the 1222 cartridge in place.
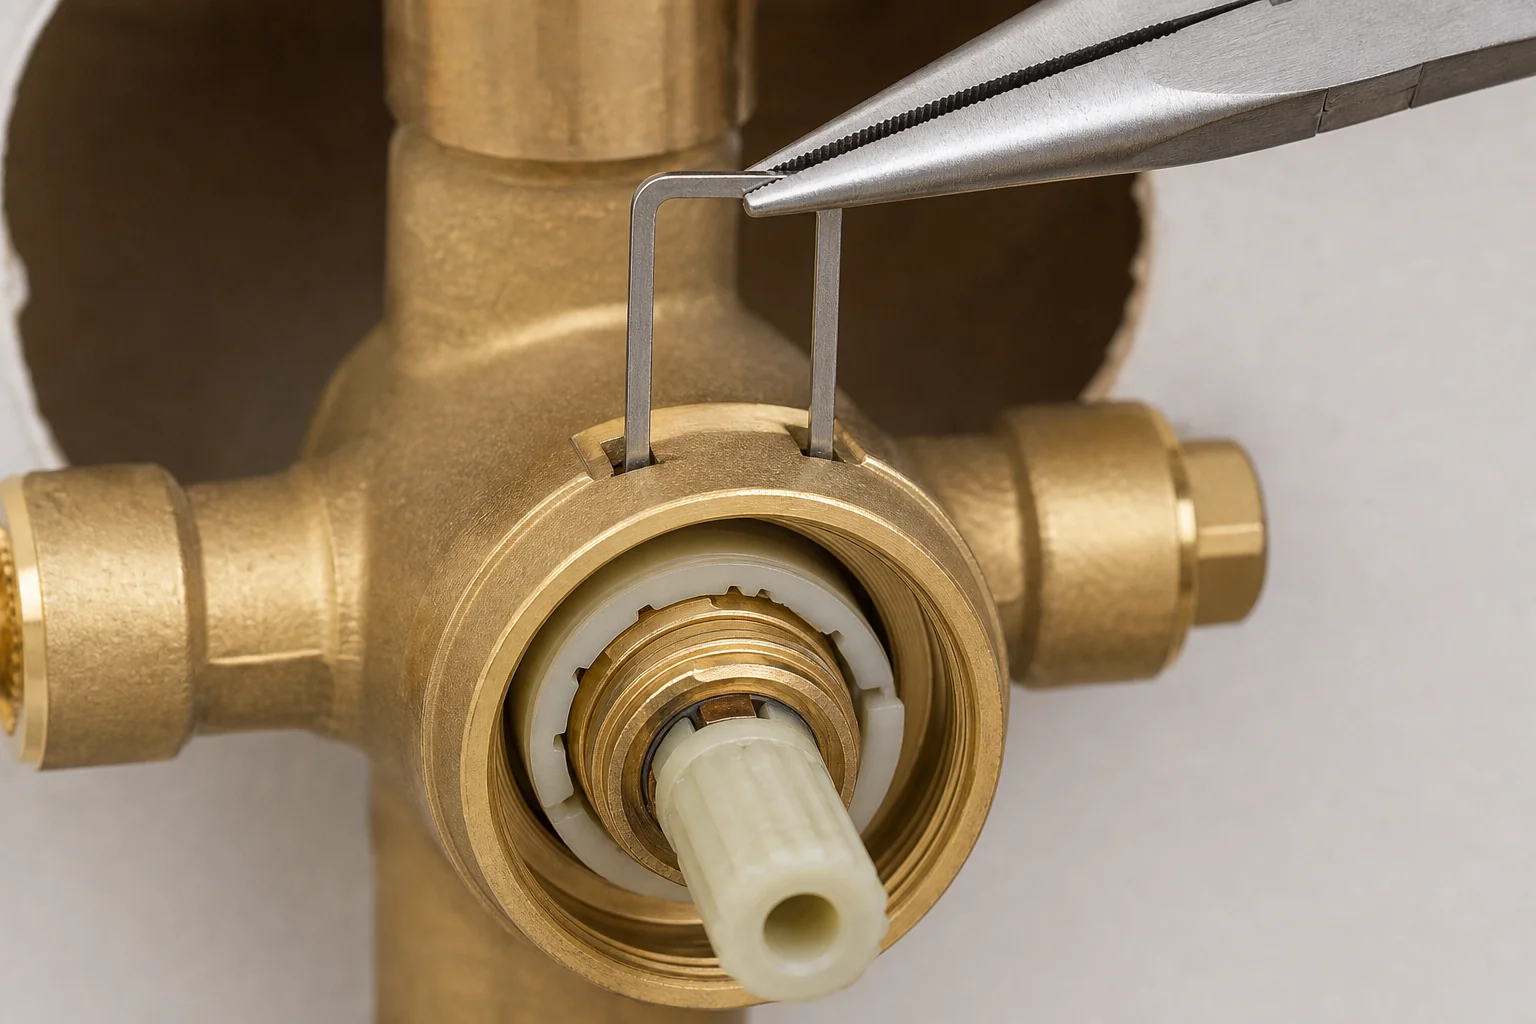
Grip the retainer clip with needle-nose pliers and slide it straight up and out of the slot. Moen’s instructions include a specific warning: do not drop the clip behind the wall. This clip is the single most important piece to track — without it, the repair cannot be completed and water cannot be safely restored.
Loosen the cartridge with the plastic twisting tool
Take the plastic twisting cap from the new cartridge kit and fit it over the old cartridge’s stem. Rotate the cartridge slightly more than one-quarter turn, then remove the tool. This breaks the mineral-bond seal between the cartridge’s rubber grommets and the valve body. Skipping this step and going straight to pulling is the single most common cause of a stuck-cartridge situation.
Pull the cartridge
Grab the cartridge stem with large pliers or channel locks and pull it straight out. Moen notes this may take real effort. Pull straight — do not rotate.
If the cartridge won’t budge, switch to the Danco 86712 puller rather than applying more torque with pliers. The puller is purpose-built for frozen Moen cartridges — forcing a seized cartridge with oversized pliers risks cracking the brass valve body, which turns a $90 cartridge job into a wall-access and valve-body replacement.
Clean and flush the valve body
Moen highly recommends cleaning and flushing the valve body before installing the new cartridge. Mineral buildup and loose debris inside the brass body can damage the new cartridge or obstruct water flow. Use a nylon bristle brush to scrub mineral deposits from inside the valve body walls.
For the flush: Moen warns that water can exit the open valve body with considerable force. Stand outside the tub or shower while you turn the shutoffs on briefly to clear debris — do not lean over the open valve. After flushing, remove excess water from the valve body with a rolled paper towel. Moen specifies this explicitly: the cartridge will not seat fully if excess water remains inside the body.
Lubricate and install the new cartridge
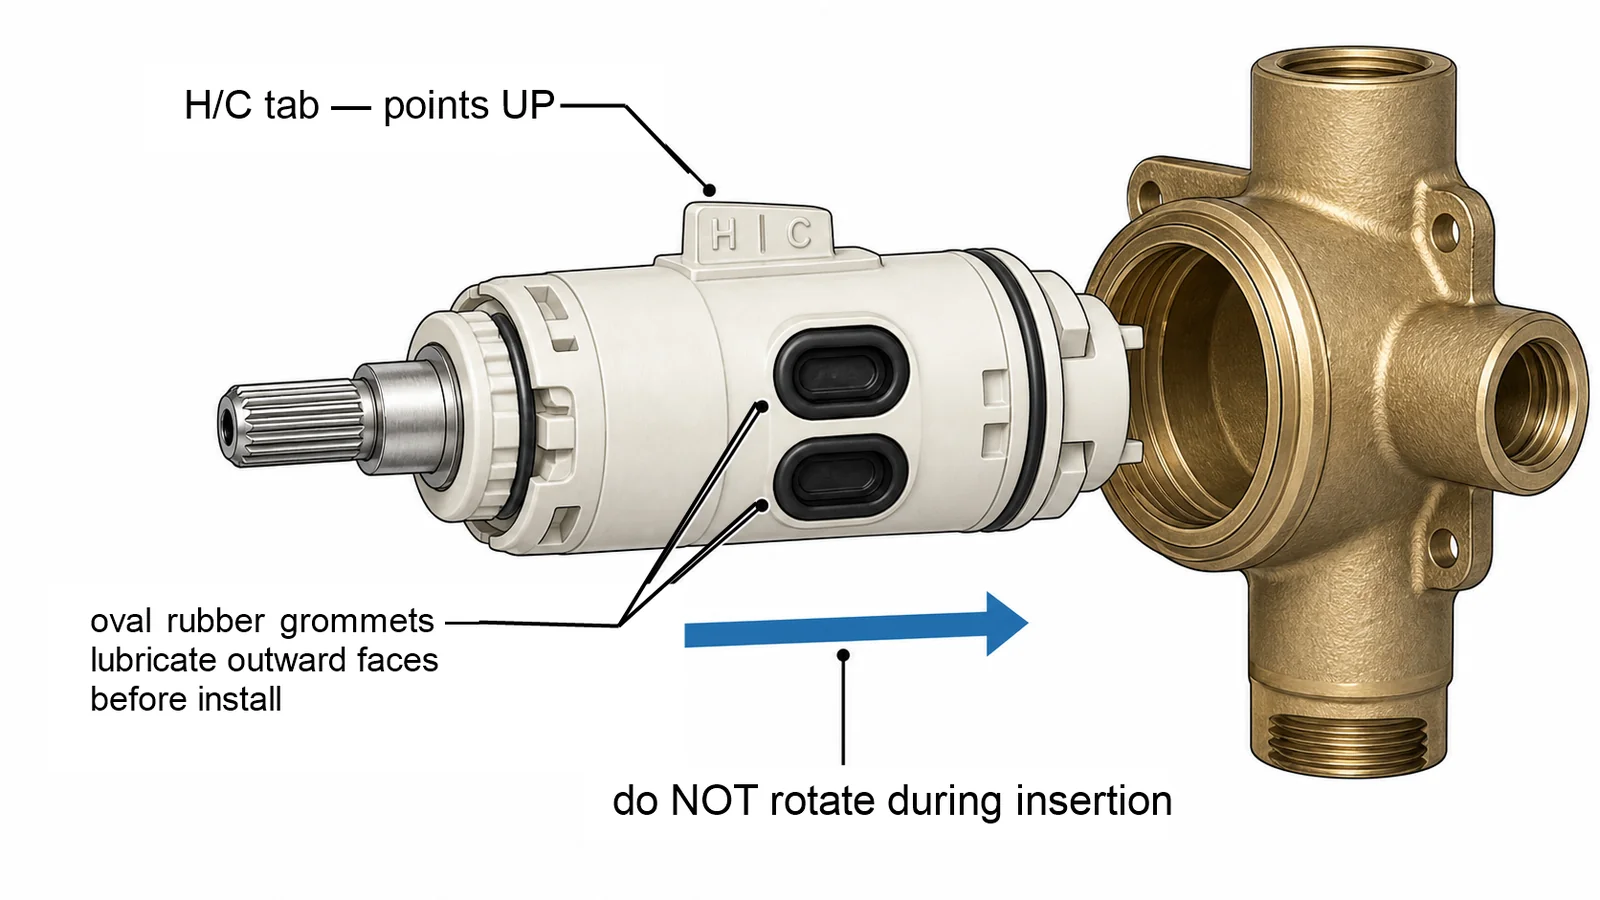
Apply silicone faucet grease to the outward-facing surface of the oval rubber grommets on both sides of the new 1222 cartridge — just the outward faces, as Moen specifies.
Orient the cartridge so the H/C tab points straight up. Slide it into the valve body without any rotation. Moen is unambiguous on this: the oval rubber grommets are not permanently attached to the cartridge body and will fall off during insertion if the cartridge rotates even slightly. Push in until the H/C tab is flush with the front face of the valve body.
Reinstall the retainer clip
With the H/C tab flush, gently slide the retainer clip back through the slot in the brass valve body. If you feel resistance, stop — resistance means the cartridge is not fully seated. Push the cartridge in further, confirm the H/C tab is flush, then retry the clip. Do not force it.
Moen’s critical rule: water cannot be turned back on if the retainer clip is not properly installed or is damaged or broken. If the clip was bent or lost during removal, source a replacement before proceeding further.
After the clip is seated, set the stem orientation: rotate the cartridge stem so the notched side of the brass stem faces opposite the H/C marking, per Moen’s instructions.
Reassemble trim and test
Reinstall the escutcheon, handle adapter, handle, and decorative cap per your trim-style guide. Turn the water supply back on slowly — Moen recommends using the dedicated shutoff valves when first restoring water to a freshly serviced valve. Check for leaks at the escutcheon and trim before declaring the repair complete.
If hot and cold are reversed after reassembly: this always means either the supply lines are reversed or the cartridge is upside down. Shut the water off, remove the cartridge, rotate it 180 degrees, and reinstall — Moen’s reversed hot/cold article confirms this is the only cause and the only fix.
The Mistakes That Wreck a Moen 1222 Replacement
These are the failure modes Moen calls out most prominently in its own documentation:
1. Skipping the twisting cap before pulling. Most stuck-cartridge problems start here. The plastic twisting tool breaks the grommet seal before pulling — use it every time, even if the cartridge feels loose to the touch.
2. Dropping the retainer clip behind the wall. The clip is thin, springy, and will bounce into a gap before you can catch it. Work over a towel, keep a finger in contact with the clip while seating it, and cover the drain. If it disappears, the repair stops until a replacement clip is in hand.
3. Rotating the cartridge during insertion. The oval rubber grommets sit loosely in channels on the 1222 cartridge body. Any rotation dislodges them. If they fall into the valve body cavity, the repair requires backing out to Step 7.
4. Installing with the H/C tab down. The shower appears to work — but hot and cold are swapped. The fix is a full disassembly cycle and 180-degree rotation. This is avoidable by double-checking the H/C tab orientation before pushing the cartridge in.
5. Skipping the valve body flush. Mineral debris dislodged during cartridge removal will score the new cartridge’s rubber seals within weeks. The five minutes of cleaning and flushing extend the new cartridge’s working life by years.
When to Call a Plumber
Four conditions move this repair beyond DIY:
- The shutoff valves won’t fully close. Moen’s documentation is clear: any cartridge repair requires a complete water shutoff. A leaking shutoff is a separate plumbing problem that must be fixed first.
- The cartridge is frozen and the Danco 86712 puller can’t move it. The puller is the end of the DIY escalation path — applying more force after that risks cracking the valve body.
- The retainer clip is damaged or lost and can’t be sourced quickly. The repair is incomplete without it, and water cannot be safely turned on.
- Flushing reveals heavy debris, damaged brass, or uncontrolled water flow. A deteriorated valve body is not a cartridge problem; it’s a valve replacement.
Professional plumbing service runs $182–$500 for most homeowners, with an average around $340 and hourly rates of $45–$200, per Angi’s 2026 plumbing cost data. For a straightforward cartridge swap, a plumber visit is one to two hours of labor — meaningful savings compared to a valve-body replacement if caught early.
How Often Does the Moen 1222 Cartridge Need Replacing?
Moen does not publish a rated service interval for the 1222 cartridge. In practice, the symptoms are the signal: a drip that won’t stop after tightening the handle, a handle that has become noticeably stiffer or looser than it used to be, or temperature that won’t hold consistent. Homes with hard water or high sediment in the supply will see cartridges wear faster — which is one more reason not to skip the valve body flush during this repair.
Quick Reference: Moen 1222 Symptoms, Causes, and Fixes
| Symptom | Likely cause | Fix |
|---|---|---|
| Shower drips when off | Worn 1222 cartridge seals | Replace the 1222 cartridge |
| Handle stiff or hard to turn | Corroded or seized cartridge | Replace; use puller if frozen |
| Hot and cold are reversed | Cartridge upside down or supply lines reversed | Rotate cartridge 180° and reinstall |
| Low flow after replacement | Debris in valve body | Re-flush valve body; check showerhead |
| Retainer clip won’t seat | Cartridge not fully flush with valve body | Push cartridge fully in, retry clip |
| Leaks at escutcheon | Trim not fully seated or hardware loose | Reseat escutcheon, retighten screws |
| Still drips after new cartridge | Wrong cartridge model (1225 in a Posi-Temp valve) | Confirm valve type; replace with 1222 |
What to Do Next
If your shower was dripping before this repair, read why is my shower dripping to confirm you’ve addressed the root cause — some drips originate at the diverter or supply connection rather than the cartridge body.
If you’re not certain your valve is a Posi-Temp 1222 rather than a standard-valve 1225 or a newer M-CORE, start at how to identify your shower valve and cartridge before ordering parts.
For the full picture of single-handle shower repairs — including diverter issues, low pressure, and temperature problems — the Shower Repair Guide covers every article in the cluster.
Can I use a Moen 1225 cartridge in a Posi-Temp valve?
No. The Moen 1225 is a flow cartridge for Moen single-handle standard valve showers. Lowe’s product documentation for the 1225 explicitly excludes Posi-Temp and ExactTemp valves. The cartridges are not interchangeable — installing the wrong one will result in a leaking or non-functioning valve.
What if I can’t find a shutoff for my shower?
Moen notes that shower shutoffs are commonly behind an access panel in the adjacent wall, closet, or ceiling. If your shower has no dedicated shutoff, use the home’s main water valve at the meter, in the basement, or on an exterior wall. Do not proceed without a complete shutoff — Moen states that failure to do so risks flooding or injury.
The retainer clip slipped behind the wall — what do I do?
Stop the repair. Do not turn on the water without the clip correctly installed — Moen’s documentation explicitly states water cannot be restored until the clip is replaced. Moen replacement clips are available at plumbing supply houses and online. If the clip is inaccessible without wall access, call a plumber.
My cartridge still won’t come out after the twisting cap and pliers — now what?
Get the Danco 86712 cartridge puller ($17.98 at Home Depot), which is specifically designed for frozen Moen 1222, 1225, and 1200 cartridges. If the puller also fails to move the cartridge, call a plumber — at that point, applying additional force risks cracking the brass valve body.
Do I need silicone grease, or will any lubricant work?
Use silicone faucet grease only. Moen specifies lubricating the outward-facing surfaces of the oval rubber grommets before installation. Petroleum-based lubricants degrade rubber seals and will cause premature failure of the new cartridge.
How will I know if the repair worked before I put all the trim back on?
After reinstalling the retainer clip and setting the stem orientation, you can do a quick test before reassembling the handle and escutcheon: carefully turn the water supply back on and confirm there are no leaks from the valve body. Then install the trim and test the handle for full range of motion and correct hot/cold assignment.
Sources
- Moen 1222 Posi-Temp Cartridge Replacement Instructions — Moen official procedure
- Moen How to Turn Off the Water Supply to the Faucet — Moen shutoff guidance
- Moen Valve Body Cleaning and Flushing — Moen cleaning procedure
- Moen How to Reverse Hot and Cold for a 1222 Cartridge — Moen hot/cold reversal fix
- Moen 1225 Standard Valve Cartridge Instructions — different valve family; confirms 1225 ≠ Posi-Temp substitute
- Moen 1214 M-CORE Cartridge Instructions — newer valve family with different procedure
- Home Depot — Moen 1222 Posi-Temp Shower Cartridge — $71.68, Model #1222
- Home Depot — Danco 86712 Cartridge Puller for Moen — $17.98, fits Moen 1200/1222/1225
- Lowe’s — Moen 1225 Cartridge — confirms 1225 excludes Posi-Temp
- Angi — Plumbing Repair Costs 2026 — professional service cost benchmarks
Educational content only. Not a substitute for licensed professional advice. Local plumbing codes vary by jurisdiction. Use of any guidance from this guide is at your own risk.
Get the homeowner’s plumbing repair toolkit checklist — the tools, parts, and decisions every homeowner should have on hand. [Free download — enter your email]
Parts for this repair
As an Amazon Associate, plumbingbythebook earns from qualifying purchases. Links below are affiliate links — they cost you nothing extra.
- Moen 1222 Posi-Temp Shower Cartridge — OEM Moen 1222 replacement cartridge. Verify the listing shows ‘Moen’ as the brand — marketplace counterfeits are a real risk for OEM plumbing parts.
- Danco 86712 Cartridge Puller for Moen — The recommended puller for Moen 1200, 1222, and 1225 cartridges. Buy this before you start if the shower is more than a few years old.
Related guides
How to Identify Your American Standard Shower Valve: Trim, Cartridge, and Rough-In Valve [2026]
How to identify your American Standard shower valve starts with a fact that trips up a lot of…
How to Identify Your Moen Shower Valve: Cartridge Family and Series [2026]
How to Identify Your Moen Shower Valve: Cartridge Family and Series [2026] Knowing how to identify your Moen…
How to Identify Your Kohler Shower Valve: Rite-Temp, MasterShower, and Cartridge Family [2026]
How to Identify Your Kohler Shower Valve: Rite-Temp, MasterShower, and Cartridge Family [2026] Knowing how to identify your…