
A leaking flapper costs $4 to fix and a fill valve costs $10, but only if you buy the right one. Buy the wrong size flapper or a generic fill valve that doesn’t seat in your tank’s flush-valve opening and you’ve added a return trip to the hardware store, a second weekend, and zero progress. Knowing how to identify your toilet brand and model before you start the repair is the single highest-leverage step in any toilet fix.
The good news: most toilets stamp the model number somewhere you can read it in 30 seconds with a flashlight. The catch is that no manufacturer agrees on where to put it, so you have to know all five of the common locations. This article walks through them in order from “easiest” to “you may need to call customer service,” with brand-specific cues for the five most common residential toilet brands – Kohler, TOTO, American Standard, Gerber, and Mansfield.
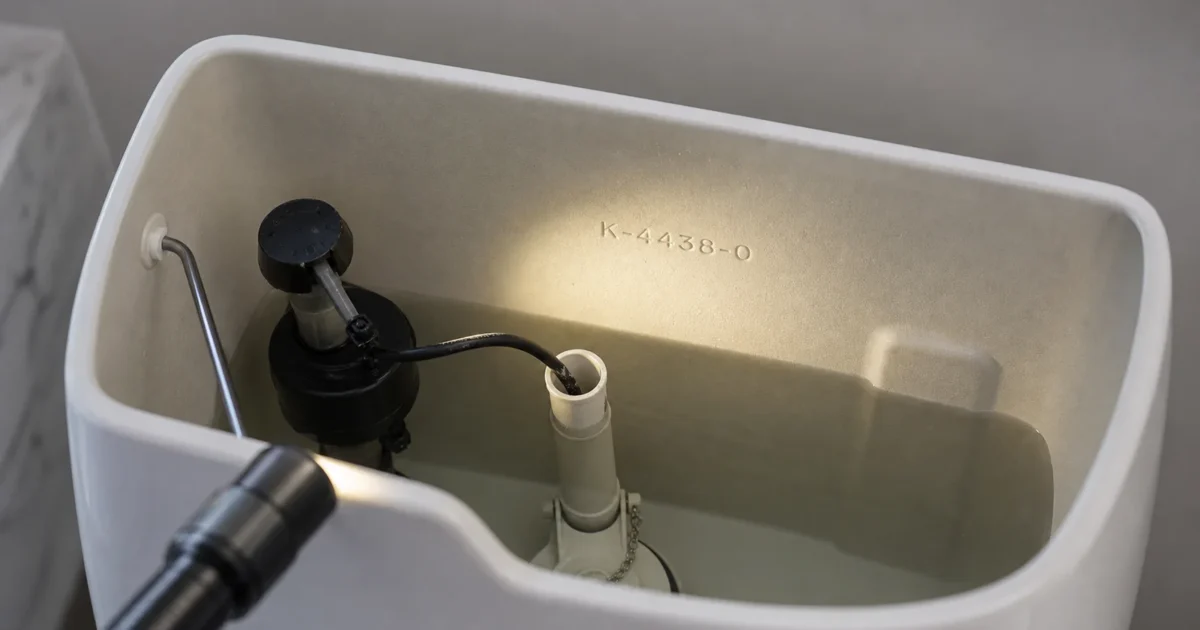
Quick answer – where is my toilet’s model number? Lift the tank lid and shine a flashlight at an angle across the inside back wall of the tank, just above or below the waterline – that is where most toilets stamp, mold, or ink-print the model number, and the tank number is the one that determines most repair parts. If it is not there, check, in order: the underside of the tank lid, under the bowl rim (and between the seat bolts), and – for TOTO – the right-hand tank wall opposite the trip lever.
Method 1: Inside the Tank, Back Wall Near the Waterline
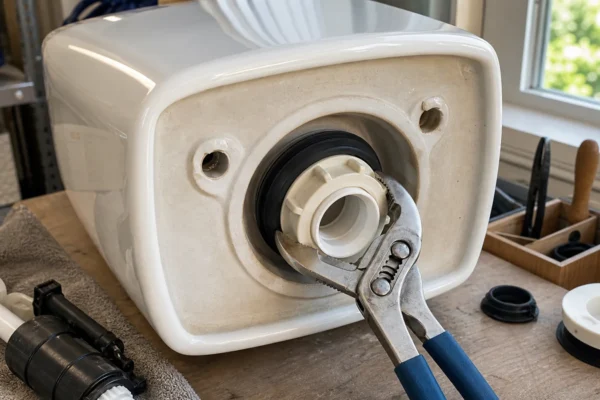
This is the most common location and the place to start. Take the tank lid off (lift straight up, set it gently on a towel – porcelain chips easily). Shine a flashlight at an angle across the back wall of the tank, just above and below the waterline.
What you’re looking for: a stamped, molded, or ink-printed model number. American Standard tank numbers are four digits and sit on the back wall near the water-level mark, either stamped into the china or printed as a barcode label. Kohler tank numbers are molded into the china or stamped in blue or black ink, and a K prefix may or may not appear in front of the base number. Gerber tank model numbers sit on the back wall near the waterline alongside a cast date and a barcode/serial label Gerber calls the “D and S Code.”
For TOTO, look at both the back wall AND the right-hand wall opposite the trip lever – TOTO model marks are stamped or engraved into the china in both locations depending on the model. TOTO model numbers commonly combine letters and a three-digit number like CST854, ST743E, or MS974CEFG.
If mineral deposits or water staining make the stamp hard to read, wipe the back wall with a cloth before getting close with the flashlight. Kohler explicitly notes that dirt remaining in the depressions can actually make an impressed number MORE visible, so don’t scrub the area completely clean before reading it.
Method 2: Underside of the Tank Lid
Flip the tank lid over (carefully – this is the most expensive part on the toilet to replace). Look at the underside.
Tank lids often carry a separate part number from the tank itself. For Kohler, the underside of the lid has a part number specific to the lid, not the toilet – useful for ordering a replacement lid, but not enough to identify the toilet’s internal repair parts. For Mansfield, the tank model number can appear under the lid, on the back wall of the tank, OR on the bottom of the tank itself. For older or obscure toilets, the lid underside is sometimes the only legible marking left.
Photograph anything you find before putting the lid back. A plumber or customer-service rep can often work backwards from a lid part number plus photos of the internal flush valve to identify the original toilet.
Method 3: Under the Bowl Rim or Between Seat Bolts
The bowl has its own identification, and bowl numbers are easy to confuse with tank numbers. For a two-piece toilet, the tank and bowl can come from different model lines if a previous owner replaced one half – so knowing both numbers matters when ordering parts that span the tank-to-bowl interface (gaskets, tank bolts, certain flush valves).
Kohler two-piece bowl numbers are molded into the underside of the bowl flange. Gerber bowl numbers sit under the rim of the bowl – use a smartphone camera or small mirror to read it while installed. Many modern toilets also stamp the manufacturer name in small print on the bowl between the two seat bolts (lift the seat to expose this area).
Ignore the brand name printed on the toilet seat itself. The seat is frequently replaced with an aftermarket part and may not match the toilet’s manufacturer at all. Mistaking the seat brand for the toilet brand is one of the most common identification errors.
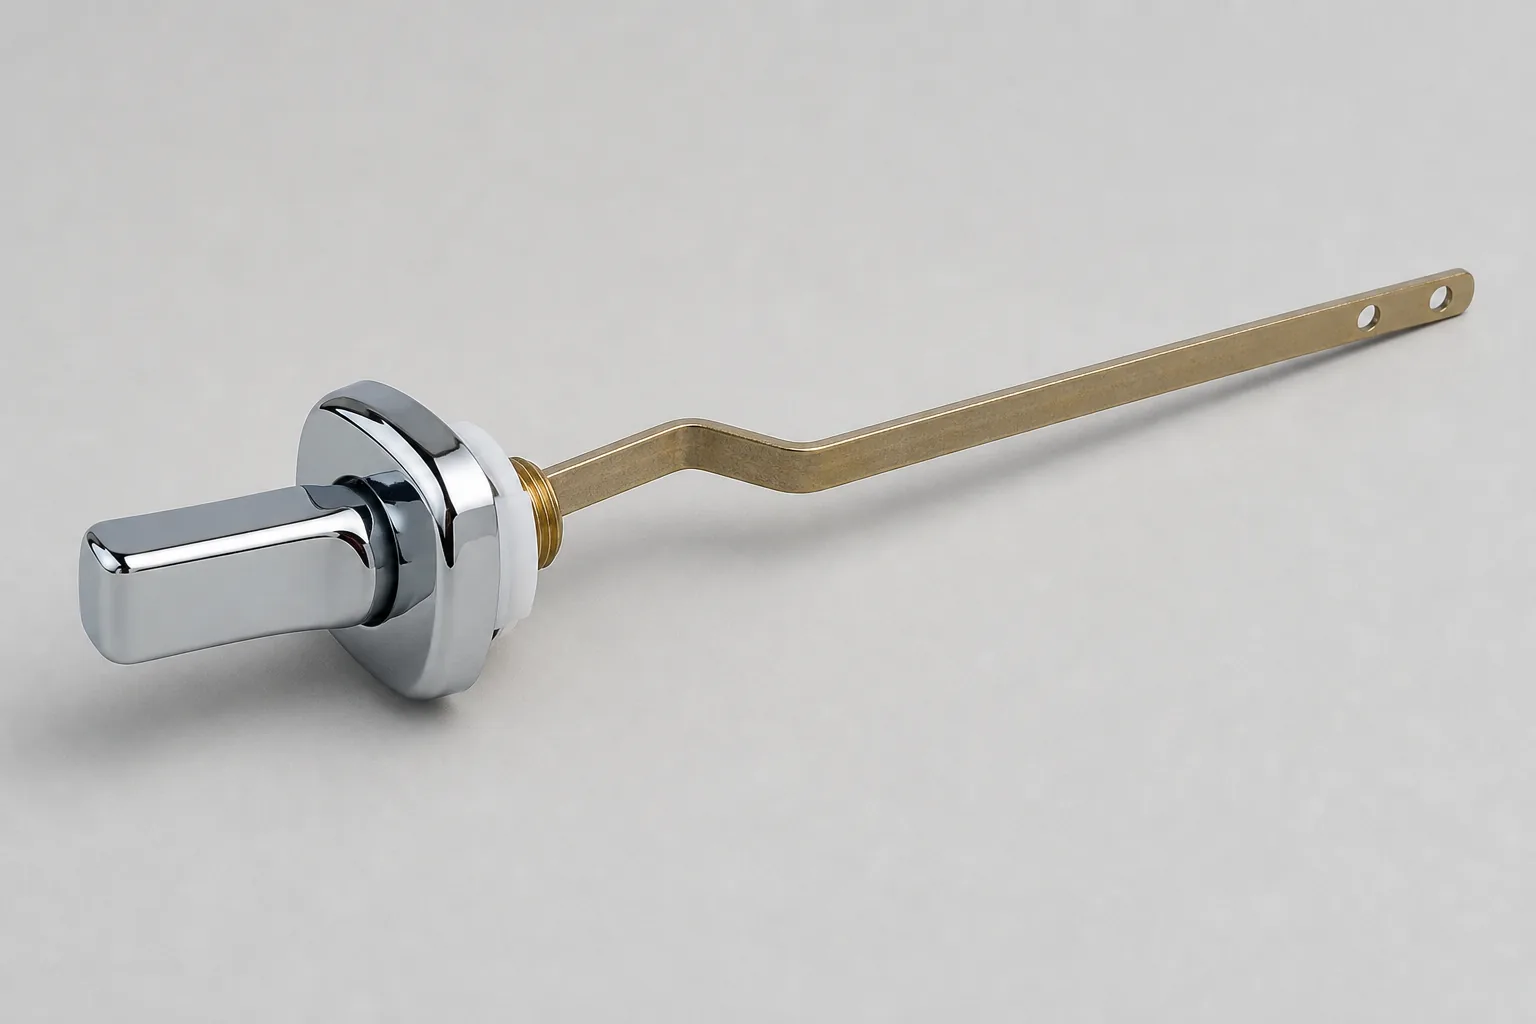
Method 4: Brand-Specific Cues
When the tank or bowl stamp is faded, missing, or covered by a tank liner (Kohler’s “Insuliner” model in particular), brand-specific visual cues can narrow the search. This table is the at-a-glance version – what each brand’s number looks like, where it hides, and the cue that confirms it:
| Brand | Tank number format | Where to read it | Key cue / generation suffix |
|---|---|---|---|
| Kohler | 4-5 digits, optional K prefix |
Molded or blue/black-ink stamped inside the tank; lid underside | Canister-style flush valve on some models; suffix AA, AB, or BA follows the color code |
| American Standard | 4 digits | Stamped or barcode label on the back wall near the waterline | First digit 2 = one-piece, 4 = two-piece; XXX in parts diagrams = the color/trim suffix |
| TOTO | Letters + 3 digits (e.g. CST854) |
Back wall and the right-hand wall opposite the trip lever | ST=tank, CT=bowl, CST=pair, MS=sold with seat; suffix E=1.28 gpf, G=glaze, R=right lever, M=dual flush; color codes start # (#01 Cotton White, #11 Colonial White) |
| Gerber | Tank 28-xxx, bowl 21-xxx |
Back wall near waterline, alongside a cast date + barcode (the “D and S Code”) | Line names (Aqua Saver, Maxwell, Viper, Avalanche) help match by shape when the stamp is partial |
| Mansfield | 3 digits (1/7) or 4 digits starting 3 |
Back wall, under the lid, or the tank bottom | 1=two-piece, 7=one-piece, 3xxx=newer; water consumption (gpf) is often noted inside the tank |
| Pressure-assist (Flushmate/Sloan) | Flushmate series number on a blue sticker | Top of the sealed pressure vessel inside the tank | A sealed black vessel instead of open water; you need this number and the porcelain toilet’s number to order parts |
Kohler also offers a beta photo-upload tool, Kohler Scout, that attempts to match a full-toilet photo to a model (covered in Method 5).
Method 5: Manufacturer Photo Tools and Customer Care
When stamps are unreadable or the toilet is older than 15 years, the manufacturer is your last identification step before guessing.
Kohler’s Find a Service Part page supports a three-step flow: identify the product, view the parts diagram, select the genuine part. Kohler Scout (beta) accepts a photo upload and attempts to identify the model. Mansfield’s parts sellers explicitly ask for tank/parts photos when the number can’t be found.
American Standard’s support is FAQ-based – their model-number help points you back to the four-digit tank number on the back wall. TOTO USA has product FAQs plus PDF parts manuals you can search by model string. Gerber’s model-number help page walks through tank, bowl, cast date, barcode, and serial locations specifically.
A short ID phone call to manufacturer customer service can be free, but if it ends with “we need a plumber to look at it in person,” budget $75-$150 for a plumber diagnostic/service-call visit (Modernize’s 2026 plumbing cost guide).
How to Identify Your Toilet: The Quick Decision Tree
If you’ve worked through the methods above and want to know what to do with what you found:
- Tank model number is legible: that’s the most useful number. Most repair parts are determined by the tank number marked inside the tank.
- Only the bowl number is legible: good for bowl-specific parts (rim gaskets, bowl-to-floor seals); contact the manufacturer with the bowl number to back into the tank model.
- Only the lid number is legible: good for lid replacement; not enough for internal parts. Treat the lid number plus full-toilet photos as a customer-service ticket.
- Nothing is legible but the manufacturer logo is visible: use brand-specific visual cues above to narrow the line, then try the manufacturer’s photo tool (Kohler Scout, manufacturer parts FAQ).
- No legible markings AND no logo: the toilet is either very old or generic. Move to universal “will fit” parts (Method 6 of this guide is implicit – universal flapper kits work on ~99% of toilets per Korky’s specification) OR replace the whole fixture if it’s an old high-gpf model anyway.
What to Do If You Still Can’t Find the Brand
Three fallback paths, in order of preference:
A disciplined photo set. Photograph the whole toilet from front, side, and above. Photograph the tank with lid on and off, the underside of the lid, the inside back wall, side walls, bottom of tank, flush valve, fill valve, trip lever, bowl rim, and every number, barcode, label, or date mark. Send the set to manufacturer customer service or upload to Kohler Scout if you suspect Kohler.
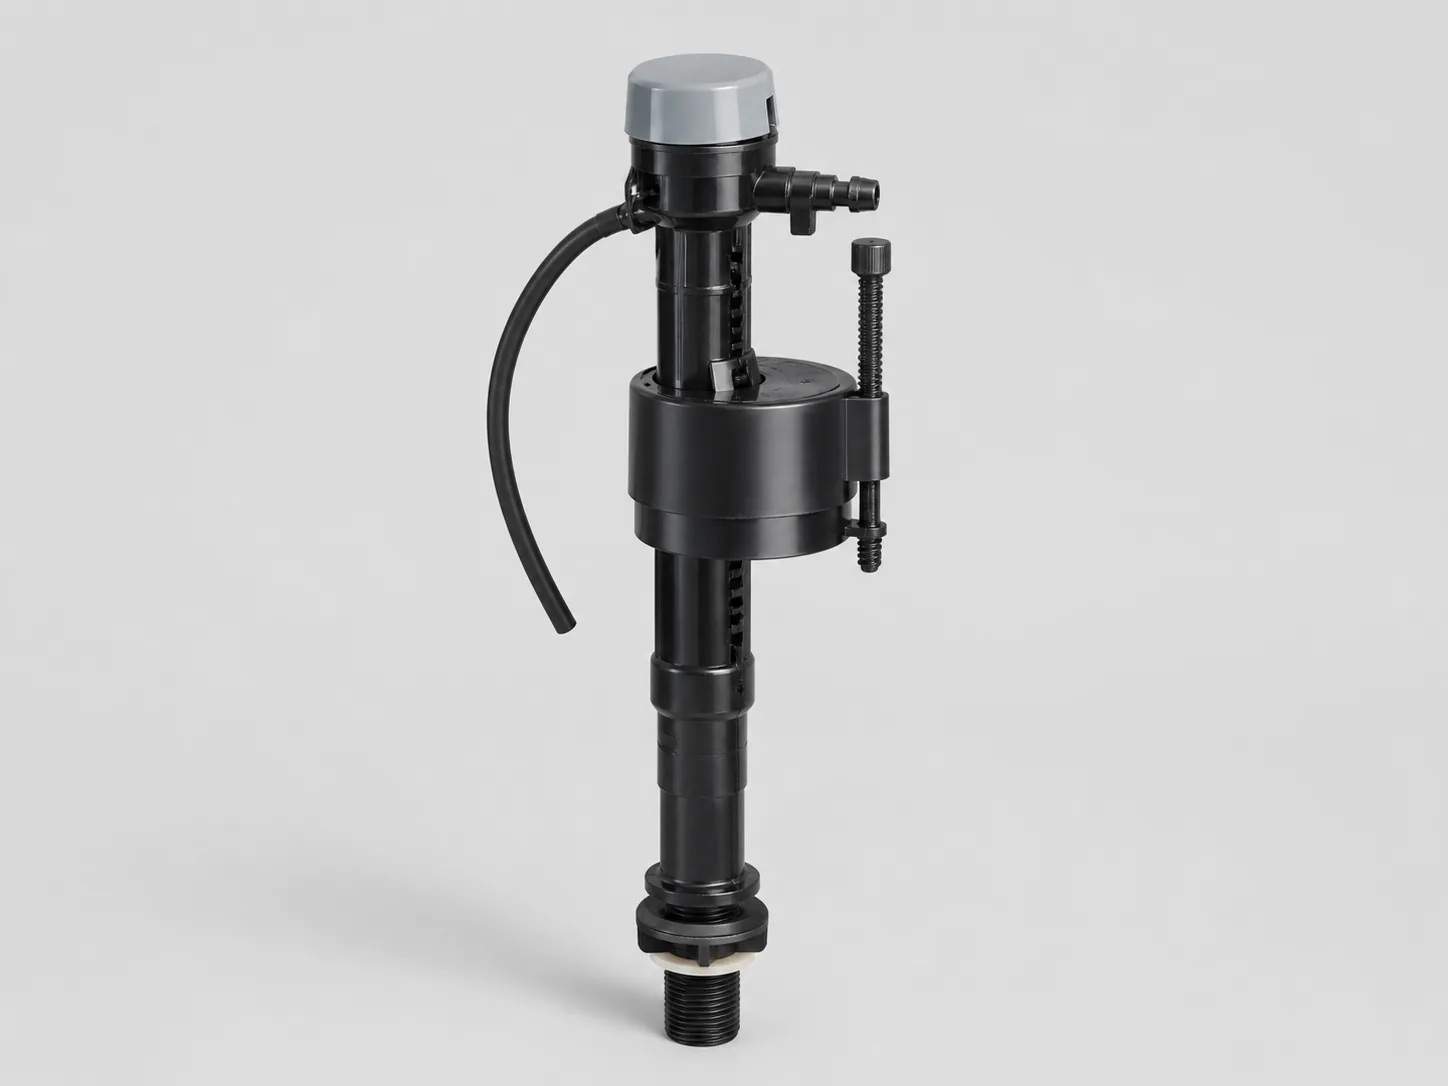
Universal “will fit” parts. Fluidmaster’s 400H Performax fill valve has universal compatibility with most 2-inch and 3-inch toilets and adjusts from 9 to 14 inches in height. Korky’s universal fill-valve and 2-inch flapper kit advertises a fit on 99% of toilets. Danco and BrassCraft sell similar universal toilet repair kits. Universal parts work for the high-frequency causes (worn flapper, failing fill valve) but NOT for proprietary canister/tower flush valves, pressure-assist systems, or toilets with non-standard mounting hardware.
Replace the whole toilet. Reasonable when the porcelain is cracked, the tank or lid is unavailable, the pressure vessel is obsolete, the fixture is an old high-gpf model with repeated part failures, or the repair would require discontinued parts at premium prices. Rebuilding a toilet runs $250-$600 (Fixr); a new water-efficient toilet starts around $150 and goes up.
Beyond the Model Number: Date, Flush-Valve Size, and Rough-In
The model number gets you brand-specific parts, but three quick measurements answer the questions the model number doesn’t – how old the toilet is, which flapper and flush valve fit, and whether a replacement will even bolt down.
How old is it? Read the date stamp. Most manufacturers press a manufacture date into the soft clay, usually inside the tank or on the underside of the lid, near the model number. It’s often formatted month-day-year with a two-digit year (a stamp like “4 5 87” or “46187” means 1987). The date won’t identify the model, but on an unmarked vintage toilet it’s sometimes the only clue you have – and it tells you whether you’re maintaining a water-guzzling 3.5-gallon-per-flush antique that’s worth replacing rather than repairing.
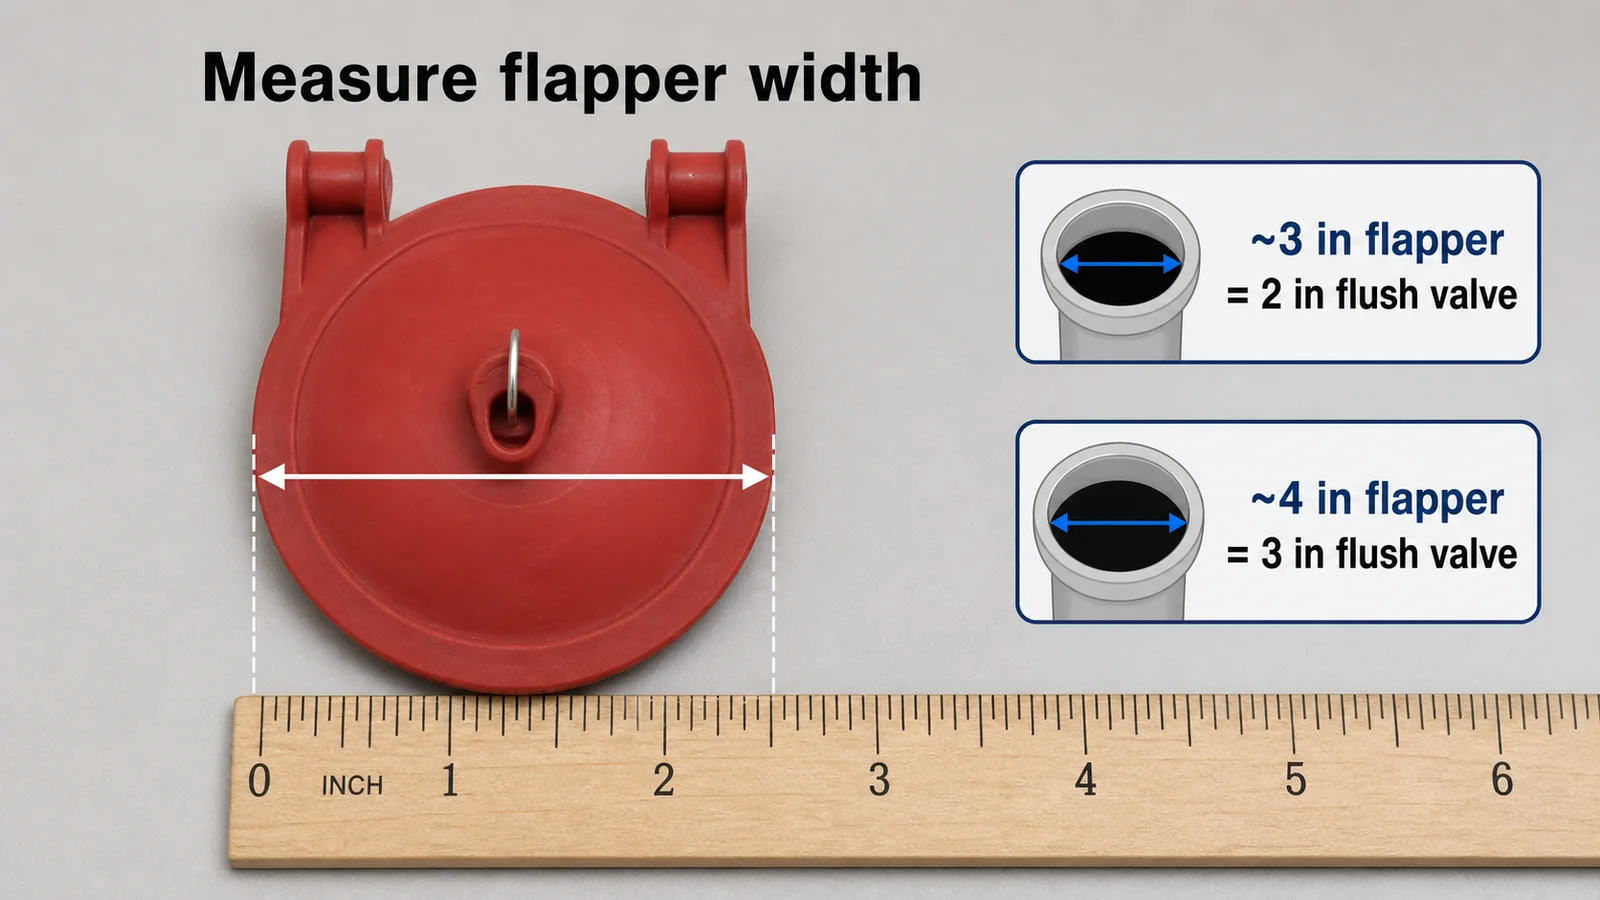
Do you have a 2-inch or 3-inch flush valve? This is the single most important sizing question for the two most common repairs (flapper and flush valve), and the model number rarely tells you directly. The fastest method, per Fluidmaster: measure your existing flapper. A flapper roughly 3 inches wide takes a 2-inch flush valve; one roughly 4 inches wide takes a 3-inch valve. Many flappers are also labeled “2” or “3” on the rubber. Older toilets are usually 2-inch; many post-2010 high-efficiency models use a 3-inch valve for a faster flush.
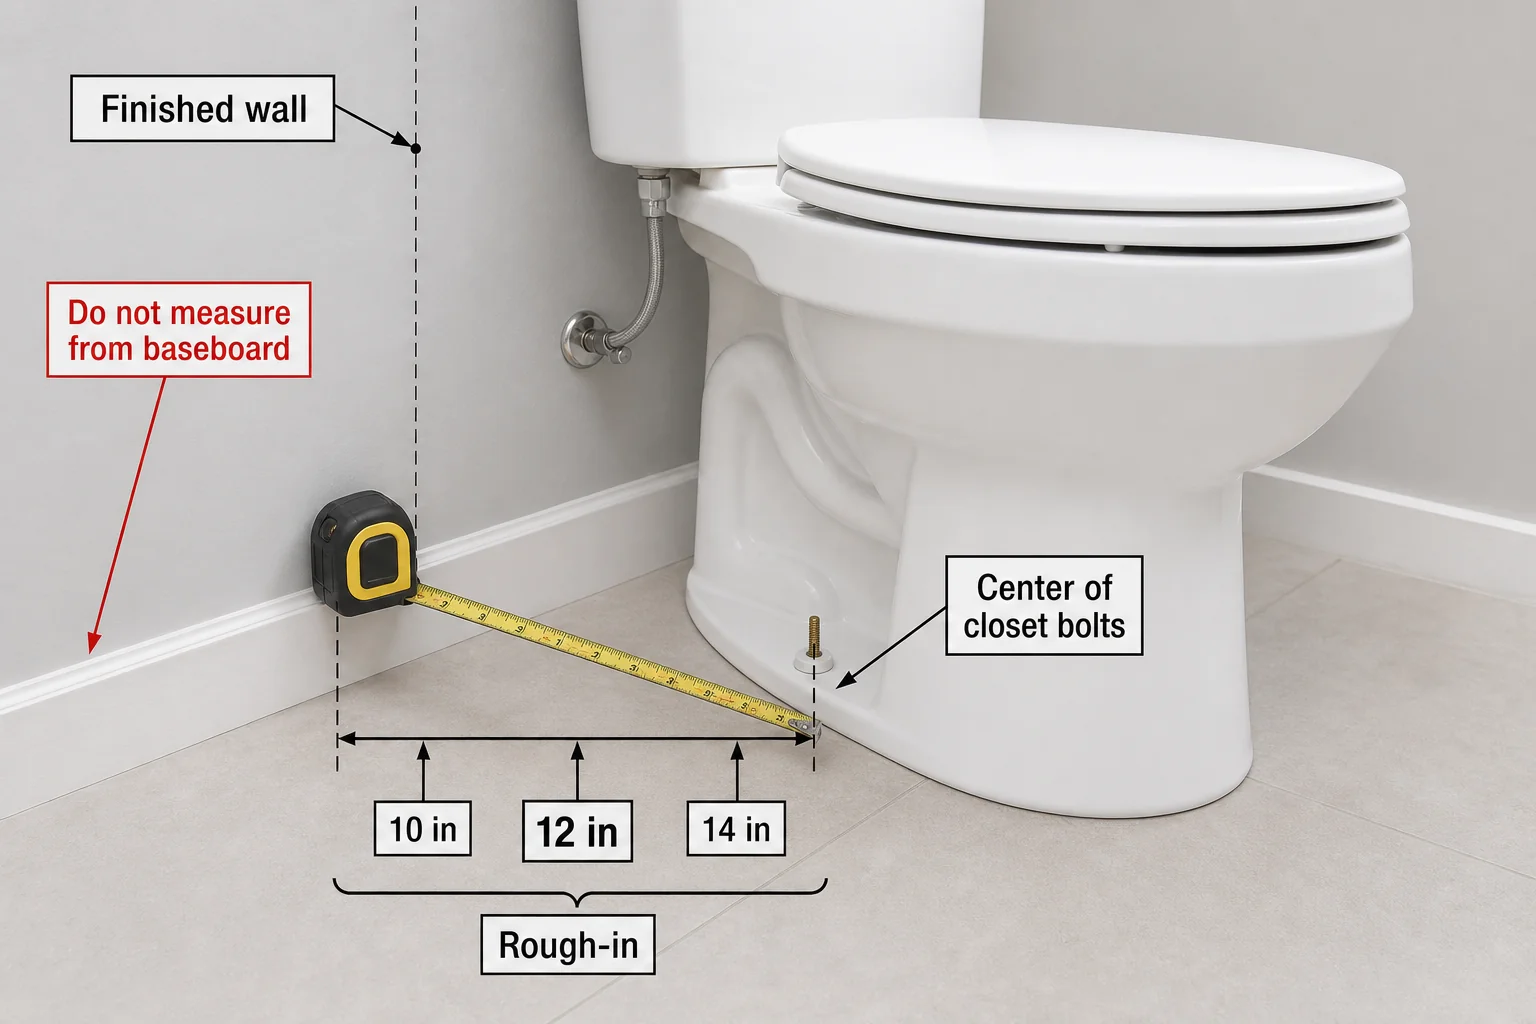
Measuring for a replacement? Get the rough-in. If you’re replacing the whole toilet rather than repairing it, the rough-in is the make-or-break dimension. Measure from the finished wall (not the baseboard) to the center of the closet bolts that hold the toilet to the floor. 12 inches is standard; 10-inch and 14-inch rough-ins exist on older or custom installs. A 10-inch toilet will fit a 12-inch rough-in (leaving a small gap behind it), but a 12-inch toilet will not fit a true 10-inch rough-in – so measure before you buy.
One-piece or two-piece? A visible seam where the tank meets the bowl means a two-piece (the tank and bowl bolt together); a smooth, continuous molding with no seam is a one-piece. It affects which gaskets and bolts you need, and – as noted under American Standard above – a tank number beginning with 2 is typically one-piece, 4 is two-piece.
What to Do Next
Once you have the model number, the per-issue repair articles tell you what to actually buy. The Pillar 2 cluster – including Why Is My Toilet Running? 6 Common Causes and the per-issue toilet repair articles publishing on a rolling cadence – all start with “what’s your model” before they recommend parts. Bookmark the Toilet Repair Guide (Pillar 2 hub) as the index, or subscribe at the bottom of any guide page for one notification per new article.
For the faucet equivalent – “How to Identify Faucet Brand and Model” – the same identification logic applies. See How to Identify Your Faucet Brand and Model for cross-fixture identification patterns that work for faucets, valves, and supply fittings.
Where is my toilet’s model number located?
Most often it’s stamped, molded, or ink-printed on the inside back wall of the tank, just above or below the waterline – that’s the place to start. If it’s not there, check the underside of the tank lid, under the bowl rim, and (for TOTO) the right-hand tank wall opposite the trip lever.
What if there are no legible markings at all?
Take a disciplined photo set – the whole toilet, the tank inside and out, the lid underside, the flush valve, and every label or date mark – and send it to manufacturer customer service, or upload it to Kohler Scout if you suspect Kohler. If nothing identifies it, universal “will fit” repair parts work on about 99% of toilets for the common fixes.
Is the brand printed on the toilet seat the toilet’s brand?
Not reliably. Seats are frequently swapped for aftermarket parts, so the seat brand may not match the toilet at all – mistaking the seat brand for the toilet brand is one of the most common identification errors.
Are toilet repair parts universal?
For the high-frequency fixes – a worn flapper or a failing fill valve – universal kits (such as Korky’s, advertised to fit 99% of toilets, or the Fluidmaster 400H) usually work. They do NOT cover proprietary canister/tower flush valves, pressure-assist systems, or non-standard mounting hardware, which need the exact part.
The stamp is faded – how do I read it?
Wipe the back wall with a cloth and shine a flashlight at an angle across it. Don’t scrub the depressions completely clean: Kohler notes that dirt remaining in an impressed number can actually make it more visible.
Do I need both the tank and the bowl number?
The tank number is the most useful – most repair parts are determined by it. The bowl number matters for bowl-specific parts (rim gaskets, bowl-to-floor seals), and on a two-piece toilet the tank and bowl can be from different model lines if a previous owner replaced one half.
How can I tell how old my toilet is?
Look for a date stamp pressed into the china inside the tank or under the lid, usually near the model number. It’s typically month-day-year with a two-digit year – a stamp like “4 5 87” means 1987. It won’t give the model, but it dates the fixture and flags an old high-gallon-per-flush toilet that may be cheaper to replace than to keep repairing.
Do I have a 2-inch or 3-inch flush valve?
Measure your old flapper: about 3 inches wide means a 2-inch flush valve, about 4 inches wide means a 3-inch valve (many flappers are also stamped “2” or “3”). This, not the model number, is what determines the flapper and flush valve you buy.
How do I measure my toilet’s rough-in for a replacement?
Measure from the finished wall (not the baseboard) to the center of the bolts holding the toilet to the floor. 12 inches is standard; 10 and 14 inches exist. A 10-inch toilet fits a 12-inch rough-in, but a 12-inch toilet won’t fit a true 10-inch one – so confirm before buying.
Sources
- Kohler: Identifying Your Toilet Model PDF
- Kohler: Finding a Kohler or Sterling Product Model Number or Serial Number
- Kohler: Find a Service Part (Scout photo tool)
- American Standard: Toilet Model Number FAQ
- TOTO USA Product FAQ
- TOTO Aquia III Parts Manual
- Gerber: Where to Find the Model Number
- Mansfield: How to Find Tank Model Number
- PlumbingSupply: Toilet Identification Cross-Reference
- PlumbingSupply: Finding Toilet Repair Parts
- Fluidmaster 400H Performax Fill Valve
- Korky Universal Fit Toilet Repair Kit (Lowe’s)
- Kully Supply: Flushmate Series Number Guide
- Modernize: 2026 Toilet Repair Cost
- Fixr: Toilet Repair Cost Guide
Educational content only. Not a substitute for licensed professional advice. Local plumbing codes vary by jurisdiction. Use of any guidance from this guide is at your own risk.
Get the homeowner’s plumbing repair toolkit checklist – the tools, parts, and decisions every homeowner should have on hand. [Free download – enter your email]
Parts for this repair
As an Amazon Associate, plumbingbythebook earns from qualifying purchases. Links below are affiliate links — they cost you nothing extra.
- Korky Universal Toilet Repair Kit (Fill Valve + 2-Inch Flapper) — When you genuinely can’t identify the toilet, this universal kit fits about 99% of standard tanks — the safe choice for the common fill-valve and flapper repairs.
- Fluidmaster 400H PerforMAX Universal Toilet Fill Valve — Universal-fit, height-adjustable (9-14 in.) fill valve for most 2-inch and 3-inch toilets when a brand-specific part isn’t available.
- Korky 2-Inch / 3-Inch Universal Toilet Flapper — A universal flapper covers most standard toilets — match the flush-valve opening size (about 2 in. on older toilets, 3 in. on many newer high-efficiency models).
Related guides
How to Identify Your Glacier Bay Toilet Parts (the Fluidmaster and Niagara Components Inside) [2026]
How to Identify Your Glacier Bay Toilet Parts (the Fluidmaster and Niagara Components Inside) [2026] The whole trick…
What Size Flapper Do I Need? How to Choose the Right Toilet Flapper and Fill Valve [2026]
Your toilet is running, ghost-flushing, or refilling every few minutes with no one touching the handle. You’ve pulled…
How to Replace a Toilet Flush Valve: Step-by-Step Guide [2026]
The flush valve is the center assembly in your toilet tank — the overflow tube, the valve seat,…