
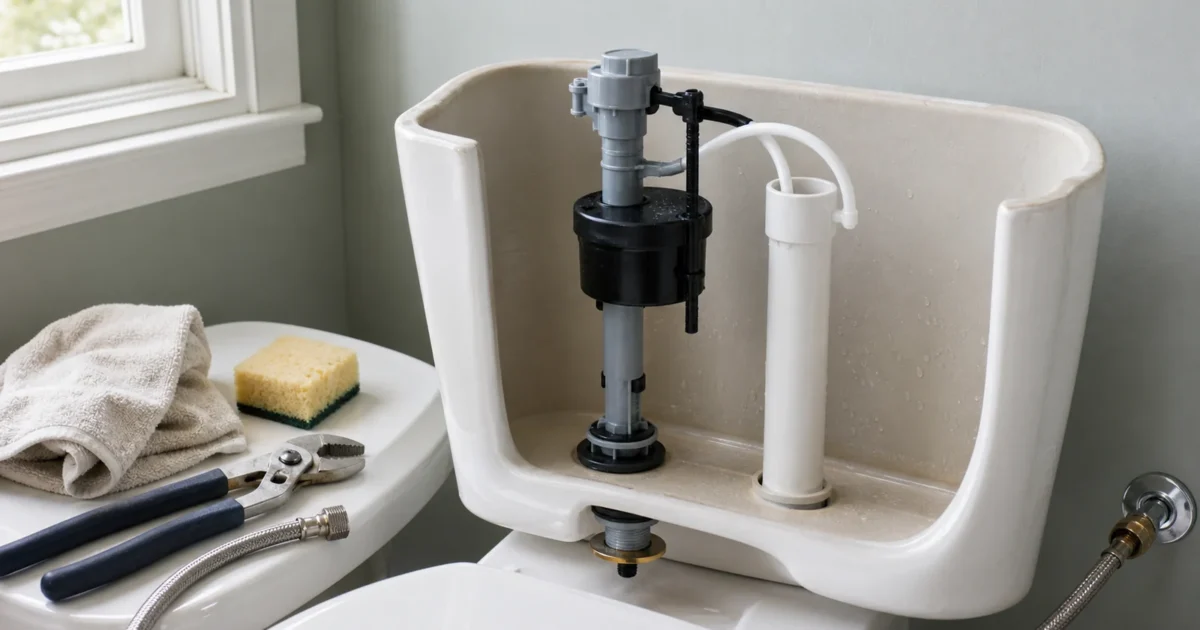
The fill valve is the tank’s water-intake part: it refills the tank after each flush and shuts off at the right level. When it wears out, the toilet runs constantly, hisses, fills slowly, or never quite shuts off. Replacing it is a straightforward DIY job – a $10 to $20 universal valve and about 20 to 30 minutes. This guide on how to replace a toilet fill valve covers confirming it’s actually the valve, setting the height correctly (the step that trips people up), and the manufacturer rule that keeps you from cracking the tank.
Fill-valve fit depends on your toilet’s type and height, so it pays to identify your toilet brand and model before ordering a replacement.
First: Confirm It’s the Fill Valve
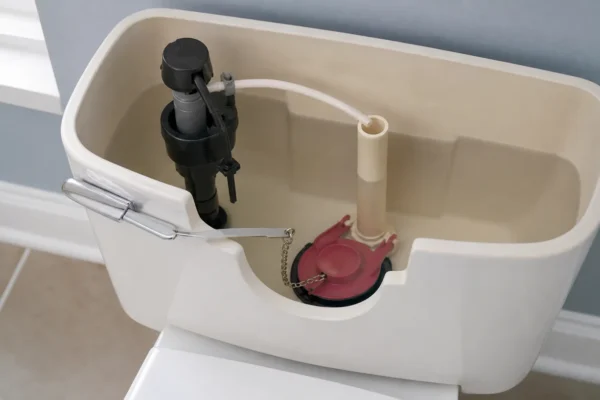
Two tank parts cause most running toilets, and they fail differently:
- Fill valve / water level: if water rises into the overflow tube (the open vertical pipe in the middle of the tank) and drains away, or the valve never fully shuts off, the fill valve or its level setting is the problem (Kohler).
- Flapper: if the toilet runs in brief bursts at random while the water sits below the overflow, suspect the flapper or flush-valve seal first (Home Depot).
Our running toilet guide walks through telling them apart. This article assumes you’ve narrowed it to the fill valve.
Choose a Replacement
A modern universal anti-siphon fill valve – the Fluidmaster 400A, the quieter Fluidmaster PerforMAX, or the Korky 528 – fits virtually any standard tank toilet and is height-adjustable, so one part covers most homes. Buy the size class your tank uses (the standard float-cup style replaces nearly all older ball-and-float valves). While you’re in there, it’s worth replacing the flexible supply line if it’s old – more on that below.
Tools and Materials
- The new universal fill valve
- Adjustable pliers or a wrench (for the mounting nut and supply coupling)
- A sponge and a bucket (water stays in the tank and line after draining)
- A towel
- Optional but recommended: a new braided stainless supply line if yours is 5+ years old
How to Replace a Toilet Fill Valve: Step by Step
Shut off the water
Close the stop valve behind the toilet (clockwise). Flush and hold the handle to drain most of the tank. If the stop valve won’t fully close, is corroded, or weeps at the stem, stop here – that’s a plumber call, not a fill-valve job (This Old House).
Empty the tank
Lift off the lid and set it flat somewhere safe (porcelain lids chip easily). Sponge out the remaining water and put a bucket under the supply connection – water remains in the line (Korky).
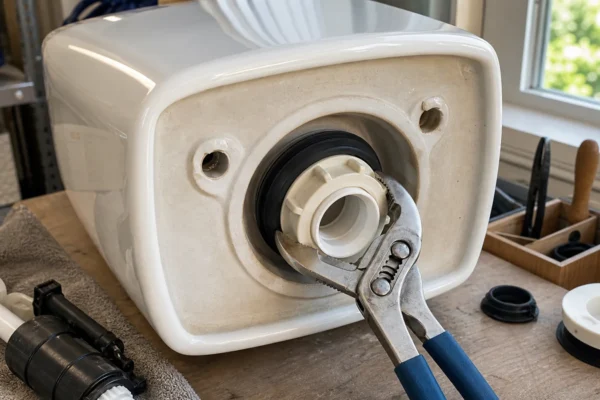
Disconnect and remove the old valve
Unclip the refill tube from the overflow tube, unthread the supply-line coupling nut from the valve shank under the tank, then remove the mounting locknut and lift the old valve straight out (iFixit).
Clean the tank hole and check the supply line
Wipe the area. Fluidmaster recommends replacing a supply connector that’s worn or more than five years old – a burst supply line is a top cause of catastrophic water damage (Fluidmaster). If the supply is rigid, soldered, kinked, or too short to reconnect without stress, treat that as a plumber call.
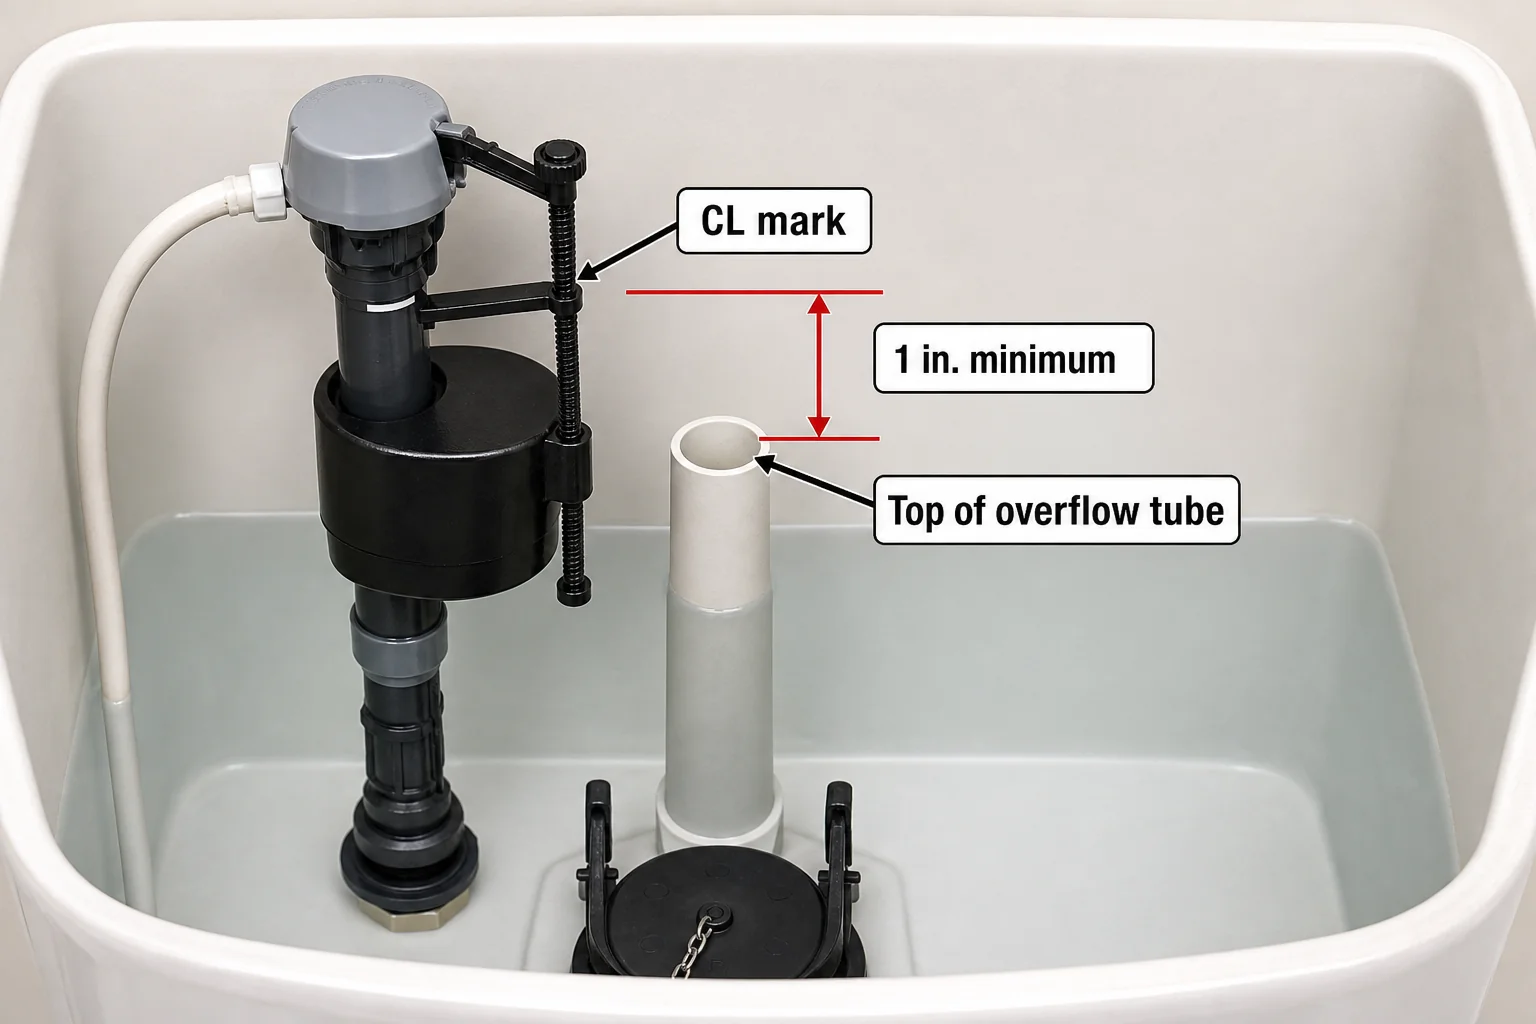
Set the new valve height before tightening
This is the step people get wrong. The valve’s critical level mark must sit at least 1 inch above the overflow tube – a plumbing-code anti-backflow requirement (2018 IRC P2902.5.3). For a Fluidmaster 400A, set the cap roughly 3 inches above the overflow pipe (Fluidmaster); for a Korky 528, extend it so its water-level mark is about 1/2 inch below the top of the overflow (Korky).
Install the valve
Put the shank washer on, drop the valve through the tank hole, and rotate the body to about 45 degrees from the back wall so the float clears the tank wall and flush parts and the refill tube has a clean path to the overflow. Thread the mounting nut on from below with its beveled (tapered) side facing up toward the tank – a reversed nut won’t seat flat and can weep – then hand-tighten only. Do not wrench it hard – it’s a plastic-to-porcelain joint and over-tightening cracks the tank (Fluidmaster).
Reconnect the supply line by hand
Snug only – over-tightening the coupling nut damages the valve and can cause leaks (Fluidmaster). Don’t use Teflon tape or pipe dope on this connection – the coupling’s rubber washer makes the seal, and tape only gets in the way.
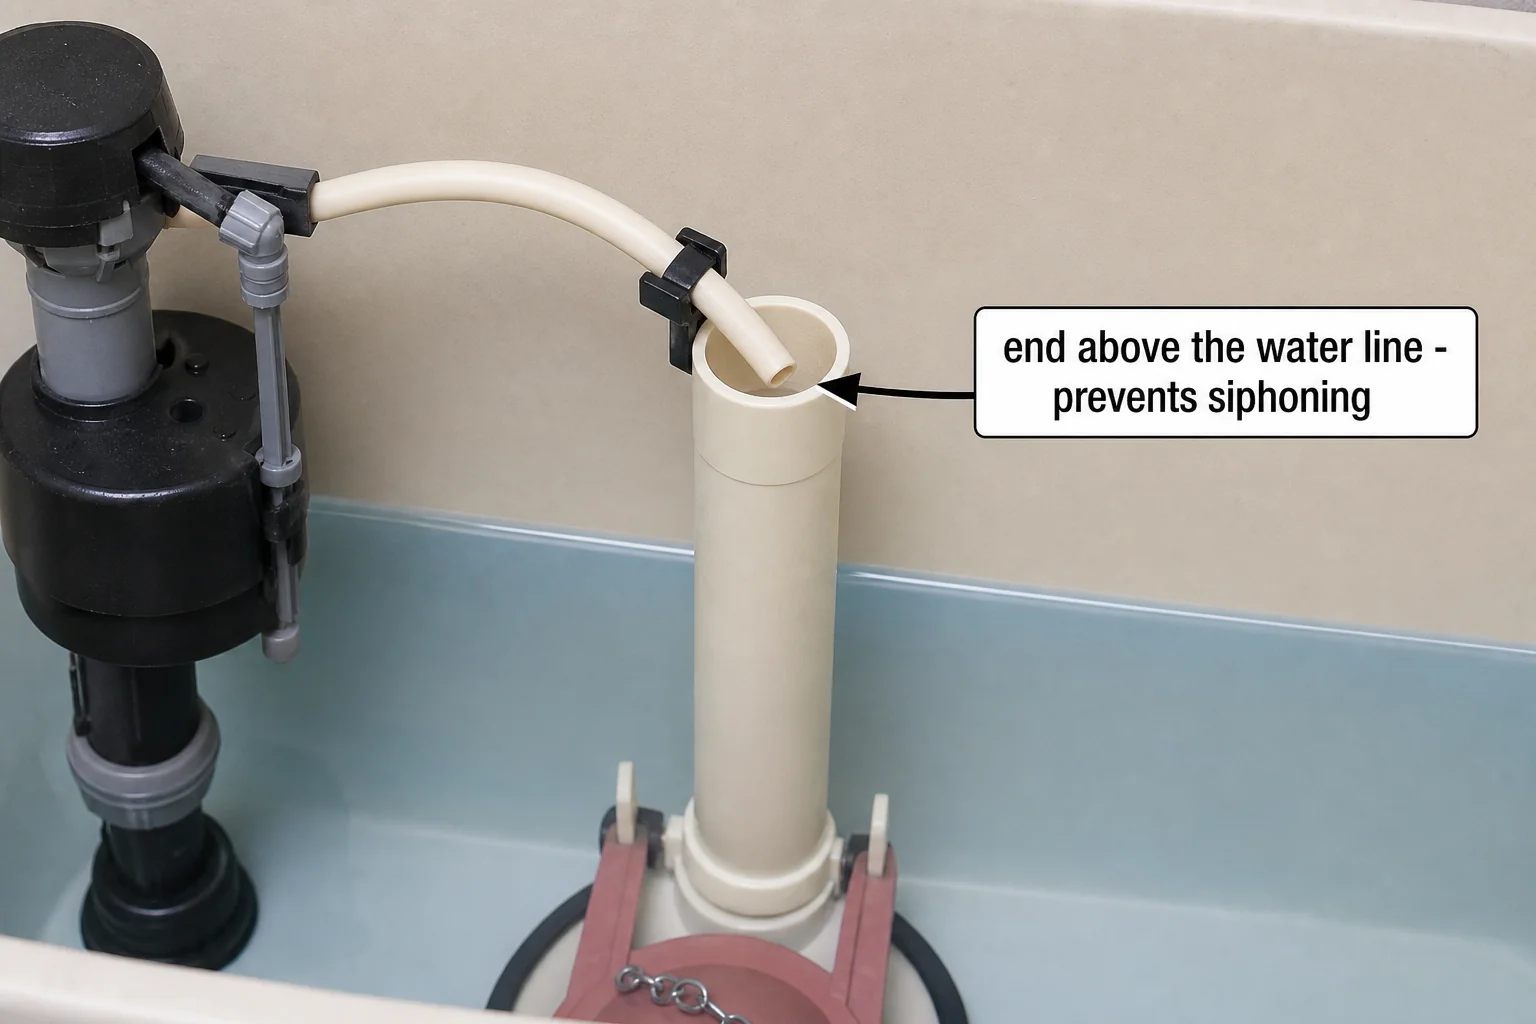
Clip the refill tube to the overflow tube
Clip it so it sends water into the overflow pipe – but make sure its end stays above the water line. A refill tube pushed down inside the overflow tube can siphon the tank and make the valve cycle (Fluidmaster).
Flush the line, then turn the water on slowly
Before you clip everything down for good, crack the stop valve open for a second or two with the tank still empty to flush out any pipe debris or sediment loosened during the swap – grit that lodges under the new valve’s seal is the most common reason a brand-new fill valve hisses. Then open the valve the rest of the way and watch the fill cycle. Check the shank, the supply coupling, and the tank for leaks. Flush several times and confirm the valve shuts off cleanly and the level settles about an inch below the top of the overflow tube.
Tune the bowl refill
If needed, adjust the valve’s refill dial so the bowl reaches its normal level about when the tank finishes; too much refill just runs water down the drain (Korky).
Common Mistakes
- Confusing the flapper for the fill valve – water into the overflow tube = fill valve; brief random runs below the overflow = flapper. Diagnose first.
- Over-tightening the mounting nut or supply coupling – the manufacturers say hand-tighten; force cracks the tank or valve (Fluidmaster).
- Setting the height too low – if the critical level sits below the overflow, you’ve created a code/backflow problem; keep it at least 1 inch above (2018 IRC P2902.5.3).
- Refill tube too far down the overflow – causes siphoning and phantom cycling.
- Reusing a tired supply line – a five-minute upgrade that prevents a flood.
When to Call a Pro
The fill-valve swap itself is DIY-friendly. Escalate when the surrounding parts aren’t:
- The shutoff valve won’t close or leaks when you try – replacing an angle stop is a separate, riskier job.
- Rigid copper or soldered supply connections you can’t safely reconnect.
- A cracked tank (sometimes discovered when an old nut is over-torqued).
How do I know if my fill valve is bad?
It runs constantly or won’t shut off, fills very slowly, hisses, or lets water trickle into the overflow tube. A valve that cycles on its own when the level is below the overflow is usually a flapper issue instead.
Are toilet fill valves universal?
The common float-cup valves (Fluidmaster 400A/PerforMAX, Korky 528) fit nearly all standard tank toilets and adjust to height. Pressure-assist and some specialty toilets use proprietary parts.
How high should the fill valve be set?
So the critical-level mark is at least 1 inch above the overflow tube (a code requirement), with the tank water settling about an inch below the overflow top. Follow your valve’s height diagram.
Why is my toilet still running after replacing the fill valve?
Check the water-level/height setting, make sure the refill tube isn’t pushed down into the overflow (siphoning), and confirm the flapper is sealing – a leaking flapper produces the same running symptom.
Why is my brand-new fill valve hissing?
Two usual causes. First, debris from the supply line lodged under the new valve’s seal – shut off, lift the valve cap per the manufacturer’s instructions, and flush the line into a cup to clear the grit (which is why flushing the line at install matters). Second, water pressure that’s too high: above roughly 80 psi, water forces past the seal and a perfectly good valve hisses. Test static pressure at a hose bib, and if it’s over 80 psi the fix is a pressure-reducing valve on the main line, not another fill valve.
How much does a toilet fill valve cost?
About $10 to $20 for a universal valve; a complete fill-valve-and-flapper kit runs a little more.
Do I need to replace the supply line too?
Not strictly, but if it’s more than about five years old or looks worn, replacing it with a braided stainless line is cheap insurance against a burst.
Where to Go From Here
Not sure whether it’s the fill valve or the flapper? Our running toilet guide covers all six causes and how to tell them apart. For every other toilet problem, the toilet repair guide is the symptom-first index.
This guide is for general homeowner education and is not a substitute for licensed professional advice. If the shutoff valve, supply piping, or tank is involved beyond a simple valve swap, consult a licensed plumber.
Parts for this repair
As an Amazon Associate, plumbingbythebook earns from qualifying purchases. Links below are affiliate links — they cost you nothing extra.
- Fluidmaster 400A Anti-Siphon Toilet Fill Valve — The universal-fit fill valve — height-adjustable 9-14 in., fits virtually any standard tank toilet.
- Fluidmaster PRO45B PerforMAX Toilet Fill Valve — Quieter, faster-filling upgrade with the same universal fit as the 400A.
- Fluidmaster 7513 Braided Stainless Toilet Supply Line — Worth swapping while the tank is open — braided stainless almost never bursts the way old plastic lines do.
Tools for this repair
As an Amazon Associate, plumbingbythebook earns from qualifying purchases. Links below are affiliate links — they cost you nothing extra.
- Adjustable Wrench — Backs off the lock nut under the tank and the supply-line nut — the two connections this job turns.
- Tongue-and-Groove (Channel-Lock) Pliers — Grip for a corroded lock nut the wrench can't break loose.
- Shop Towels / Sponge — Sponge out the last inch of tank water and catch drips when you disconnect the supply line.
Related guides
How to Identify Your Glacier Bay Toilet Parts (the Fluidmaster and Niagara Components Inside) [2026]
How to Identify Your Glacier Bay Toilet Parts (the Fluidmaster and Niagara Components Inside) [2026] The whole trick…
What Size Flapper Do I Need? How to Choose the Right Toilet Flapper and Fill Valve [2026]
Your toilet is running, ghost-flushing, or refilling every few minutes with no one touching the handle. You’ve pulled…
How to Replace a Toilet Flush Valve: Step-by-Step Guide [2026]
The flush valve is the center assembly in your toilet tank — the overflow tube, the valve seat,…