
Water pooling at the base of a toilet after a flush usually has one root cause: a failed wax ring. Knowing how to fix a leaky toilet bowl at the floor means pulling the toilet, replacing that ring, and resetting the toilet correctly — an intermediate DIY job that takes about two hours and costs $5 to $25 in parts. The job is within reach for most homeowners who can safely shut off the water supply and lift a standard toilet; the part that trips people up most is confirming the source of the leak before they start pulling anything apart.
If the bowl is cracked or the flange is past a wax-ring fix, see what it costs to replace a toilet.
If a repair reveals worn brand-specific hardware, identify your toilet brand and model to match the exact part.
How to Fix a Leaky Toilet Bowl: Confirm It’s the Wax Ring First
Water on the bathroom floor near the toilet can come from several places — and a wax ring replacement is a two-hour job you don’t want to do twice. Spend five minutes ruling out the easier sources before pulling the toilet.
Supply-line and fill-valve drips travel down the outside of the tank and pool at the base. Dry the floor and tank completely, wait an hour, then run a finger along the supply line and down the exterior of the tank. If moisture appears there first, the problem is above the floor — read how to fix a leaky toilet tank before lifting the bowl.
Condensation forms when the tank “sweats” in a humid bathroom — the porcelain surface cools the water inside and moisture collects on the outside. This isn’t a plumbing leak; it clears up with better ventilation or a tank insulation liner.
Bowl or tank cracks are visible on close inspection with a flashlight. Porcelain cracks mean replacement, not a wax ring swap.
Once you’ve eliminated those, do the definitive test: dry the floor completely, flush several times, and watch specifically where the toilet base meets the floor. If water appears at that joint — especially with a faint sewer smell or a slight wobble in the bowl — the wax ring has failed (This Old House).
What a Wax Ring Actually Does
The wax ring — or wax-free seal — is the single element that keeps the toilet’s drain outlet sealed against the closet flange set into the floor. The wax compresses when you press the toilet down onto the flange, forming a watertight barrier around the drain opening.
Wax rings are single-use. Once compressed, they can’t be repositioned or reused — which means any movement in the toilet after installation (a rocking bowl, someone leaning hard during cleaning) can break the seal over time. Oatey specifically says a removed wax ring cannot be reinstalled and must be replaced with a fresh one.
The closet flange is the plastic or cast-iron ring anchored through the finished floor into the subfloor. It should sit at or slightly above the finished floor surface — not below it. When new tile or laminate is installed over existing flooring, the flange can end up below the new floor level — and a standard wax ring won’t bridge that gap reliably. That’s the most common reason a newly reset toilet leaks from the start, and the fix is a flange extender or extra-thick ring rather than stacking two standard rings (Oatey explicitly advises against stacking).
Parts and Tools You’ll Need
Parts:
- A new wax ring or wax-free seal. For a flange at floor level: Oatey 31181L standard Johni-Ring (~$2.08 at Lowe’s) or Fluidmaster 7512 reinforced kit with bolts (~$4.90 at Home Depot). For a flange slightly below floor level: Oatey 31183L jumbo Johni-Ring with sleeve (~$4.58 at Lowe’s) or the Everbilt 7514 extra-thick kit (~$6.98 at Home Depot). For a recessed or uneven flange, the Fluidmaster 7530P24 Better Than Wax (~$9.98 at Home Depot) is repositionable and handles a wider range of flange heights than standard wax.
- New closet bolts (T-bolts) — included in most kits; Lowe’s recommends always replacing them when the wax ring comes out (Lowe’s).
- New flexible toilet supply connector — the toilet is already off, and the old connector has been disturbed.
- Oatey 43400 Set-Rite flange extension kit (~$23.97 at Home Depot or SupplyHouse) if inspection reveals the flange sits 1/4 to 1-5/8 inches below the finished floor.
Tools: adjustable wrench, bucket, sponge or small wet/dry shop vac, utility knife (for scoring caulk), plastic putty knife or scraper for old wax, gloves. Penetrating oil is useful when closet-bolt nuts look corroded; a small hacksaw handles bolt shanks that are too long after the cap is on.
How to Fix a Leaky Toilet Bowl: Step-by-Step Wax Ring Replacement
Shut off the water and empty the tank and bowl
Turn the stop valve clockwise until it won’t move. If there’s no dedicated toilet stop valve, shut off the main supply. Flush and hold the handle to drain as much water as possible from both the tank and bowl, then sponge or shop-vac the remaining standing water from each. The less water you carry with the toilet, the less mess (Lowe’s).
Disconnect the supply line
Put a bucket and old towels under the connection, then loosen the nuts at both ends — at the fill-valve shank above and at the compression fitting at the stop valve. Set the old line aside; you’ll install the new one during reassembly.
Free the toilet base
Score any caulk around the base perimeter with a utility knife. Remove the plastic caps at each side of the base to expose the closet-bolt nuts. Apply penetrating oil if the nuts look corroded and let it soak a minute before attempting to loosen. Work steadily — forcing a stuck nut can bend or crack the flange.
Lift the toilet
Rock the bowl gently — just enough to break the wax seal — then lift straight up. This Old House recommends lifting straight so the bowl clears the closet bolts cleanly (This Old House). Set the toilet on cardboard or an old drop cloth, keeping it upright to avoid draining the trap water onto the floor.
Temporarily block the open drain with a rag or old towel. An uncovered closet flange allows sewer gases into the room — a practical reason Kohler’s installation instructions flag it as a step not to skip (Kohler installation manual).
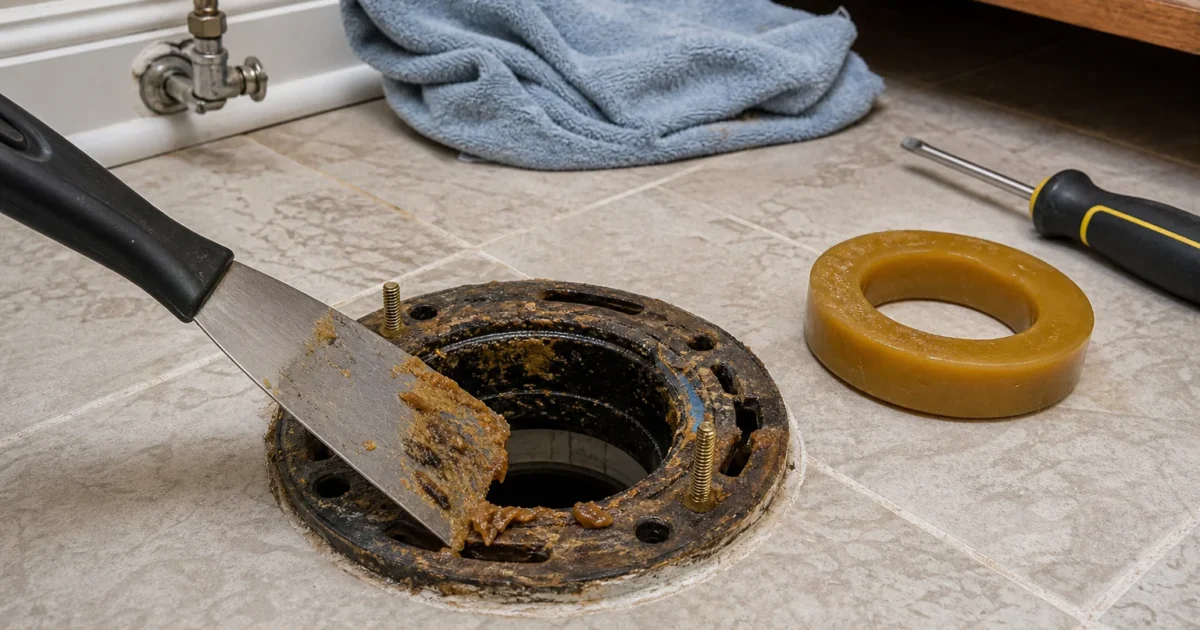
Scrape and inspect
Use a plastic putty knife to remove every trace of old wax from both the flange ring and the toilet horn (the drain outlet on the bottom of the bowl). Oatey says both surfaces must be completely clean before a new ring is set — any leftover wax prevents the new seal from seating fully (Oatey). While you’re at it, inspect the flange: look for cracks, looseness, corrosion, and whether its surface sits at or above the finished floor. Push on the subfloor around the drain opening — if it feels soft or spongy, water damage has weakened it and the subfloor needs repair before you reset the toilet (Lowe’s).
Install new closet bolts
Slide the bolt heads into the flange slots at roughly 3 and 9 o’clock — where the toilet base holes will land. Use the small stabilizing nut included in most bolt kits to hold them upright while you lower the toilet. Trying to steer two floppy bolts through the base holes without this stabilizer is where the extra five minutes of frustration usually goes (Oatey).
Place the new wax seal
For a standard installation, center the wax ring on the flange — wax-side up — and press it gently so it lies flat. If the ring has a plastic cone (funnel), Kohler says to orient the tapered end downward into the flange opening (Kohler). TOTO’s instructions call for pressing the ring onto the toilet horn instead, wax-side down. Either approach is valid — follow whichever the product directions specify for the combination of ring and toilet you have.
Lower the toilet and compress the seal
Position yourself over the toilet, align the bowl base holes over the closet bolts, and lower the bowl straight down without letting it swing or rotate. Once the base contacts the wax, press firmly and evenly on both sides of the rim to compress the seal. Do not shift or rotate the bowl after the wax has compressed — TOTO’s installation manual is explicit that any movement at this stage compromises the seal and requires starting over with a new ring (TOTO).
Secure the bowl
Install the cap bases, washers, and nuts on the closet bolts. Hand-tighten first, then add 1/2 turn more — the standard TOTO specifies. Alternate between sides and check that the bowl sits flat with no rocking before you fully tighten. Stop when the toilet is snug and stable; over-tightening can crack the porcelain base — a more expensive fix than the leak you’re repairing (TOTO). If the bolt shanks are too long for the caps to snap on, cut them with a small hacksaw.
Reconnect, fill, and test
Hook up the new supply line and hand-tighten both fittings — snug, not forced. Open the stop valve slowly and watch the fill valve, supply connection, tank base, and the floor around the bowl as the tank fills. Flush several times and inspect the base for moisture. For a slower-leak check, place a ring of toilet paper around the base and check it after an hour — any moisture shows up immediately on paper (Terry Love forum). Once you’ve confirmed no leak after several flushes, caulk the front and sides of the base — but leave a small gap at the rear so any future failure produces visible water on the floor rather than hidden rot beneath the flooring (Angi).
When the Flange Is the Problem
A new wax ring won’t fix a leaky toilet bowl if the flange itself is the real issue. Three situations need more than a ring swap:
Flange too low. New tile or laminate over the old floor is the common cause — the finished surface is now 1/4 to 3/4 inch above the flange top, and a standard ring can’t reliably bridge the gap. For gaps up to about 1/2 inch, an extra-thick ring like the Oatey 31183L works. For larger gaps — up to 1-5/8 inches below the floor — the Oatey 43400 Set-Rite kit is the manufacturer-recommended path. Stacking two wax rings is not the answer; Oatey explicitly says not to do it (Oatey).
Flange cracked, broken, or not anchored. If the flange shifts when you push on it or can’t hold the closet bolts in position, a new seal installed on top of it will fail quickly. Repair or replace the flange before resetting the toilet. Oatey’s flange repair guide covers repair rings for both cast-iron and PVC flanges (Oatey).
When to call a plumber: the stop valve won’t close; the valve uses rigid or soldered supply piping; the subfloor is soft or water-damaged; the drain is cast iron in poor condition; there are stains on the ceiling below the bathroom. Angi’s 2026 data puts professional wax-ring replacement at $50 to $200, and flange replacement at $145 to $350 (Angi). HomeGuide lists a full toilet reseat with new seal and bolts at about $230 (HomeGuide).
The 5 Mistakes That Cause the Leak to Come Back
- Reusing the old wax. Wax is single-use. Once the ring has been compressed and then removed, it cannot re-seal — always set the toilet back with a new ring.
- Leaving old wax on either surface. Even a thin residue between the new ring and the flange or toilet horn creates an uneven bed. Scrape both surfaces completely clean before placing the new seal.
- Moving the toilet after the wax compresses. Any shift or rotation after the base contacts the wax breaks the seal. Lower the bowl straight, compress it, and don’t move it.
- Over-tightening the closet-bolt nuts. Snug plus 1/2 turn is the limit. More torque risks cracking the porcelain base — an outcome that’s more expensive than the leak you started with.
- Caulking the full base perimeter. Sealing all the way around looks finished, but it traps any future leak under the flooring — where it silently rots the subfloor for months before you notice. Always leave the rear edge open (Angi).
Quick Reference: Leaky Toilet Base Symptom → Cause → Fix
| Symptom | Most likely cause | Next step |
|---|---|---|
| Water at base after flushing; slight sewer smell | Failed wax ring | Replace wax ring (this guide) |
| Water at base only when tank fills or supply is on | Supply line or tank-to-bowl connection | Tighten or replace supply line; check tank bolts |
| Water at base in humid weather; no smell | Condensation on tank | Improve ventilation; add tank liner |
| Bowl rocks or wobbles | Broken wax seal, loose bolts, or damaged flange | Re-seat bowl; inspect flange |
| Leak returns shortly after wax ring replacement | Flange too low, old wax not fully removed, or bowl shifted during set | Inspect flange height; reset with new ring |
| Subfloor soft or spongy near base | Long-term slow leak or pre-existing water damage | Repair subfloor and flange before resetting |
What to Do Next
If you traced the leak to the tank rather than the floor — the supply line, tank bolts, or internal components — the diagnosis and repair path is different. Start at how to fix a leaky toilet tank for that route. If the toilet runs after you’ve finished this repair, how to replace a toilet flapper covers the most common running-toilet cause.
Once the wax ring is replaced, give the toilet a few days of normal use and do one final floor check before you caulk the base — a slow leak from a slightly misaligned set may not show up immediately on the first test. Once you know how to fix a leaky toilet bowl at the floor, the same diagnostic approach — confirm the source, fix the right part — applies to every plumbing repair you take on next.
How do I know if my toilet wax ring needs replacing?
The clearest signs are water pooling at the base of the toilet after flushing, a faint sewer smell near the toilet floor, or a bowl that rocks from side to side. Dry the area completely, flush several times, and watch the joint between the base and the floor — if water reappears specifically there, the wax ring has failed. That confirmation step is the starting point whenever you need to know how to fix a leaky toilet bowl at the floor versus addressing a higher leak in the tank or supply line.
Can I replace a toilet wax ring myself, or do I need a plumber?
Angi rates this as an intermediate DIY job at about two hours and $5 to $25 in parts. Most homeowners can do it if they can safely lift the toilet, shut off the water supply, and confirm the flange is sound. Call a plumber if the stop valve won’t close, the subfloor feels soft or spongy, the flange is broken or not anchored, or the toilet is wall-hung.
How much does it cost to fix a leaky toilet bowl with a wax ring?
DIY supply cost runs $5 to $25 — a new ring, bolts, and a supply-line replacement. Hiring a plumber: Angi’s 2026 data puts wax-ring replacement at $50 to $200; if the flange also needs repair or replacement, costs run $145 to $350 or more.
What’s the difference between a regular wax ring and a wax-free seal?
A standard wax ring — like the Oatey Johni-Ring or Fluidmaster 7512 — uses molded wax that compresses once and holds. A wax-free seal — like the Fluidmaster 7530P24 Better Than Wax — uses a rubber gasket that can be repositioned after placement, which is useful when a flange is recessed or slightly uneven. Either works for a sound, properly-height flange; the wax-free option is worth the extra cost when the flange geometry is tricky.
Do I need a jumbo wax ring or a standard one?
Use a standard ring when the flange sits at or slightly above the finished floor. Use a jumbo or extra-thick ring — like the Oatey 31183L with sleeve — when the flange sits slightly below the floor, typically because new tile or flooring raised the surface. For gaps larger than about 1/2 inch, the Oatey 43400 Set-Rite flange extension kit corrects heights from 1/4 inch to 1-5/8 inches below the finished floor.
Can I stack two wax rings if the flange is low?
No. Oatey explicitly advises against stacking wax rings — the double stack compresses unevenly and is prone to failure. Use a jumbo ring, a wax-free seal, or a flange extension kit instead, depending on how far below the floor the flange sits.
Sources
- Oatey: How to Replace a Toilet Wax Ring
- Oatey: Toilet Flange Installation Guide
- Oatey: Toilet Flange Repair Guide
- Oatey Johni-Ring Product Family
- Oatey Set-Rite Flange Extension Kit
- Lowe’s: How to Replace a Toilet Wax Ring
- TOTO One-Piece Toilet Installation Manual
- Kohler: Installing a Toilet Wax Ring
- Kohler Toilet Installation PDF
- American Standard: How to Install a Toilet
- Fluidmaster 7512 Installation Instructions
- Fluidmaster 7530P24 Product Overview
- Danco Perfect Seal 10718X
- This Old House: Easy Fix for a Leaking Toilet
- Angi: How to Replace a Toilet Wax Ring
- Angi: 2026 Toilet Repair Cost Guide
- HomeGuide: Toilet Repair Cost
- Terry Love Forum: Detecting a Slow Wax Ring Leak
- Terry Love Forum: Low-Flange Wax Ring Stacking Discussion
Educational content only. Not a substitute for licensed professional advice. Local plumbing codes vary by jurisdiction. Use of any guidance from this guide is at your own risk.
Get the homeowner’s plumbing repair toolkit checklist — the tools, parts, and decisions every homeowner should have on hand. [Free download — enter your email]
Parts for this repair
As an Amazon Associate, plumbingbythebook earns from qualifying purchases. Links below are affiliate links — they cost you nothing extra.
- Fluidmaster 7512 Reinforced Wax Ring Kit with Flange and Bolts — Reinforced wax ring kit with polyethylene flange and closet bolts — fits 3-inch and 4-inch waste lines. About $5 at Home Depot and SupplyHouse.
- Fluidmaster 7530P24 Better Than Wax Universal Wax-Free Toilet Seal — Repositionable wax-free seal rated for recessed flanges and heated-floor bathrooms. About $10 at Home Depot.
- Oatey 31183L Jumbo Johni-Ring Wax Ring with Sleeve — Extra-thick wax ring with sleeve for flanges that sit slightly below the finished floor. About $4.58 at Lowe’s.
- Oatey 43400 Set-Rite Toilet Flange Extension Kit — Corrects flange height from 1/4 inch to 1-5/8 inches below the finished floor — the right fix when new tile has dropped the flange. About $24 at Home Depot.
Related guides
How to Identify Your Glacier Bay Toilet Parts (the Fluidmaster and Niagara Components Inside) [2026]
How to Identify Your Glacier Bay Toilet Parts (the Fluidmaster and Niagara Components Inside) [2026] The whole trick…
What Size Flapper Do I Need? How to Choose the Right Toilet Flapper and Fill Valve [2026]
Your toilet is running, ghost-flushing, or refilling every few minutes with no one touching the handle. You’ve pulled…
How to Replace a Toilet Flush Valve: Step-by-Step Guide [2026]
The flush valve is the center assembly in your toilet tank — the overflow tube, the valve seat,…