
A leaky toilet tank is actually two separate problems wearing the same name — an internal leak that makes the toilet run or ghost-flush without you touching it, and an external leak that puts visible water on the floor. How to fix a leaky toilet tank depends entirely on which type you’re dealing with, and buying parts before you know the answer is the most common reason homeowners end up making two hardware-store trips.
Most internal leaks cost under $15 to fix and take under an hour. External leaks at the tank bolts or gasket run $6 to $14 in parts and require lifting the tank off the bowl — more involved, but still a beginner-to-intermediate job. A worn flapper alone wastes roughly 90 gallons per day per the EPA WaterSense, so leaving a running toilet alone isn’t just annoying — it compounds fast on a water bill.
This guide to how to fix a leaky toilet tank walks through the two-minute diagnosis, each repair path, and the clear signals that a job belongs to a licensed plumber.
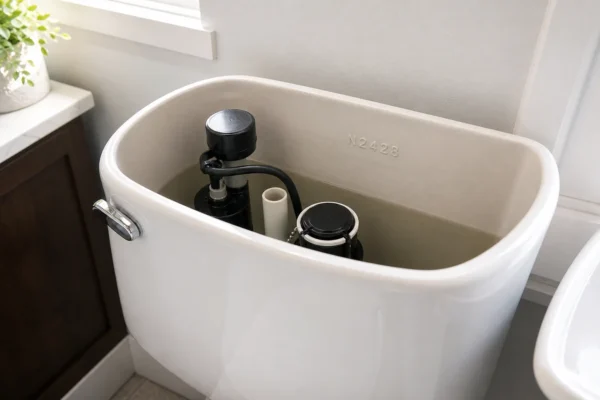
Tank leaks often need brand-specific gaskets or canister parts, so identify your toilet brand and model before you order.
How to Fix a Leaky Toilet Tank: Identify the Leak Type First
The repair path splits based on where the water is going. Spend two minutes on this step before you touch a part.
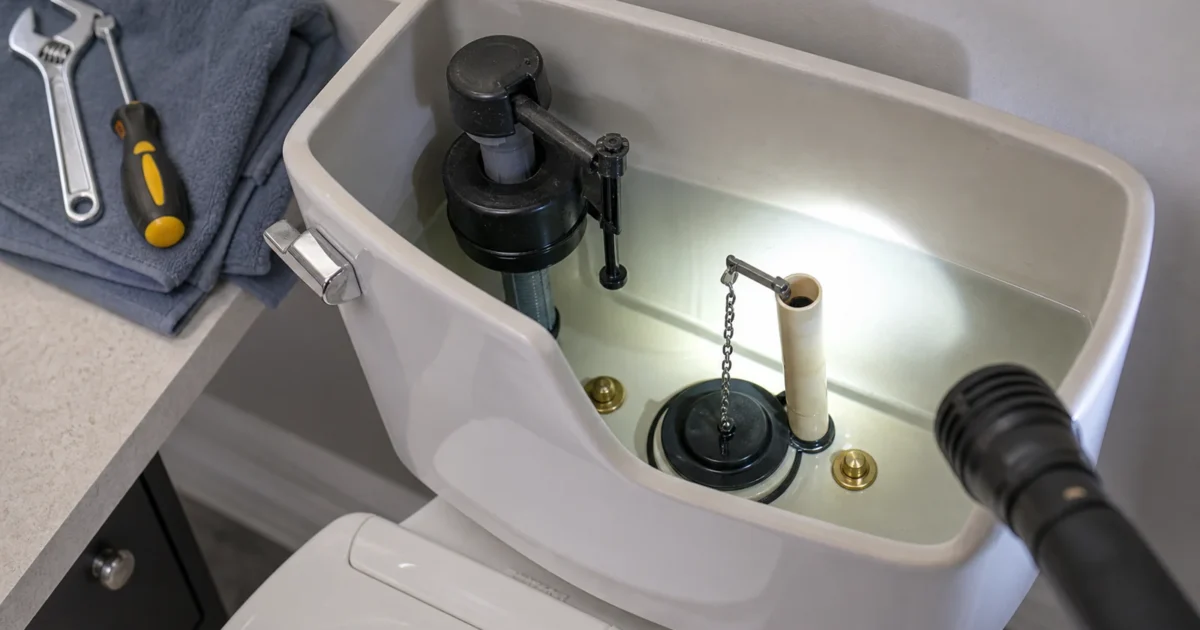
Internal leak (running toilet): Remove the tank lid and set it flat on a towel. Drop a few drops of food coloring into the tank. Wait 10 to 15 minutes without flushing. If color appears in the bowl, water is leaking past the flush valve — the tank can’t hold its level, and the fill valve cycles on to top it off (Kohler, EPA WaterSense). A toilet that hisses, refills randomly at 2 a.m., or won’t stop running is the classic symptom.
External leak (water on the floor): Dry the outside of the tank completely. Run a piece of dry tissue around the supply connector at the bottom of the tank, the plastic locknut where the fill valve meets the tank, each tank-bolt nut on the underside of the bowl, and the seam where tank meets bowl. The first tissue that comes back wet identifies the source — not the drip point lower down, where all water eventually pools.
If water appears only at the base of the toilet bowl — not at the tank — that’s typically a wax-ring issue, not a tank repair.
The Most Common Internal Causes — Ranked
Manufacturer guides from Kohler and Home Depot agree on the order of frequency. Check them in this sequence:
- Worn or wrong-size flapper — the rubber seal stiffens, warps, or doesn’t fit the flush valve. Dye in the bowl confirms it.
- Chain slack wrong or snagging — too much chain catches under the flapper; too little prevents it from closing fully. Symptom: the handle needs jiggling or the toilet double-flushes.
- Water level set too high — water spills into the overflow tube even when the flapper seals. The dye test bowl stays clear, but the tank hisses continuously.
- Refill tube pushed below the waterline — it siphons water from the tank into the overflow tube. Symptom: slow tank draining even after a new flapper.
- Worn fill valve — won’t shut off fully, leaving a persistent low hiss after all four fixes above are ruled out.
How to Fix the Flapper and Chain (Most Common Fix)
Before buying parts, confirm two things: the dye test is positive, and you know whether your flush valve is 2-inch or 3-inch. Most toilets installed before roughly 2005 use a 2-inch valve; many 1.6 gpf and 1.28 gpf high-efficiency toilets installed after 2005 use a 3-inch valve. Reach into the tank and feel the flush-valve opening at the bottom — a 2-inch rim fits comfortably inside a closed fist; a 3-inch opening is noticeably larger, roughly the size of a large orange.
Korky’s 2001 2-inch flapper runs $5.48 at Home Depot and fits standard 2-inch plastic flush valves. Korky’s 3060 3-inch flapper fits the large valves in many newer HET toilets. If your toilet is a Kohler with a canister flush system — a tower mechanism rather than a hinged flap — you need a Kohler OEM canister seal, not a universal flapper.
Flapper replacement steps: 1. Shut off the supply stop (clockwise). Flush and hold the handle to drain the tank. Sponge out remaining water into a bucket. 2. Disconnect the chain from the flush lever. Slide the old flapper’s collar off the overflow-tube pegs (ear-style) or slide the ring off the tube (ring-style). 3. Wipe the flush-valve seat with a damp cloth — mineral deposits on the seat defeat even a new flapper and take 30 seconds to remove. 4. Install the new flapper in the same attachment style. Reconnect the chain with 1 to 2 links of slack — no more (Korky, Kohler). 5. Turn the supply back on slowly. Flush three times. Repeat the dye test.
If the flapper seals but the chain keeps snagging on the lever arm, trim the excess after re-clipping to leave only the required 1–2 links.
For the complete flapper walkthrough — including adjustable-flapper dial settings and brand-specific attachment styles — see the how to replace a toilet flapper guide.
How to Fix a Running Tank: Water Level and Refill Tube
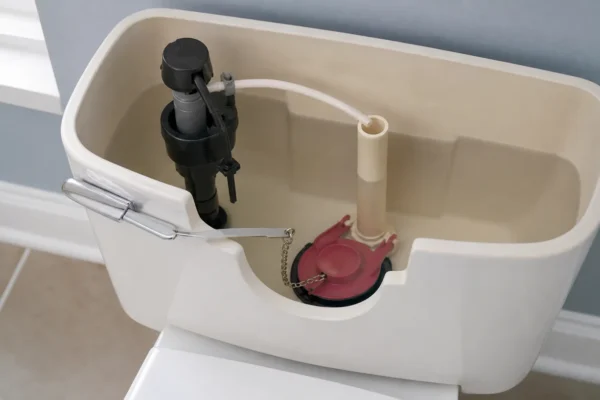
Once the dye test clears (flapper is sealing) but the toilet still runs, look at the overflow tube and refill tube.
Water level too high: The fill valve should shut off before water reaches the top of the overflow tube. Kohler recommends about 1 inch below the overflow tube; Home Depot’s guide references about 1/4 inch below the fill tube’s overflow reference mark. Most tank interiors have a molded waterline indicator — that’s the target. Adjust the float screw on a Fluidmaster-style valve, or twist the lock ring on a Korky-style valve, until the tank level reaches the mark and the valve shuts off cleanly. For the step-by-step adjustment procedure, see our how to adjust toilet tank water level guide.
Refill tube submerged: The small flexible hose clipped to the overflow tube should feed the bowl after each flush — but it must not be pushed down inside the overflow tube below the waterline. If it is, it creates a continuous siphon that drains the tank slowly even with a perfect flapper seal. Fix: pull the tube out, clip it above the opening of the overflow tube so there’s a visible air gap (American Standard, Kohler). Repeat the dye test after repositioning.
How to Replace the Fill Valve
If adjustments don’t resolve the running — or if the fill valve is visibly worn, hisses constantly at correct water level, or is more than seven to ten years old — replacement is the right call. Parts run about $10 for a Fluidmaster 400A (best for older 3.5–7 gpf toilets, per Fluidmaster’s own guidance) or about $15 for the Fluidmaster 400H PerforMAX (better for 1.28/1.6 gpf HET toilets with its separate bowl-refill dial).
A running toilet can waste thousands of gallons per month — use the free Water-Waste Calculator to see what yours is costing in real dollars before deciding whether repair or full replacement makes more sense.
Fill valve replacement steps: 1. Shut off the supply stop. Flush, hold the handle, then sponge out remaining water. 2. Disconnect the supply line from the bottom of the fill-valve shank. Loosen the plastic locknut beneath the tank and remove the old valve. 3. Set the new valve height before inserting it: extend it so the critical-fill line on the valve body sits about 1 inch above the overflow tube’s top edge. Lock the height. 4. Insert the shank washer inside the tank, lower the valve shank through the tank hole, and hand-tighten the locknut from below. Do not overtighten — Fluidmaster’s installation instructions explicitly warn against it; overtightening distorts the washer and can crack porcelain. 5. Clip the refill tube to the fill-valve nipple and secure it above the overflow tube opening with the supplied clip — air gap required (American Standard). 6. Reconnect the supply line. Turn the supply on slowly. Adjust the float until the final water level sits at the tank’s molded waterline mark. Verify the valve shuts off cleanly.
For the full fill-valve replacement guide, see our how to replace a toilet fill valve article.
How to Fix an External Leak: Tank Bolts and Tank-to-Bowl Gasket
Water appearing on the floor under the tank — not at the bowl base — traces to three external points: the supply-line connector, the fill-valve locknut, or the tank bolts and tank-to-bowl gasket.
Supply-line connector: Hand-tighten the slip-joint nut clockwise 1/4 turn. If it still drips, the washer inside the nut is worn — replace the flexible braided supply line ($5–8 at any hardware store).
Fill-valve locknut: If the tissue test shows moisture at the shank, try tightening the plastic locknut under the tank by hand — 1/4 turn only. If it leaks again, replace the fill valve using the procedure above.
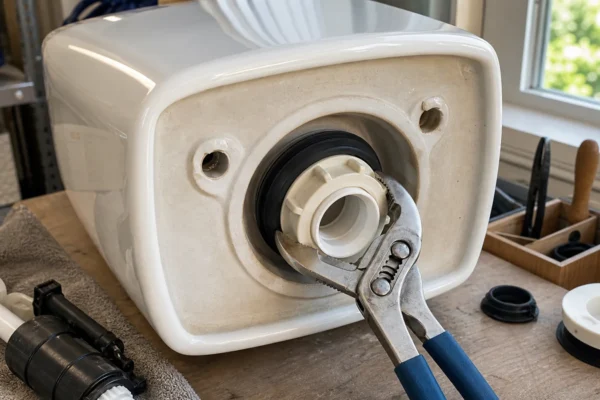
Tank bolts and tank-to-bowl gasket: Replacing these requires removing the tank, but the parts are inexpensive — $6 to $14 for an Everbilt or Korky gasket-and-bolt kit.
- Drain and dry the tank completely (shut off supply, flush, sponge).
- Disconnect the supply line. From under the bowl, loosen the two tank-bolt nuts. Lift the tank straight up off the bowl and set it on a folded towel.
- Remove both old bolt assemblies. Pull off the old tank-to-bowl gasket from the flush-valve base. Replace both bolt assemblies and the gasket together — Home Depot advises replacing all hardware simultaneously so a deteriorated rubber washer doesn’t put you back at step 1 in six months.
- Press the new gasket onto the flush-valve base. Align the tank over the bowl, lower it onto the gasket, and hand-tighten the nuts from below — alternating side-to-side so the tank stays level, per Home Depot’s repair guide. Stop when the tank is stable and no longer rocks; don’t chase porcelain-to-porcelain contact.
- Reconnect the supply line. Turn the supply on slowly. Check all four external points with dry tissue: supply connector, fill-valve shank, both tank-bolt nuts, and the tank-to-bowl seam.
Note: Korky’s 481BP 3-inch gasket kit does not fit Kohler toilets — match the gasket to your brand and flush-valve size, or use an Everbilt kit and verify dimensions.
Mistakes That Make a Leaky Tank Harder to Fix
A few patterns appear repeatedly across manufacturer troubleshooting guides and plumbing forums:
Assuming “universal” fits every toilet. Fluidmaster excludes Glacier Bay and Niagara flapperless toilets, one-piece toilets, and side-entry valves from 400A compatibility. Korky limits the 2001 to 2-inch flush valves. If you have a Kohler canister toilet, a TOTO with a proprietary flapper, or a Mansfield tower-seal design — identify the tank model number stamped inside the tank or on the back of the tank, and buy OEM parts. Compatibility is the repair.
Overtightening plastic nuts and tank bolts. Fluidmaster’s fill-valve instructions say hand-tighten and stop — overtightening cracks the washer seat. The same applies to tank bolts: the rubber gasket does the sealing work, not bolt torque. If the tank rocks after snugging the nuts evenly, there’s a leveling problem, not an under-tightening problem.
Installing a new flapper without cleaning the valve seat. Mineral deposits on the flush-valve seat prevent any rubber flapper from sealing cleanly — even a brand-new one. A 30-second wipe with a damp cloth or white-vinegar-soaked rag before installing the replacement is the most underrated step in the whole repair.
When to Call a Plumber (and What It Costs)
Most flapper, chain, fill-valve, and tank-bolt repairs are accessible to any homeowner who can fully shut off the supply and work without overtightening. Call a plumber when:
- The supply stop won’t fully close. Every disassembly step here depends on it. If the stop is frozen or stripped, that’s the repair to do first — and it may require a plumber.
- The tank is cracked or the porcelain is fractured around the bolt holes or fill-valve shank. A cracked tank can’t be patched — it needs full tank replacement.
- Water appears at the base of the toilet bowl, not the tank. That’s typically a wax-ring issue — a different repair.
- The toilet is one-piece, pressure-assisted, flapperless, or side-entry and the OEM part isn’t obvious.
Professional toilet repair typically runs $130 to $300 for most valve or seal jobs, or $70 to $150 for a simple valve replacement, versus under $50 in DIY parts for ordinary flapper/fill-valve/gasket work (HomeGuide, Angi). Frame the call as a water-damage decision, not just a parts-cost decision.
Quick Reference: Symptom to Fix
| Symptom | Most Likely Cause | Fix | Difficulty |
|---|---|---|---|
| Toilet hisses or refills randomly | Worn or wrong-size flapper | Replace flapper | Beginner |
| Handle needs jiggling to stop running | Chain snagging or too-long slack | Adjust chain to 1–2 links | Beginner |
| Continuous water into overflow tube | Water level set too high | Adjust fill-valve float | Beginner |
| Tank drains slowly after new flapper | Refill tube submerged in overflow | Clip tube above waterline | Beginner |
| Persistent hiss after all fixes | Fill valve won’t fully close | Replace fill valve (~$10–15) | Beginner |
| Water on floor after flushing (tank area) | Tank bolt or gasket leak | Replace bolts and gasket | Intermediate |
| Moisture at fill-valve shank | Locknut loose or washer worn | Tighten or replace fill valve | Beginner |
| Cracked porcelain near bolt hole | Overtightened in prior repair | Call a plumber | Pro |
What to Do Next
If the running toilet is confirmed but the cause isn’t clear yet, the why is my toilet running guide walks through all six diagnostic causes side-by-side. For the complete flapper swap with photos and brand-specific attachment styles, see how to replace a toilet flapper. If you’ve resolved the leak but the flush is now weak or slow, how to adjust toilet tank water level covers float adjustment for Fluidmaster, Korky, TOTO, and ball-float valves.
For the full Pillar 2 decision tree — including when to repair versus replace the whole toilet — start at the Toilet Repair Guide.
How much does it cost to fix a leaky toilet tank?
Most DIY repairs stay under $50 in parts — a flapper runs $5 to $6, a fill valve $10 to $15, and a tank-to-bowl gasket kit $6 to $14 at Home Depot or SupplyHouse. Professional toilet repair typically costs $130 to $300, or $70 to $150 for a simple valve swap (HomeGuide).
Can I fix a leaky toilet tank myself?
Yes, for most repairs — flapper, chain, fill valve, and tank bolts. The gating factor is whether your supply stop fully closes. If it won’t, call a plumber before attempting any disassembly; you need a reliable shutoff to work safely.
Why is my toilet still running after I replaced the flapper?
Four other causes can produce identical symptoms: chain slack catching under the new flapper, water level set too high (overflowing the overflow tube), refill tube pushed below the waterline (siphoning), and a worn fill valve that won’t fully close. Check the chain and water level before spending on a fill valve.
What causes water to pool under the toilet tank?
Water on the floor under the tank usually traces to a leaking tank-bolt nut, a deteriorated tank-to-bowl gasket, or a dripping supply-line connector. Dry the tank exterior completely, then place dry tissue at each connection point one at a time to find the first one that comes back wet.
How do I know if my toilet uses a 2-inch or 3-inch flapper?
Reach into the tank and feel the flush-valve opening at the bottom. If the rim fits comfortably inside a closed fist, it’s 2-inch. A noticeably larger opening — roughly the size of a large orange — is 3-inch. Most pre-2005 toilets use 2-inch; many 1.6 gpf and 1.28 gpf HET toilets installed since 2005 use 3-inch.
How long does a toilet fill valve last?
Most fill valves last 7 to 10 years under normal use. Signs it’s time to replace: a constant low hiss even after correct float adjustment, visible mineral buildup on the valve body, or a water level that slowly creeps up past the set point even with the supply shut briefly off.
Sources
- EPA WaterSense — Fix a Leak Week
- Kohler — How to Fix a Running Toilet
- Kohler Assist — Toilet Occasionally Leaking or Running
- Fluidmaster 400A Universal Fill Valve product page
- Fluidmaster 400A/400H Installation Instructions (PDF)
- Korky 2001 2-Inch Universal Toilet Flapper
- Korky 3060 3-Inch Premium Universal Toilet Flapper
- Korky — Slow Flushing and Chain Adjustment
- American Standard — Fill Valve Replacement FAQ
- Home Depot — How to Fix a Toilet Tank
- Home Depot — How to Fix a Leaky Toilet Flapper
- Home Depot — How to Fix a Running Toilet
- This Old House — How to Fix a Running Toilet
- Lowe’s — Fluidmaster 400H PerforMAX Fill Valve
- Lowe’s — Korky 481BP 3-Inch Tank-to-Bowl Gasket Kit
- HomeGuide — Toilet Repair Cost
- Angi — Bathroom Leak Repair Cost
Educational content only. Not a substitute for licensed professional advice. Local plumbing codes vary by jurisdiction. Use of any guidance from this guide is at your own risk.
Get the homeowner’s plumbing repair toolkit checklist — the tools, parts, and decisions every homeowner should have on hand. [Free download — enter your email]
Parts for this repair
As an Amazon Associate, plumbingbythebook earns from qualifying purchases. Links below are affiliate links — they cost you nothing extra.
- Korky 2001BP Universal 2-Inch Toilet Flapper — Standard 2-inch universal flapper for most pre-2005 toilets — $5 to $6 at Home Depot and SupplyHouse.
- Korky 3060BP Universal 3-Inch Toilet Flapper — 3-inch flapper for HET and 1.6 gpf toilets with a large flush valve — confirm your valve size before ordering.
- Fluidmaster 400A Universal Fill Valve — The most widely available fill valve in North America — about $10; best for older pre-1994 toilets (3.5–7 gpf).
- Fluidmaster 400H PerforMAX Fill Valve — Upgraded valve with a separate bowl-refill dial for 1.28 and 1.6 gpf HET toilets — about $15.
- Everbilt 3-Inch Tank-to-Bowl Gasket and Bolt Kit — Replace the gasket and bolts together — about $8 at Home Depot; don't patch just one if both are deteriorated.
Related guides
How to Identify Your Glacier Bay Toilet Parts (the Fluidmaster and Niagara Components Inside) [2026]
How to Identify Your Glacier Bay Toilet Parts (the Fluidmaster and Niagara Components Inside) [2026] The whole trick…
What Size Flapper Do I Need? How to Choose the Right Toilet Flapper and Fill Valve [2026]
Your toilet is running, ghost-flushing, or refilling every few minutes with no one touching the handle. You’ve pulled…
How to Replace a Toilet Flush Valve: Step-by-Step Guide [2026]
The flush valve is the center assembly in your toilet tank — the overflow tube, the valve seat,…